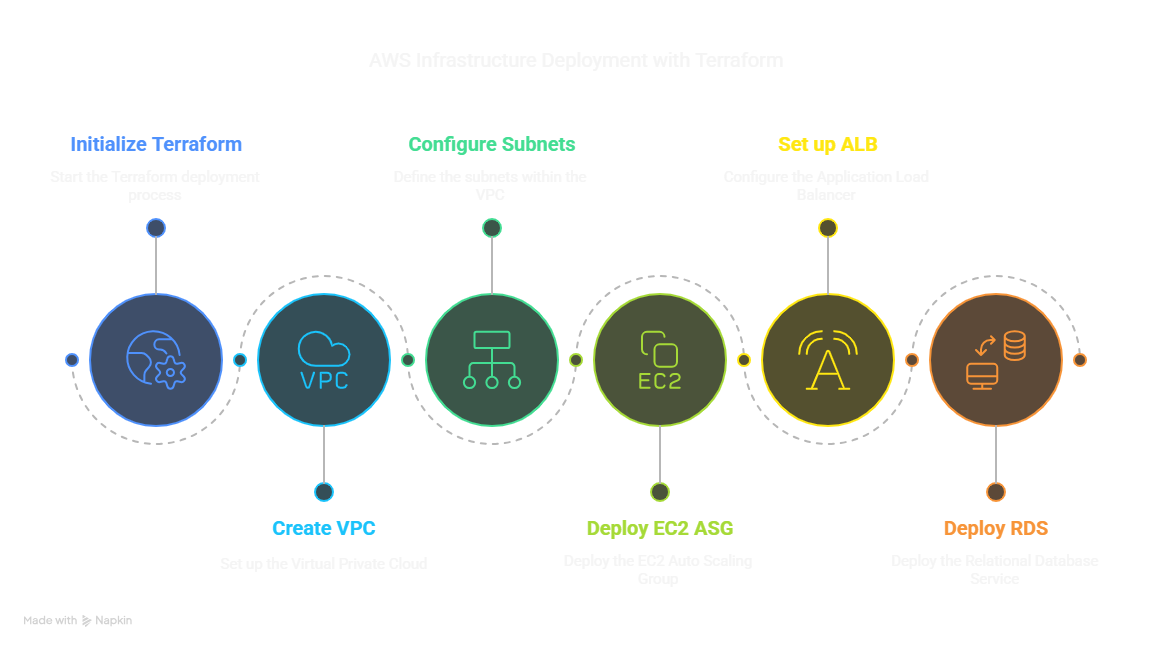
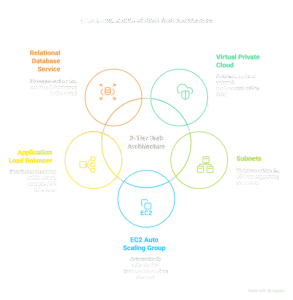
Goal: Deploy a 3-Tier Web Architecture (VPC, Subnets, EC2 ASG, ALB, RDS) on AWS using Terraform.
3-Tier Web Architecture Phases:
Prerequisites & Local Setup: Install required tools and configure AWS access.
Get the Code: Download or clone the Terraform project files.
Configure Project Variables: Customize settings like region and database credentials.
Deploy with Terraform: Initialize, plan, and apply the Terraform configuration.
Verify Deployment: Check if the infrastructure is running correctly.
Clean Up: Destroy the infrastructure to avoid costs.
Phase 1: Prerequisites & Local Setup
Step 1.1: Create an AWS Account
If you don’t have one, go to https://aws.amazon.com/ and sign up.
You’ll need a credit card for verification (even for the Free Tier).
Note: While many resources used here fit within the AWS Free Tier for a limited time/usage, NAT Gateways, Load Balancers (after free hours), and potentially EC2/RDS instances (depending on type/duration) will incur costs. Be mindful of this.
Step 1.2: Create an IAM User for Terraform
Why? It’s a security best practice not to use your root AWS account credentials for applications or tools like Terraform.
Log in to the AWS Management Console using your root account email and password.
Navigate to the IAM service (Identity and Access Management).
Go to Users in the left sidebar and click Add users.
User name: Choose a descriptive name (e.g., terraform-admin).
Select AWS credential type: Check Access key – Programmatic access. Optionally, check Password – AWS Management Console access if you also want to log in as this user (choose a custom password or auto-generate).
Click Next: Permissions.
Select Attach existing policies directly.
Search for and check the box next to AdministratorAccess.
(Note: For production, you’d create a custom policy with only the minimum required permissions for Terraform to manage the specific resources. For this initial setup, AdministratorAccess is simpler but less secure).
Click Next: Tags (Optional: Add tags if you wish, e.g., Purpose=Terraform).
Click Next: Review.
Review the details and click Create user.
CRITICAL: On the success screen, you’ll see the Access key ID and the Secret access key. Click Show to reveal the secret key. Copy both of these immediately and save them somewhere secure (like a password manager). You will NOT be able to see the Secret Access Key again after leaving this screen. You can also download the .csv file containing these keys.
Step 1.3: Install AWS CLI (Command Line Interface)
The AWS CLI allows you to interact with AWS services from your terminal.
Go to the AWS CLI installation guide: https://docs.aws.amazon.com/cli/latest/userguide/getting-started-install.html
Follow the instructions for your operating system (Windows, macOS, Linux).
After installation, open a new terminal or command prompt and verify:
aws --versionYou should see the installed AWS CLI version.
Step 1.4: Configure AWS CLI Credentials
Now, configure the AWS CLI to use the IAM user credentials you created.
Run the following command in your terminal:
aws configureYou will be prompted for four pieces of information:
AWS Access Key ID: Paste the Access Key ID you saved from Step 1.2.
AWS Secret Access Key: Paste the Secret Access Key you saved from Step 1.2.
Default region name: Enter the AWS region code where you want to deploy your infrastructure (e.g., us-east-1, eu-west-2, ap-southeast-1).
This command creates configuration files (usually in ~/.aws/credentials and ~/.aws/config on Linux/macOS, or %USERPROFILE%\.aws\ on Windows) that Terraform and other tools will use to authenticate with AWS.
Step 1.5: Install Terraform
Go to the Terraform downloads page: https://www.terraform.io/downloads.html
Download the appropriate package for your operating system.
Unzip the package. You’ll find a single executable file named terraform (or terraform.exe on Windows).
Move this executable to a directory that is included in your system’s PATH. This makes the terraform command available from any directory in your terminal.
(Common locations: /usr/local/bin on macOS/Linux, or create a dedicated folder like C:\Terraform on Windows and add it to your System Environment Variables PATH).
Open a new terminal and verify the installation:
terraform versionYou should see the Terraform version number.
Step 1.6: Install Git
Git is needed to clone the project repository.
Go to the Git downloads page: https://git-scm.com/downloads
Download and install Git for your operating system, accepting the default options during installation is usually fine.
Open a new terminal and verify the installation:
git --version
Step 1.7: (Optional but Recommended) Install a Code Editor
You’ll need to edit text files. A good code editor makes this easier.
Recommended: Visual Studio Code (VS Code) – https://code.visualstudio.com/
Install the HashiCorp Terraform extension in VS Code for syntax highlighting and other features.
Step 1.8: Create an EC2 Key Pair for SSH
If you intend to SSH directly into the EC2 instances (controlled by the allow_ssh_cidr and ec2_key_pair_name variables later), you need an EC2 Key Pair already created in the AWS region you plan to deploy to.
Go to the EC2 service in the AWS Console.
Navigate to Key Pairs under Network & Security.
Click Create key pair.
Enter a name (e.g., three-tire-architecture-key).
Choose the key pair format (.pem for OpenSSH on Linux/macOS, .ppk for PuTTY on Windows).
Click Create key pair. The private key file (.pem or .ppk) will be downloaded. Save this file securely and note the key pair name you chose. You will need the name for the ec2_key_pair_name variable later.
Phase 2: Get the Code
Step 2.1: Choose a Directory
Decide where you want to store the project files on your computer (e.g., in a projects or terraform folder).
Step 2.2: Clone the Repository
Open your terminal and navigate to the directory you chose in Step 2.1.
Use git clone followed by the URL of the GitHub repository containing the 3-Tier architecture code you were provided. Replace <repository-url> with the actual URL:
git clone https://github.com/Consultantsrihari/-Three-Tier-Architecture-Deployment-Using-Terraform.gitThis will create a new directory (e.g., terraform-aws-3-tier-arch) containing all the project files (main.tf, variables.tf, modules/, etc.).
- Project GitHub Link: Three-Tier-Architecture-Deployment-Using-Terraform
Step 2.3: Navigate into Project Directory
Change into the newly created project directory:
cd Three-Tire-Architecture-Deployment-Using-Terraform # Or whatever the directory name isYou should now be in the root directory of the Terraform project.
Phase 3: Configure Project Variables
Step 3.1: Understand terraform.tfvars
Terraform automatically loads variable definitions from a file named terraform.tfvars (if it exists) in the root directory.
This is the standard place to put sensitive values (like passwords) or settings specific to your deployment.
The provided project includes terraform.tfvars.example as a template and .gitignore to prevent accidentally committing your real terraform.tfvars file.
Step 3.2: Create terraform.tfvars from Example
In your terminal (while inside the project directory), run:
cp terraform.tfvars.example terraform.tfvars
Step 3.3: Edit terraform.tfvars
Open the newly created terraform.tfvars file in your code editor (like VS Code).
Required:
Find the line db_username = “<YOUR_RDS_USERNAME>” and replace the placeholder with the desired master username for your database (e.g., adminuser, webappadmin).
Find the line db_password = “<YOUR_SECURE_RDS_PASSWORD>” and replace the placeholder with a strong, secure password for the database master user.
Review & Optionally Change:
aws_region: Ensure this matches the region you set with aws configure in Step 1.4. If they differ, Terraform will try to deploy to the region in this file.
project_name: You can change this if you want a different prefix for your resource names.
Network CIDRs (vpc_cidr, public_subnet_cidrs, private_subnet_cidrs): Only change if you understand CIDR notation and need a specific network layout. Ensure the number of public/private CIDRs match the number of Availability Zones you intend to use (default is 2).
Instance/DB Types (instance_type, db_instance_class): Change if you need different performance characteristics (be mindful of costs).
allow_ssh_cidrs:
To disable direct SSH access (recommended if using AWS Systems Manager Session Manager), leave it as [] or uncomment and set it to [].
To enable SSH from your current IP: Find your public IP (search “what is my IP” in Google), uncomment the line, and set it like this: allow_ssh_cidrs = [“YOUR_IP_ADDRESS/32”] (replace YOUR_IP_ADDRESS with your actual IP).
ec2_key_pair_name:
If you are not using SSH or using SSM, leave it as “” or commented out.
If you enabled SSH (allow_ssh_cidrs) and created a key pair in Step 1.8, uncomment this line and set the value to the exact name of the key pair you created (e.g., ec2_key_pair_name = “my-app-key”).
Save the terraform.tfvars file.
Phase 4: Deploy with Terraform
Step 4.1: Initialize Terraform
This command prepares your working directory for Terraform operations. It downloads provider plugins (like the AWS provider) and initializes any modules used in your configuration.
Run this in your terminal from the project’s root directory:
terraform initYou should see output indicating successful initialization.
Step 4.2: Validate Configuration (Optional)
Checks your Terraform files for syntax errors and basic consistency.
Run:
terraform validateIt should report “Success! The configuration is valid.”
Step 4.3: Plan Deployment
This is a crucial “dry run” step. Terraform determines what actions are needed to achieve the desired state defined in your code and shows you an execution plan.
Run:
terraform plan -var-file="terraform.tfvars"Review the output carefully. It will show:
+ create: Resources that will be created.
~ update: Resources that will be modified.
– destroy: Resources that will be destroyed.
Since this is the first run, you should only see + create for all the resources (VPC, subnets, gateways, route tables, security groups, ALB, target group, listener, launch template, ASG, DB subnet group, DB instance).
Make sure the plan looks correct before proceeding.
Step 4.4: Apply Deployment
This command executes the actions outlined in the plan, actually creating the resources in your AWS account.
Run:
terraform apply -var-file="terraform.tfvars"Terraform will display the execution plan again and ask for confirmation: Do you want to perform these actions?
Review it one last time and type yes and press Enter.
(Alternative) Auto-Approve (Use with caution): terraform apply -var-file=”terraform.tfvars” -auto-approve
Wait: This will take several minutes. Terraform will output progress as it creates each resource. The RDS instance usually takes the longest (10+ minutes).
Success: Upon successful completion, Terraform will display the output values defined in outputs.tf (like alb_dns_name).
Phase 5: Verify Deployment
Step 5.1: Check Application Load Balancer (ALB)
Copy the value of the alb_dns_name output from the Terraform apply step.
Paste this DNS name into your web browser’s address bar (using http://, e.g., http://webapp-3tier-alb-1234567890.us-east-1.elb.amazonaws.com).
You should see the basic HTML page: “Welcome to the AWS 3-Tier Architecture Demo! Served by instance: i-xxxxxxxxxxxxxxxxx”.
Refresh the page a few times. The instance ID (i-xxxx…) might change as the ALB distributes traffic across the different EC2 instances launched by the Auto Scaling Group.
Step 5.2: Check AWS Management Console
Log in to the AWS Management Console (using the IAM user if you gave it console access, or root). Make sure you are in the correct region (the one specified in aws_region).
VPC: Look for the VPC, Subnets, Route Tables, Internet Gateway, NAT Gateways, and Elastic IPs created with your project_name prefix.
EC2:
Check Load Balancers: Find your ALB.
Check Target Groups: Find the target group associated with the ALB; check the “Targets” tab – you should see registered instances with a “healthy” status (might take a minute or two after launch).
Check Auto Scaling Groups: Find your ASG; it should show the desired number of instances running.
Check Instances: See the EC2 instances launched by the ASG.
Check Security Groups: Verify the ALB, Web, and DB security groups exist with the correct rules.
RDS: Check Databases: Find your RDS instance; its status should be “Available”. Check its configuration details (Multi-AZ, VPC, Subnet Group, Security Group).
Step 5.3: (Optional) Test SSH Access
If you enabled SSH (allow_ssh_cidr) and configured a key pair (ec2_key_pair_name):
Find the Public IP address of one of the running EC2 instances from the EC2 console.
Open your terminal.
Use the ssh command with your private key file (.pem):
# Replace </path/to/your/key.pem> and <INSTANCE_PUBLIC_IP>
ssh -i </path/to/your/key.pem> ec2-user@<INSTANCE_PUBLIC_IP>
You should be able to connect to the instance. Type exit to disconnect.
Phase 6: Clean Up
Step 6.1: Destroy Infrastructure
CRITICAL: To avoid ongoing AWS charges for the resources you deployed (especially NAT Gateways, ALB, RDS, EIPs), destroy them when you are finished.
In your terminal, from the project’s root directory, run:
terraform destroy -var-file="terraform.tfvars"Terraform will show you all the resources it plans to destroy (everything it created).
Review the plan and type yes when prompted to confirm.
(Alternative) Auto-Approve (Use with caution): terraform destroy -var-file=”terraform.tfvars” -auto-approve
Wait: Destruction will take several minutes.
Verify: After Terraform finishes, you can optionally check the AWS console again to confirm the resources have been removed.
Congratulations! You have successfully set up your environment, configured the project, deployed a 3-Tier architecture on AWS using Terraform, verified it, and cleaned it up.
For more information about Job Notifications, Open source Projects, Tech updates and Interview questions, please stay tuned TechCareerHubs official website.