Project 1: End-to-End Static Website on AWS
The Goal: End-to-End Static website on AWS, we will deploy a simple static website (HTML/CSS/JS) on AWS. It will be serverless, incredibly fast for users worldwide, secure with HTTPS, and accessible via a custom domain like www.yourdomain.com.
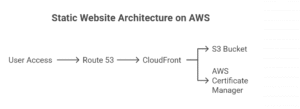
The Architecture:
Amazon S3: Will hold our raw HTML/CSS/JS files.
Amazon CloudFront: Will be our CDN, caching files globally for speed and providing free SSL (HTTPS).
Amazon Route 53: Will manage our custom domain and point it to CloudFront.
AWS Certificate Manager (ACM): Will generate our free SSL certificate.
Part 1: Host the Basic Website on Amazon S3
In this part, we’ll get the website files into AWS and make them accessible via a public, but ugly, URL.
Step 1: Create an S3 Bucket
An S3 bucket is a container for your files.
Sign in to the AWS Management Console.
In the search bar at the top, type “S3” and select it.
Click the “+ Create bucket” button.
Fill in the details:
Bucket name: This must be globally unique and DNS-compliant (no uppercase letters, no underscores). Example: my-unique-static-site-123.
AWS Region: Choose a region close to you (e.g., US East (N. Virginia)).
Scroll down to the “Block Public Access settings for this bucket” section.
This is a critical step. Uncheck the box for “Block all public access”.
Acknowledge the warning that this will turn off the block. We need this for a public website, and we will secure it with a specific policy later.
Leave all other settings as default and click “Create bucket”.
Step 2: Create and Upload Your Website Files
Let’s use the same simple website files from the Azure example.
Create a file named index.html on your local computer with this code
<!DOCTYPE html>
<html lang="en">
<head>
    <meta charset="UTF-8">
    <meta name="viewport" content="width=device-width, initial-scale=1.0">
    <title>My AWS Website</title>
    <style>
        body { font-family: 'Segoe UI', Tahoma, Geneva, Verdana, sans-serif; text-align: center; margin-top: 50px; background-color: #fff8f0; }
        h1 { color: #FF9900; }
        p { font-size: 1.2em; }
        .container { padding: 2em; background-color: white; border-radius: 8px; box-shadow: 0 4px 8px rgba(0,0,0,0.1); display: inline-block; }
    </style>
</head>
<body>
    <div class="container">
        <h1> Welcome to My Static Website on AWS! </h1>
        <p>This site is hosted on <strong>Amazon S3</strong>.</p>
        <p>It's delivered globally via <strong>Amazon CloudFront</strong>.</p>
    </div>
</body>
</html>
In the AWS console, click on the name of the S3 bucket you just created.
Click the “Upload” button.
Click “Add files”, select your index.html file, and then click “Upload” at the bottom of the page.
Step 3: Enable Static Website Hosting
Inside your S3 bucket, click on the “Properties” tab.
Scroll all the way down to the “Static website hosting” card and click “Edit”.
Select “Enable”.
More options will appear:
Hosting type: Keep “Host a static website”.
Index document: index.html
Error document: 404.html (optional, but good practice).
Click “Save changes”.
Scroll back down to the “Static website hosting” card. You will now see the Bucket website endpoint. Copy this URL and save it. It will look like http://your-bucket-name.s3-website-us-east-1.amazonaws.com.
Step 4: Create a Bucket Policy for Public Access
This step explicitly grants the public permission to read the files in your bucket.
Inside your bucket, click the “Permissions” tab.
Under “Bucket policy”, click “Edit”.
In the policy editor, paste the following JSON. Remember to replace YOUR-BUCKET-NAME with your actual S3 bucket name
{
    "Version": "2012-10-17",
    "Statement": [
        {
            "Sid": "PublicReadGetObject",
            "Effect": "Allow",
            "Principal": "*",
            "Action": "s3:GetObject",
            "Resource": "arn:aws:s3:::techcareerhubs99634/*"
        }
    ]
}
Click “Save changes”. A warning about public access may appear; this is expected.
Verification Point 1
Open a new browser tab and paste the Bucket website endpoint URL you saved. You should see your new website live!
Part 2: Accelerate with Amazon CloudFront (CDN)
Now let’s put the CDN in front of S3 to get global speed and prepare for our custom domain and HTTPS.
Step 1: Create a CloudFront Distribution
In the AWS console search bar, type “CloudFront” and select it.
Click “Create a CloudFront distribution”.
In the “Origin domain” field, click and select your S3 bucket from the dropdown. Important: Do not use the autocomplete option. Select the one that says s3-website-us-east-1.amazonaws.com. Using the website endpoint is crucial for S3 to handle index documents properly.
Scroll down to “Viewer protocol policy” and select “Redirect HTTP to HTTPS”. This ensures all users use a secure connection.
Under “Default root object”, enter index.html. This tells CloudFront what file to serve if a user visits the root URL.
Leave all other settings as default and click “Create distribution”.
Important: CloudFront distributions take 5-15 minutes to deploy. You can see the status on the main CloudFront page. It will say “Deploying” and then change to a date/time when it’s finished.
Verification Point 2
Once the deployment is complete, click on your new distribution. On the “Details” tab, copy the Distribution domain name (e.g., d1234abcd.cloudfront.net). Paste this URL into your browser. You should see your website, now served via the fast global CDN.
Part 3: Map Your Custom Domain with Route 53 and Enable HTTPS
This is the final step to make your site professional.
Step 1: Request a Free SSL Certificate
In the AWS console search bar, type “Certificate Manager” and open it.
CRITICAL: In the top-right corner, make sure your region is set to US East (N. Virginia) us-east-1. CloudFront can only use certificates from this region.
Click “Request a certificate”.
Select “Request a public certificate” and click “Next”.
Domain names:
Add your root domain: yourdomain.com
Click “Add another name” and add a wildcard domain: *.yourdomain.com (this will cover www and any other subdomains).
Validation method: Keep “DNS validation” selected.
Click “Request”.
On the next screen, you will see your certificate request with a “Pending validation” status. Click on the Certificate ID.
You will see a table with your domain names. Click the button “Create records in Route 53”. A popup will confirm the records to be created. Click “Create records”. This automatically proves to AWS that you own the domain.
Wait a few minutes. The certificate status will change from “Pending” to “Issued”.
Step 2: Update CloudFront to Use Your Domain and Certificate
Go back to your CloudFront distribution.
Click on the “General” tab and then click “Edit”.
Under “Alternate domain name (CNAME)”, click “Add item” and enter your desired hostname, like www.yourdomain.com.
Under “Custom SSL certificate”, click the input box and select the certificate you just created in ACM. Its name will be your domain (yourdomain.com).
Scroll to the bottom and click “Save changes”. The distribution will start deploying again.
Step 3: Point Your Domain to CloudFront using Route 53
In the AWS search bar, go to Route 53.
If you haven’t used Route 53 before, you’ll need to create a Hosted Zone.
Click “Create hosted zone”.
Domain name: yourdomain.com.
Type: Public hosted zone.
Click “Create”.
Route 53 will give you four NS (Name Server) records. You must go to your domain registrar (GoDaddy, etc.) and replace their nameservers with these four AWS nameservers.
Go into your domain’s Hosted Zone.
Click “Create record”.
Fill in the details:
Record name: www
Record type: A – IPv4 address
Turn on the “Alias” toggle.
Route traffic to: Choose “Alias to CloudFront distribution”.
In the text box that appears, select your CloudFront distribution (it will be listed by its domain name, like d1234abcd.cloudfront.net).
Click “Create records”.
Final Verification
Once the CloudFront distribution has finished redeploying (check the status), open your browser and navigate to https://www.yourdomain.com.
You have successfully built and deployed a serverless, globally-distributed, secure static website on AWS!
For more information about Job Notifications, Open-source Projects, DevOps and Cloud project, please stay tuned TechCareerHubs official website.