Project 1: End-to-End Static Website on Azure
The Goal: To build End-to-End static website on azure, we will deploy a simple static website (HTML/CSS/JS) on Azure. It will be serverless, incredibly fast for users worldwide, secure with HTTPS, and accessible via a custom domain like www.yourdomain.com.
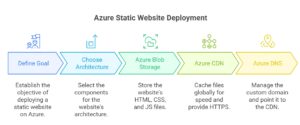
The Architecture:
Azure Blob Storage: Will hold our raw HTML/CSS/JS files.
Azure CDN: Will cache our files at edge locations around the world for speed and provide free SSL (HTTPS).
Azure DNS: Will manage our custom domain and point it to the Azure CDN.
Part 1: Host the Basic Website in Azure Storage
In this part, we’ll get the website files into Azure and make them accessible via a public, but ugly, URL.
Step 1: Create a Resource Group
A Resource Group is a logical container for your Azure resources. It’s best practice to keep all resources for a project in one group.
Sign in to the Azure Portal.
Click “Resource groups” on the home page or search for it.
Click “+ Create”.
Fill in the details:
Subscription: Choose your subscription.
Resource group: Give it a name, like Static-Website-RG.
Region: Choose a region close to you (e.g., East US).
Click “Review + create”, then “Create”.
Step 2: Create the Storage Account
In the Azure portal, click “+ Create a resource”.
Search for and select “Storage account”. Click “Create”.
On the “Basics” tab, fill in the details:
Subscription: Your subscription.
Resource group: Select the Static-Website-RG you just created.
Storage account name: This must be globally unique and contain only lowercase letters and numbers. Example: myuniquesitestorage123.
Region: Select the same region as your resource group.
Performance: Standard (this is fine for a website).
Redundancy: Locally-redundant storage (LRS) is the cheapest and sufficient for this project.
Click “Review”, then “Create”. Azure will now deploy the storage account.
Step 3: Enable Static Website Hosting
Once the deployment is complete, click “Go to resource”.
In the left-hand menu of your storage account, scroll down to “Data management” and click on “Static website”.
Toggle the status to “Enabled”.
Two input boxes will appear.
Index document name: index.html
Error document path: 404.html (You can create this file later).
Click “Save”.
Azure will now display a Primary endpoint URL. Copy this URL and save it somewhere. It will look like https-your-account-name.z13.web.core.windows.net/. This is the direct URL to your website.
Step 4: Create and Upload Your Website Files
First, let’s create a simple website on your local computer.
Create a file named index.html and paste this code into it:
<!DOCTYPE html>
<html lang="en">
<head>
    <meta charset="UTF-8">
    <meta name="viewport" content="width=device-width, initial-scale=1.0">
    <title>My Azure Website</title>
    <style>
        body { font-family: 'Segoe UI', Tahoma, Geneva, Verdana, sans-serif; text-align: center; margin-top: 50px; background-color: #f0f8ff; }
        h1 { color: #0078D4; }
        p { font-size: 1.2em; }
        .container { padding: 2em; background-color: white; border-radius: 8px; box-shadow: 0 4px 8px rgba(0,0,0,0.1); display: inline-block; }
    </style>
</head>
<body>
    <div class="container">
        <h1> Welcome to My Tech career hubs Static Website on Azure! </h1>
        <p>This site is hosted on <strong>Azure Blob Storage</strong>.</p>
        <p>It's delivered globally via <strong>Azure CDN</strong>.</p>
    </div>
</body>
</html>
Now, let’s upload it to Azure.
In your storage account in the Azure portal, go to “Storage browser” in the left menu.
Expand “Blob containers” and you will see a special container named $web. Click on it.
Click the “Upload” button at the top.
In the pane that opens, browse for your index.html file and upload it.
Verification Point 1
Open a new browser tab and paste the Primary endpoint URL you saved earlier. You should see your new website live!
Part 2: Accelerate with Azure CDN and Add a Custom Domain
The website works, but the URL is long and ugly. Let’s fix that by putting a Content Delivery Network (CDN) in front of it to make it fast and ready for a custom domain.
Step 1: Create a CDN Profile and Endpoint
In the Azure portal, click “+ Create a resource”.
Search for “CDN” and select “Front Door and CDN profiles”. Click “Create”.
Select “Explore other offerings” and then choose “Azure CDN Standard from Microsoft (classic)”. Click “Continue”.
Fill in the details for the CDN Profile:
Name: Give the profile a name, like my-website-cdn-profile.
Resource Group: Select Static-Website-RG.
Pricing tier: Standard Microsoft.
Check the box to “Create a new CDN endpoint now”.
Fill in the CDN Endpoint details:
CDN endpoint name: This must be globally unique. Example: my-azure-static-site.
Origin type: In the dropdown, select “Storage static website”.
Origin hostname: Select the storage account you created. The origin hostname field will auto-populate with the web endpoint.
Click “Review + create”, then “Create”.
Important: CDN endpoint deployment can take a few minutes to become active globally.
Verification Point 2
Once deployed, go to the CDN Endpoint resource. On its “Overview” page, you will find the Endpoint hostname (e.g., my-azure-static-site.azureedge.net). Open this URL in a browser. You should see the same website. If you get a “Not Found” error, wait 10-15 minutes for the CDN to fully propagate and try again.
Part 3: Map Your Custom Domain and Enable HTTPS
This is the final step to make your site professional. You will need your own domain name for this part. (e.g., yourdomain.com). We will set up www.yourdomain.com.
Step 1: Delegate Your Domain to Azure DNS
First, you need to tell your domain registrar (GoDaddy, Namecheap, etc.) that Azure is now in charge of your domain’s DNS.
In the Azure portal, search for “DNS zones” and click “+ Create”.
Resource Group: Select Static-Website-RG.
Name: Enter your root domain name exactly (e.g., yourdomain.com).
Click “Review + create”, then “Create”.
Once created, go to the DNS Zone resource. On the “Overview” page, you will see four servers listed as “Name server 1” through “Name server 4”. Copy these four server names.
Log in to your domain registrar’s website. Find the DNS management area and look for “Name Servers” or “DNS Servers”.
Replace the existing name servers with the four Azure name servers you copied.
Save your changes. Note: This change can take anywhere from a few minutes to 48 hours to propagate across the internet.
Step 2: Create the CNAME Record
Now we’ll create the record that points www to our CDN.
Go back to your DNS Zone in the Azure portal.
Click “+ Record set” at the top.
Fill in the details:
Name: www (this will create the www.yourdomain.com record).
Type: CNAME.
Alias: Paste your CDN Endpoint hostname here (e.g., my-azure-static-site.azureedge.net).
TTL: You can leave this as 1 hour.
Click “OK”.
Step 3: Add the Custom Domain to the CDN and Enable HTTPS (SSL)
This is the magic step that gives you a free SSL certificate.
Navigate to your CDN Endpoint resource in the Azure portal.
Under “Settings”, click on “Custom domains”.
Click “+ Custom domain”.
In the pane that opens, enter your full custom domain hostname: www.yourdomain.com.
Click “Add”.
The domain will be added to the list with a status of “pending”. Click on it.
A new pane will open. For Custom domain HTTPS, turn it On.
Certificate management type: Select “CDN managed”. This is the free, auto-renewing option.
Click “Save”.
Patience is Key: This process has two stages:
Domain Validation: Takes a few minutes to a few hours.
Certificate Provisioning: Takes a few hours.
You can monitor the progress on the Custom Domains screen.
Final Verification
Once the Custom Domain HTTPS status shows as complete, open your browser and navigate to https://www.yourdomain.com.
You have successfully built and deployed a serverless, globally-distributed, secure static website on Azure!
For more information about Job Notifications, Open-source Projects, DevOps and Cloud project, please stay tuned TechCareerHubs official website.