Step-by-Step Guide: Dockerize Node.js, React, MongoDB App
In this project we will learn how to build a Dockerize full-stack application with Node.js, React, MongoDB, Nginx, and Docker Compose. Step-by-step guide for beginners.
What We’ll Build:
A Backend API using Node.js and Express.
A Frontend App using React.
A Database using MongoDB.
A Dockerfile for the backend service.
A production-grade Dockerfile for the frontend using a multi-stage build with Nginx.
A docker-compose.yml file to manage all services seamlessly.
Prerequisites
Before you start, make sure you have the following installed on your system.
Node.js and npm: Download here
A code editor like VS Code.
Step 1: Final Project Structure
First, create a root directory for your project called fullstack-docker-app. All our work will happen inside this folder.
Here’s a map of what our final project will look like. Don’t create all the files yet—we’ll do it step-by-step.
fullstack-docker-app/
├── backend/
│   ├── node_modules/
│   ├── package.json
│   ├── server.js
│   └── Dockerfile
├── frontend/
│   ├── build/
│   ├── node_modules/
│   ├── public/
│   ├── src/
│   ├── package.json
│   ├── nginx.conf
│   └── Dockerfile
└── docker-compose.yml
Step 2: Building the Node.js & Express Backend API
Our backend will be a simple API that connects to MongoDB to store and retrieve messages.
2.1. Initialize the Project
Navigate into your root directory, create the backend folder, and initialize a Node.js project.
mkdir backend
cd backend
npm init -y
2.2. Install Dependencies
We need express for the server, mongoose to interact with MongoDB, and cors to allow requests from our frontend.
npm install express mongoose cors2.3. Create the Server Logic
Create a new file named server.js and add the following code
// backend/server.js
const express = require('express');
const mongoose = require('mongoose');
const cors = require('cors');

const app = express();
app.use(cors());
app.use(express.json());

const PORT = process.env.PORT || 5000;
const MONGO_URI = process.env.MONGO_URI || 'mongodb://database:27017/mydatabase';

// --- MongoDB Connection ---
mongoose.connect(MONGO_URI)
    .then(() => console.log('MongoDB Connected...'))
    .catch(err => console.log(err));

// --- Mongoose Schema and Model ---
const MessageSchema = new mongoose.Schema({
    text: { type: String, required: true },
    timestamp: { type: Date, default: Date.now }
});
const Message = mongoose.model('Message', MessageSchema);

// --- API Routes ---
// Get all messages
app.get('/api/messages', async (req, res) => {
    try {
        const messages = await Message.find().sort({ timestamp: -1 });
        res.json(messages);
    } catch (err) {
        res.status(500).json({ message: 'Error fetching messages' });
    }
});

// Post a new message
app.post('/api/messages', async (req, res) => {
    const newMessage = new Message({ text: req.body.text });
    try {
        const savedMessage = await newMessage.save();
        res.status(201).json(savedMessage);
    } catch (err) {
        res.status(400).json({ message: 'Error posting message' });
    }
});

app.listen(PORT, () => console.log(`Server running on port ${PORT}`));Key Concept: Docker Networking
Notice the MONGO_URI: mongodb://database:27017/mydatabase. The hostname database is not localhost. This is the service name we will define in our docker-compose.yml file later. Docker’s internal DNS will automatically resolve this name to the IP address of our MongoDB container.
2.4. Dockerize the Backend
Now, let’s create a Dockerfile in the backend directory. This file contains the instructions to build a Docker image for our API.
# backend/Dockerfile

# Use an official Node.js runtime as a parent image
FROM node:18-alpine

# Set the working directory in the container
WORKDIR /app

# Copy package.json and package-lock.json to the working directory
# This step is separated to leverage Docker's layer caching
COPY package*.json ./

# Install any needed packages
RUN npm install

# Copy the rest of the application's source code
COPY . .

# Make port 5000 available to the world outside this container
EXPOSE 5000

# Define the command to run the app when the container starts
CMD [ "node", "server.js" ]
Step 3: Creating the React Frontend App
Next, let’s build the user interface to display and add messages.
3.1. Initialize the React App
Navigate back to the root directory (fullstack-docker-app) and use create-react-app to scaffold the frontend.
npx create-react-app frontend3.2. Build the UI in App.js
Open frontend/src/App.js and replace its content with the code below. I’ve also added some basic CSS, so you’ll want to update frontend/src/App.css too.
// frontend/src/App.js
import React, { useState, useEffect } from 'react';
import './App.css';
function App() {
const [messages, setMessages] = useState([]);
const [newMessage, setNewMessage] = useState('');
const [error, setError] = useState('');
// The backend URL will be proxied by Nginx
const API_URL = '/api/messages';
useEffect(() => {
fetch(API_URL)
.then(res => res.json())
.then(data => setMessages(data))
.catch(err => setError('Could not fetch messages. Is the backend running?'));
}, []);
const handleSubmit = (e) => {
e.preventDefault();
if (!newMessage.trim()) return;
fetch(API_URL, {
method: 'POST',
headers: { 'Content-Type': 'application/json' },
body: JSON.stringify({ text: newMessage }),
})
.then(res => res.json())
.then(data => {
setMessages([data, ...messages]);
setNewMessage('');
setError('');
})
.catch(err => setError('Failed to post message.'));
};
return (
<div className="App">
<header className="App-header">
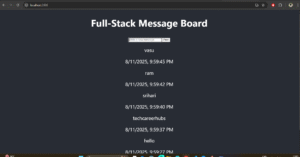
<h1>Full-Stack Message Board</h1>
<p className="subtitle">Dockerized with Node.js, React & Nginx</p>
{error && <p className="error-message">{error}</p>}
<form onSubmit={handleSubmit} className="message-form">
<input
type="text"
value={newMessage}
onChange={(e) => setNewMessage(e.target.value)}
placeholder="Write a new message..."
/>
<button type="submit">Post</button>
</form>
<div className="message-list">
{messages.map((msg) => (
<div key={msg._id} className="message-item">
<p>{msg.text}</p>
<span>{new Date(msg.timestamp).toLocaleString()}</span>
</div>
))}
</div>
</header>
</div>
);
}
export default App;For styling, replace the contents of frontend/src/App.css with this:
/* frontend/src/App.css */
.App { text-align: center; background-color: #282c34; min-height: 100vh; font-size: calc(10px + 2vmin); color: white; }
.App-header { padding: 20px; }
.subtitle { color: #61dafb; font-size: 0.8em; margin-top: -15px; }
.message-form { margin: 20px 0; }
.message-form input { padding: 10px; font-size: 1em; border-radius: 5px; border: none; margin-right: 10px; width: 300px; }
.message-form button { padding: 10px 20px; font-size: 1em; border-radius: 5px; border: none; background-color: #61dafb; color: #282c34; cursor: pointer; }
.message-list { margin-top: 20px; display: flex; flex-direction: column; align-items: center; }
.message-item { background-color: #3a3f4a; border-radius: 8px; padding: 10px 20px; margin-bottom: 10px; width: 400px; text-align: left; }
.message-item p { margin: 0; }
.message-item span { font-size: 0.7em; color: #aaa; }
.error-message { color: #ff6b6b; background-color: #4a3a3a; padding: 10px; border-radius: 5px; }
3.3. Configure Nginx as a Reverse Proxy
To serve our static React app and forward API requests to the backend, we will use Nginx. Create a file named nginx.conf in the frontend directory.
# frontend/nginx.conf
server {
  listen 80;

  # Handle requests for the React App
  location / {
    root   /usr/share/nginx/html;
    index  index.html index.htm;
    # This is necessary for Single Page Applications (SPAs)
    # It ensures that all routes are directed to index.html
    try_files $uri $uri/ /index.html;
  }

  # Handle API requests
  location /api {
    # Forward requests to our backend service
    # The name 'backend' comes from our docker-compose service name
    proxy_pass http://backend:5000;
    proxy_set_header Host $host;
    proxy_set_header X-Real-IP $remote_addr;
    proxy_set_header X-Forwarded-For $proxy_add_x_forwarded_for;
    proxy_set_header X-Forwarded-Proto $scheme;
  }

  # Optional: Hide Nginx version
  server_tokens off;
}
How does the proxy work?
When you make a request to /api/messages from the browser, it hits the Nginx server on port 80 (inside the container). The location /api block catches this request and forwards it to http://backend:5000/api/messages. Our React app doesn’t even know where the backend lives—Nginx handles all the routing!
3.4. Dockerize the Frontend with a Multi-Stage Build
For the frontend, we’ll use a multi-stage build. This is a best practice that results in a smaller, more secure final image. Create a Dockerfile in the frontend directory.
# frontend/Dockerfile

# --- Stage 1: Build the React App ---
# Use a Node image to build our static files
FROM node:18-alpine AS builder

WORKDIR /app

# Copy package files and install dependencies
COPY package*.json ./
RUN npm install

# Copy the rest of the source code
COPY . .

# Build the production-ready static files
RUN npm run build

# --- Stage 2: Serve the app with Nginx ---
# Use a lightweight Nginx image for the final production image
FROM nginx:stable-alpine

# Copy the built static files from the 'builder' stage
COPY --from=builder /app/build /usr/share/nginx/html

# Copy our custom Nginx configuration
COPY nginx.conf /etc/nginx/conf.d/default.conf

# Expose port 80 to the outside world
EXPOSE 80

# Start Nginx in the foreground
CMD ["nginx", "-g", "daemon off;"]
Why a Multi-Stage Build?
Stage 1 (builder) uses a full Node.js image to install dependencies and run the npm run build command. This stage has all the development tools.
Stage 2 starts fresh with a tiny Nginx image. We only copy the final build folder from Stage 1 into it.
The Result: Our final image is just Nginx + static files. It’s extremely small and secure because it doesn’t contain Node.js, node_modules, or our source code.
Step 4: Orchestrate Everything with Docker Compose
This is where we bring our three services (Frontend, Backend, Database) together. In the root directory of your project (fullstack-docker-app/), create the docker-compose.yml file.
# docker-compose.yml
version: '3.8'

services:
  # Backend Service (Node.js API)
  backend:
    build: ./backend
    container_name: backend-api
    ports:
      - "5000:5000"
    environment:
      - MONGO_URI=mongodb://database:27017/mydatabase
    depends_on:
      - database
    volumes:
      # Mounts local 'backend' folder into container for live-reloading
      - ./backend:/app
      # This anonymous volume prevents local node_modules from overwriting container's
      - /app/node_modules

  # Frontend Service (React + Nginx)
  frontend:
    build: ./frontend
    container_name: frontend-client
    ports:
      # Map host port 3000 to container port 80 (where Nginx listens)
      - "3000:80"
    depends_on:
      - backend

  # Database Service (MongoDB)
  database:
    image: mongo:latest
    container_name: mongodb
    ports:
      - "27017:27017"
    volumes:
      # This named volume persists data even if the container is removed
      - mongodb_data:/data/db

# Named volume for data persistence
volumes:
  mongodb_data:
Dissecting Docker Compose:
services: Defines each container: backend, frontend, and database.
build: Tells Compose where to find the Dockerfile for a service.
image: Tells Compose to pull an image directly from Docker Hub (like for mongo).
ports: Maps a port on your local machine (HOST:CONTAINER). We access the frontend via localhost:3000.
environment: Sets environment variables inside the container, perfect for passing database connection strings.
depends_on: Controls the startup order. The backend won’t start until the database is up.
volumes: The key to data persistence and live-reloading. mongodb_data:/data/db ensures your database data survives container restarts. ./backend:/app syncs your local code with the container’s code, so changes are reflected instantly (for Node.js, you might need nodemon for automatic server restarts).
Step 5: Run the Full-Stack Application
The moment of truth. Make sure you are in the root directory (fullstack-docker-app/) where your docker-compose.yml file is located.
Run this single command:
docker-compose up --build–build: This flag forces Docker Compose to build the images from your Dockerfiles before starting the containers. You only need it the first time or when you change a Dockerfile or nginx.conf.
You’ll see a stream of logs from all three services. Once the logs settle and you see MongoDB Connected… and Server running on port 5000, your application is live!
Open your web browser and navigate to http://localhost:3000.
You should see your React message board. Post a message! It will be sent to the backend, saved in MongoDB, and displayed on the screen.
How to Stop the Application
In the terminal where the app is running, press Ctrl + C.
To remove the containers and the network created by Compose, run:
docker-compose downIf you want to remove the database volume as well (which deletes all your data), run:
docker-compose down -v
Conclusion & Next Steps
Congratulations! You have successfully built, containerized, and orchestrated a full-stack application. You now have a powerful, reproducible development environment that mirrors a real-world production setup.
For more information about Job Notifications, Open-source Projects, DevOps and Cloud project, please stay tuned TechCareerHubs official website.