Complete Guide to Deploying a Polyglot App on Kubernetes
Deploying a Polyglot App on Kubernetes: End-to-end project that will take you from the basics of Docker to deploying a real-world, multi-service application on both a local Minikube cluster and a production-grade AWS EKS cluster. We’ll be using industry-standard tools like Docker, Helm, and Ingress to build and manage our application.
This project is a real-world, multi-service application that demonstrates:
- Microservices architecture (Python Flask, Node.js Express, React)
- Containerization with Docker
- Orchestration with Kubernetes (Minikube and AWS EKS)
- Packaging and deployment with Helm (including umbrella and sub-charts)
- Routing with Ingress
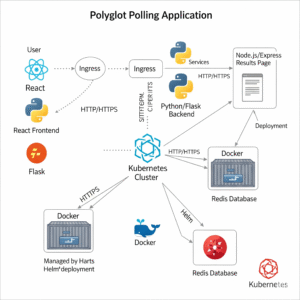
Application Architecture
poll-ui (React): A sleek frontend that allows users to vote for “Cats” or “Dogs”.
api-service (Python/Flask): A powerful backend that receives votes and stores them in our database.
result-service (Node.js/Express): A dynamic web page that displays the live polling results.
data-store (Redis): A lightning-fast in-memory database perfect for caching and counting votes.
polyglot-polling-app/
├── .gitignore
├── api-service/
│ ├── app.py
│ ├── Dockerfile
│ └── requirements.txt
├── docker-compose.yml
├── helm-charts/
│ ├── api-service/
│ │ ├── Chart.yaml
│ │ ├── templates/
│ │ │ ├── deployment.yaml
│ │ │ └── service.yaml
│ │ └── values.yaml
│ ├── poll-ui/
│ │ ├── Chart.yaml
│ │ ├── templates/
│ │ │ ├── deployment.yaml
│ │ │ └── service.yaml
│ │ └── values.yaml
│ ├── polling-app-umbrella/
│ │ ├── Chart.yaml
│ │ ├── templates/
│ │ │ └── ingress.yaml
│ │ └── values.yaml
│ ├── redis/
│ │ ├── Chart.yaml
│ │ ├── templates/
│ │ │ ├── service.yaml
│ │ │ └── statefulset.yaml
│ │ └── values.yaml
│ └── result-service/
│ ├── Chart.yaml
│ ├── templates/
│ │ ├── deployment.yaml
│ │ └── service.yaml
│ └── values.yaml
├── poll-ui/
│ ├── .dockerignore
│ ├── Dockerfile
│ ├── package.json
│ └── src/
│ ├── App.css
│ └── App.js
├── result-service/
│ ├── Dockerfile
│ ├── package.json
│ └── server.js
└── README.md
Learning Objectives (Your “Zero to Hero” Path)
Containerization: Dockerizing applications written in different languages.
Kubernetes Fundamentals: Understanding Pods, Deployments, Services, and Namespaces.
State Management: Using StatefulSets and PersistentVolumes for our Redis database.
Application Packaging: Creating production-grade Helm charts for each service.
Dependency Management: Building an “Umbrella” Helm chart to deploy the entire application with a single command.
Traffic Routing: Using Ingress to expose our services to the outside world with clean, path-based URLs (/ for the poll, /results for the results).
Local Development: Mastering a fast feedback loop using Minikube.
Cloud Deployment: Provisioning a real AWS EKS cluster and deploying the same application.
Cloud-Native Integration: Using the AWS Load Balancer Controller for native Ingress integration on EKS.
Phase 1: Building a Solid Foundation with Docker
Before we can conquer the cloud, we must first master our local environment. The goal of this phase is to take our three distinct microservices—written in Python, Node.js, and React—and run them together seamlessly as isolated, containerized applications. This is the bedrock of any cloud-native application.
Step 1: The Services – A Quick Look Under the Hood
Our application consists of three custom services and one off-the-shelf database:
api-service (Python/Flask): This is our backend workhorse. It has a single purpose: to listen for incoming votes on a /vote endpoint. When a vote arrives, it connects to our Redis database and increments a counter. It’s simple, fast, and written in Python.
# ./api-service/app.py
import os
import redis
from flask import Flask, request, jsonify

app = Flask(__name__)
redis_client = redis.Redis(host=os.environ.get('REDIS_HOST', 'redis'))

@app.route('/vote', methods=['POST'])
def vote():
    vote_option = request.get_json()['vote']
    count = redis_client.hincrby('votes', vote_option, 1)
    return jsonify({"option": vote_option, "count": count})
result-service (Node.js/Express): This service is responsible for displaying the results. It queries the Redis database, fetches the current counts for “Cats” and “Dogs”, and renders a simple, auto-refreshing HTML page.
// ./result-service/server.js
const express = require('express');
const redis = require('redis');

const app = express();
const redisClient = redis.createClient({ url: `redis://${process.env.REDIS_HOST || 'redis'}:6379` });

app.get('/', async (req, res) => {
    const votes = await redisClient.hGetAll('votes');
    res.send(`<h1>Results</h1><p>Cats: ${votes.cats || 0}</p><p>Dogs: ${votes.dogs || 0}</p>`);
});
poll-ui (React): This is our user-facing application. It’s a clean, simple interface with two buttons. Clicking a button triggers a POST request to our api-service.
// ./poll-ui/src/App.js
function App() {
  const handleVote = async (option) => {
    await fetch(`${process.env.REACT_APP_API_URL}/vote`, {
      method: 'POST',
      headers: { 'Content-Type': 'application/json' },
      body: JSON.stringify({ vote: option }),
    });
    // ... update UI message
  };
  // ... render buttons
}
Step 2: Containerization with Dockerfiles
Now for the magic. A Dockerfile is a blueprint for building a container image. We create one for each service.
For the Python api-service, the Dockerfile is straightforward: it copies the source code, installs Python dependencies from requirements.txt, and defines the command to start the server.
# ./api-service/Dockerfile
FROM python:3.9-slim
WORKDIR /app
COPY requirements.txt .
RUN pip install --no-cache-dir -r requirements.txt
COPY . .
EXPOSE 5000
CMD ["python", "app.py"]
For the React poll-ui, we use a powerful technique called a multi-stage build. This is a professional pattern that dramatically reduces our final image size.
Stage 1 (The “Builder”): We use a full Node.js image to install all dependencies and run npm run build. This creates a build directory full of optimized, static HTML, CSS, and JavaScript files.
Stage 2 (The “Server”): We switch to a new, incredibly lightweight base image: nginx:alpine. We then copy only the build directory from the first stage into the Nginx server’s web root.
The result? Our final image doesn’t contain Node.js, node_modules, or any source code. It’s a tiny, secure, and highly-performant Nginx server ready to serve our UI.
# ./poll-ui/Dockerfile

# --- Stage 1: Build the React application ---
FROM node:18-alpine AS build
WORKDIR /app
COPY package*.json ./
RUN npm install
COPY . .
RUN npm run build

# --- Stage 2: Serve the application from a lightweight Nginx server ---
FROM nginx:1.23-alpine
# Copy the build output from the 'build' stage
COPY --from=build /app/build /usr/share/nginx/html
EXPOSE 80
Step 3: Orchestration with Docker Compose
With our images defined, how do we run them all together and make them talk to each other? Enter docker-compose.yml. This file is our local orchestrator.
In it, we define our four services: redis, api-service, poll-ui, and result-service.
image: vs build:: For Redis, we use image: “redis:alpine” to pull the official image directly from Docker Hub. For our own services, we use build: ./<service-folder> to tell Docker Compose to build the image from our local Dockerfile.
ports:: We map ports from our host machine to the container (e.g., 5000:80 maps port 5000 on our machine to port 80 in the poll-ui container).
Networking: The most powerful feature! Docker Compose automatically creates a private virtual network. All four containers are attached to this network and can communicate with each other using their service names as hostnames (e.g., the API service connects to Redis using the hostname redis).
# ./docker-compose.yml
version: '3.8'

services:
  redis:
    image: "redis:alpine"

  api-service:
    build: ./api-service
    ports:
      - "5001:5000"
    environment:
      # The API code will look for this host, which is the service name
      - REDIS_HOST=redis

  poll-ui:
    build: ./poll-ui
    ports:
      - "5000:80"

  result-service:
    build: ./result-service
    ports:
      - "5002:80"
    environment:
      - REDIS_HOST=redis
Bringing It All to Life
With everything defined, running our entire application stack is as simple as one command from the project’s root directory:
docker-compose up --buildDocker Compose reads the file, builds the three custom images, pulls the Redis image, starts all four containers, and connects them to the network.
You can now access your fully functional application:
Cast your vote: http://localhost:5000
See the results: http://localhost:5002


We have successfully built a solid, containerized foundation. Our application is now portable, consistent, and ready for the next big step: deploying it to a true orchestration platform, Kubernetes.
Phase 2: Taking the Leap into Kubernetes with Minikube
We’ve successfully containerized our application, but running it with Docker Compose is just the beginning. To unlock true scalability, self-healing, and declarative management, we need to move to a container orchestrator. It’s time to introduce Kubernetes!
Our goal in this phase is to deploy the exact same application to a real Kubernetes cluster running locally on our machine, thanks to the incredible tool, Minikube.
Step 1: Setting Up Our Local Cluster
Minikube allows us to run a single-node Kubernetes cluster with a single command. It’s the perfect environment for learning and development.
First, we start our cluster, giving it enough resources to run our application smoothly:
# We use the Docker driver for better performance on most systems
minikube start --driver=docker --cpus 4 --memory 4096
This command provisions a complete, fully functional Kubernetes control plane and a worker node inside a Docker container on our machine.
Now for a critical concept: the Docker environment on your machine is separate from the Docker environment inside the Minikube cluster. To make our custom-built images available to Kubernetes, we need to build them in the right place. We do this by pointing our terminal’s Docker client to Minikube’s internal Docker daemon:
# This command configures our shell for the Minikube Docker environment
eval $(minikube -p minikube docker-env)
With our terminal configured, we simply rebuild our images. They are now stored where Minikube can find them locally without needing a public registry.
Step 2: From Imperative to Declarative – Writing Kubernetes Manifests
In the world of Kubernetes, we don’t tell the system how to do something; we tell it what we want our end state to look like. We do this by writing YAML manifests. We’ll create a new k8s-manifests/ directory to hold these files.
This is where we meet the fundamental building blocks of Kubernetes:
Deployment: This is our workhorse for stateless applications like our api-service, poll-ui, and result-service. A Deployment’s job is to ensure a specified number of identical pods (replicas) are running at all times. If a pod crashes, the Deployment Controller immediately replaces it.
# k8s-manifests/api-service-manifest.yaml apiVersion: apps/v1 kind: Deployment metadata: name: api-service-deployment spec: replicas: 1 template: spec: containers: - name: api-service image: api-service:v1 # CRITICAL: Use the local image, don't search the internet for it. imagePullPolicy: IfNotPresentStatefulSet: Our Redis database isn’t stateless; it holds our precious vote counts! For stateful applications, we use a StatefulSet. This provides our pod with crucial guarantees that a Deployment doesn’t: a stable, unique network identifier (e.g., redis-0) and stable, persistent storage.
# k8s-manifests/redis-manifest.yaml apiVersion: apps/v1 kind: StatefulSet metadata: name: redis spec: # ... configuration for stable podsService: Pods in Kubernetes are ephemeral—they can be created and destroyed, getting new IP addresses each time. So how do our services reliably find each other? The answer is a Service. A Kubernetes Service provides a stable, internal DNS name and IP address that acts as a load balancer for a set of pods.
For example, our api-service can now connect to Redis simply by using the hostname redis, without ever needing to know the pod’s actual IP address.
# A Service to expose the api-service pods internally
apiVersion: v1
kind: Service
metadata:
  name: api-service # The DNS name other pods will use
spec:
  type: ClusterIP # Only accessible from within the cluster
  selector:
    app: api-service # Routes traffic to any pod with this label
  ports:
  - port: 5000
    targetPort: 5000
Step 3: Deploying and Testing Our Application
With all our manifests written, deploying our entire application stack is beautifully simple. First, we create a namespace to keep our app isolated:
kubectl create namespace polling-appThen, we apply all the manifests in our directory with one command:
kubectl apply -f k8s-manifests/ -n polling-appKubernetes now springs into action, reading our desired state and working to make it a reality. The control plane schedules the pods, pulls the images, and configures the networking.
kubectl get all -n polling-appOnce all pods show a Running status, our application is live inside the cluster!
But how do we access it from our local machine? The services are of type ClusterIP, meaning they aren’t exposed externally. For development and debugging, we use a handy tool called kubectl port-forward. This creates a direct, secure tunnel from a port on our local machine to a port on a service inside the cluster.
# In one terminal, forward the voting UI
kubectl port-forward -n polling-app svc/poll-ui-service 8080:80

# In a second terminal, forward the results UI
kubectl port-forward -n polling-app svc/result-service 8081:80
Now, by visiting http://localhost:8080 and http://localhost:8081, we can interact with our application running inside Kubernetes.
We have successfully taken our containerized application and deployed it to a real Kubernetes cluster, learning the most important concepts along the way. But managing all these individual YAML files can be cumbersome. In the next phase, we’ll solve that problem with Helm.
Phase 3: Supercharging Our Deployments with Helm
In Phase 2, we successfully deployed our application using kubectl apply. While this works, you can imagine that as our application grows to ten, twenty, or fifty services, managing hundreds of individual YAML files becomes a maintenance nightmare. How do you version your deployments? How do you easily configure them for different environments (dev, staging, prod)?
The answer is Helm, the de facto package manager for Kubernetes.
Our goal in this phase is to transform our collection of static YAML files into a single, powerful, and reusable Helm chart. This is how professional teams manage applications on Kubernetes.
Step 1: Understanding the Helm Philosophy
Helm treats our application as a “package” or a “release”. A Helm chart is simply a collection of files in a specific directory structure that describes a related set of Kubernetes resources. The real power of Helm comes from two key concepts:
Templates: Instead of static YAML, we write template files. These files are a mix of YAML and a templating language (Go templates) that allows us to use variables, loops, and conditional logic.
Values: We extract all the configurable parts of our application—like image tags, replica counts, and service ports—into a single values.yaml file.
When you run helm install, Helm reads the values.yaml file, combines it with the templates, and generates the final, valid Kubernetes YAML to send to the cluster. This lets us deploy the same chart to different environments with different configurations just by changing the values.yaml file.
Step 2: Creating Individual “Sub-charts”
We’ll start by creating a Helm chart for each of our services (redis, api-service, poll-ui, and result-service) using the helm create <chart-name> command.
Then, we’ll take the logic from our Phase 2 Kubernetes manifests and convert them into templates. For example, our api-service-deployment.yaml from Phase 2:
apiVersion: apps/v1
kind: Deployment
metadata:
  name: api-service-deployment
spec:
  replicas: 1
  # ...
    spec:
      containers:
      - name: api-service
        image: api-service:v1
        ports:
        - containerPort: 5000
Becomes a powerful template in our api-service Helm chart:
# New Helm Template: helm-charts/api-service/templates/deployment.yaml
apiVersion: apps/v1
kind: Deployment
metadata:
  name: {{ .Release.Name }}-api-service
spec:
  replicas: {{ .Values.replicaCount }} # <-- Value from values.yaml
  # ...
    spec:
      containers:
      - name: api-service
        image: "{{ .Values.image.repository }}:{{ .Values.image.tag }}" # <-- Values
        ports:
        - containerPort: {{ .Values.service.port }} # <-- Value
This template is now driven by a clean values.yaml file:
# helm-charts/api-service/values.yaml
replicaCount: 1

image:
  repository: api-service
  tag: v1

service:
  port: 5000
We repeat this process for all our services, giving us four independent, configurable charts.
Step 3: The “Umbrella” Chart – Tying It All Together
Now for the masterstroke. How do we deploy all four charts at once? We create a fifth chart, the “Umbrella” chart (e.g., polling-app-umbrella), which acts as a parent.
This umbrella chart is special: it has no templates of its own. Its only job is to declare the other four charts as dependencies in its Chart.yaml file.
# helm-charts/polling-app-umbrella/Chart.yaml
apiVersion: v2
name: polling-app-umbrella
description: A Helm chart to deploy the entire Polyglot Polling App
version: 0.1.0

dependencies:
- name: redis
  version: "0.1.0"
  repository: "file://../redis" # <-- Points to the local chart directory
- name: api-service
  version: "0.1.0"
  repository: "file://../api-service"
- name: poll-ui
  version: "0.1.0"
  repository: "file://../poll-ui"
- name: result-service
  version: "0.1.0"
  repository: "file://../result-service"
Step 4: One Command to Rule Them All
Before we can install our umbrella chart, we need to tell Helm to fetch and package these local dependencies. This is done with a single command:
# This packages our sub-charts into the umbrella chart's 'charts/' directory
helm dependency build ./helm-charts/polling-app-umbrella
Our umbrella chart is now a complete, self-contained package.
The final deployment is beautifully simple. From our project root, we run:
# Deploys Redis, the API, the UI, and the Results service all at once
helm install my-poll-app ./helm-charts/polling-app-umbrella --namespace polling-app
And just like that, our entire application stack is deployed, versioned, and managed. We can now easily upgrade, rollback, or delete the entire application with simple Helm commands. We have officially moved from manual management to professional, scalable application packaging.
Phase 4: Intelligent Traffic Routing with Ingress
In our previous phases, we successfully deployed our application to Kubernetes, but there’s a catch: we could only access it using kubectl port-forward. This is great for debugging, but it’s not a real-world solution. We need a way to expose our application to external users through a single, stable IP address.
This is where Ingress comes in.
Our goal in this phase is to use an Ingress to intelligently route traffic from the outside world to the correct services inside our cluster, all through one entry point.
Step 1: What is an Ingress?
Think of an Ingress as the smart traffic cop or receptionist for your Kubernetes cluster. It sits at the edge of the cluster and manages all incoming HTTP and HTTPS traffic. An Ingress resource is simply a set of rules, like:
“If a request comes in for the path /, send it to the poll-ui service.”
“If a request comes in for the path /results, send it to the result-service service.”
(In more advanced setups) “If a request comes in for the hostname api.myapp.com, send it to the api-service.”
To make these rules actually work, you need an Ingress Controller. This is a specialized pod running in your cluster whose job is to listen for Ingress resources and configure a load balancer (like NGINX or a cloud provider’s load balancer) to enforce those rules.
Step 2: Setting up the Ingress Controller on Minikube
For our local Minikube environment, setting up an industry-standard NGINX Ingress Controller is incredibly simple, thanks to Minikube’s addon system:
minikube addons enable ingressThis command deploys the NGINX Ingress Controller into our cluster. It will now watch for any Ingress resources we create.
Step 3: Creating a Conditional Ingress Template
We want our Ingress to be an optional part of our deployment. Maybe for some environments, we don’t want to expose the service externally. We can achieve this using Helm’s conditional logic.
We’ll create a new template file, ingress.yaml, inside our umbrella chart’s templates/ directory. The Ingress lives in the umbrella chart because it’s a top-level resource that routes traffic to multiple sub-charts.
The template is wrapped in a simple if block
# helm-charts/polling-app-umbrella/templates/ingress.yaml
{{- if .Values.ingress.enabled -}}
apiVersion: networking.k8s.io/v1
kind: Ingress
metadata:
  name: {{ .Release.Name }}-main-ingress
  annotations:
    # This annotation is specific to the NGINX Ingress Controller
    nginx.ingress.kubernetes.io/rewrite-target: /
spec:
  ingressClassName: nginx
  rules:
  - http:
      paths:
      - path: /
        pathType: Prefix
        backend:
          service:
            # Route to the poll-ui service created by our sub-chart
            name: {{ .Release.Name }}-poll-ui
            port:
              number: 80
      - path: /results
        pathType: Prefix
        backend:
          service:
            # Route to the result-service
            name: {{ .Release.Name }}-result-service
            port:
              number: 80
{{- end -}}
This template will only generate a YAML file if the value ingress.enabled is set to true in our values.yaml file. We set it to false by default, making the Ingress opt-in.
Step 4: Deploying the Ingress with a Helm Upgrade
Our application is already running, deployed via Helm. We don’t need to reinstall it; we can simply perform an upgrade. We’ll use the –set flag on the command line to override our default value and enable the ingress.
helm upgrade my-poll-app ./helm-charts/polling-app-umbrella \
  -n polling-app \
  --set ingress.enabled=true
Helm sees that ingress.enabled is now true, renders the ingress.yaml template, and sends the new Ingress resource to the Kubernetes API. The NGINX Ingress Controller sees this new resource and immediately updates its configuration to start routing traffic.
Step 5: Accessing the Application
No more port-forwarding! We can now access our entire application through the single IP address of our Minikube cluster.
First, we get the IP: minikube ip
Let’s say it returns 192.168.49.2. We can now access our services directly in the browser:
Voting UI: http://192.168.49.2/
Results UI: http://192.168.49.2/results
We have successfully implemented a clean, scalable, and professional way to manage traffic to our application. We are now fully prepared to take this entire setup to a real cloud provider.
Phase 5: The Final Ascent – Deploying to AWS EKS
We’ve built, containerized, and packaged our application. We’ve mastered deploying it to a local Kubernetes cluster. Now, it’s time to graduate to the major leagues: deploying our application to a production-grade, managed Kubernetes service in the cloud. We’ll be using Amazon Elastic Kubernetes Service (EKS).
The goal of this phase is to experience a true cloud-native deployment workflow, from provisioning infrastructure to managing a cloud load balancer, all while using the same Helm chart we’ve already built.
⚠️ A Quick Word on Cost: Running infrastructure on AWS is not free. The resources we create in this phase (EKS control plane, EC2 nodes, Load Balancers) will incur costs. Please be sure to follow the final cleanup step to avoid unexpected bills!
Step 1: Provisioning Our Cloud Infrastructure with eksctl
Creating a Kubernetes cluster from scratch involves setting up networking (VPCs, subnets, security groups), IAM roles for permissions, and the control plane itself. This is a complex task, but eksctl—the official CLI for EKS—makes it incredibly simple.
With a single command, eksctl uses AWS CloudFormation in the background to build a best-practices EKS cluster.
# This command takes 15-20 minutes to complete
eksctl create cluster \
  --name my-poll-cluster \
  --region us-east-1 \
  --version 1.28 \
  --nodegroup-name standard-workers \
  --node-type t3.medium \
  --nodes 2 \
  --nodes-min 1 \
  --nodes-max 3
After this command finishes, eksctl automatically configures our local kubectl to point to our new cloud cluster. We can verify this by running kubectl get nodes and seeing our two t3.medium EC2 instances ready for action.
Step 2: Cloud-Native Ingress with the AWS Load Balancer Controller
On Minikube, we used the NGINX Ingress Controller. In AWS, the best practice is to use the AWS Load Balancer Controller. This controller has a special superpower: when it sees an Ingress resource, it doesn’t just configure a pod—it provisions a real AWS Application Load Balancer (ALB) in your AWS account. This gives us a highly available, scalable, and fully managed entry point to our application.
Installing it involves following the official AWS documentation. This is a critical real-world step that involves:
Creating an IAM OIDC provider for our cluster.
Creating an IAM Policy that grants the controller permissions to manage ALBs.
Creating a Kubernetes Service Account and attaching the policy to it.
Installing the controller using its official Helm chart.
Step 3: A Private Home for Our Images – Amazon ECR
Our local Docker images built inside Minikube are not accessible to our EKS cluster in the cloud. We need a central, private container registry. For this, we use Amazon Elastic Container Registry (ECR).
For each of our three services (api-service, poll-ui, result-service), we perform the following steps:
Create a Repository: In the AWS console or via the AWS CLI, we create a new ECR repository.
Tag the Image: We re-tag our local Docker image with the full ECR repository URI, which looks something like 123456789012.dkr.ecr.us-east-1.amazonaws.com/poll-ui:v1.
Log In and Push: We use the AWS CLI to get temporary login credentials for Docker and then docker push our tagged image to our private ECR repository.
Step 4: The Final Deployment with Helm
This is where all our hard work pays off. The beauty of Helm is that we can deploy the exact same chart we used for Minikube. The only difference is that we will override some key values on the command line to adapt it for our AWS environment.
The helm upgrade –install command is perfect for this. It will install the chart if it doesn’t exist or upgrade it if it does.
helm upgrade --install my-poll-app ./helm-charts/polling-app-umbrella \
  --namespace polling-app \
  --create-namespace \
  \
  # Override the image repositories to point to our ECR images
  --set poll-ui.image.repository=12345.dkr.ecr.us-east-1.amazonaws.com/poll-ui \
  --set api-service.image.repository=12345.dkr.ecr.us-east-1.amazonaws.com/api-service \
  --set result-service.image.repository=12345.dkr.ecr.us-east-1.amazonaws.com/result-service \
  \
  # Enable the Ingress
  --set ingress.enabled=true \
  # Tell the Ingress resource to use our AWS Load Balancer Controller
  --set ingress.className=alb
When Helm sends the Ingress manifest to the cluster with ingress.className=alb, the AWS Load Balancer Controller springs into action. It talks to the AWS API and provisions an Application Load Balancer, configures listeners for HTTP, and creates target groups pointing to our application’s pods.
After a few minutes, we can check the status:
kubectl get ingress -n polling-appThe ADDRESS field will now show a long public DNS name (e.g., k8s-polling-app-maining-123456789.us-east-1.elb.amazonaws.com).
By navigating to that URL in any browser, anywhere in the world, we can access our application, now running securely and scalably on the AWS cloud.
Final Step: Cleaning Up!
To avoid ongoing costs, we tear down our infrastructure with the same tools we used to build it:
# Delete the Helm release and all its Kubernetes resources
helm uninstall my-poll-app -n polling-app

# Delete the EKS cluster and all its underlying AWS resources
eksctl delete cluster --name my-poll-cluster --region us-east-1
And with that, we have completed the full journey from a local Docker container to a globally accessible, production-grade application on Kubernetes.