End-to-End DevOps Automation for a Scalable and Secure AI Chatbot
End-to-End DevOps Automation for a Scalable and Secure AI Chatbot: This project walk through the end-to-end process of building and deploying a scalable, secure AI Chatbot using modern DevOps practices. We will cover everything from initial setup and infrastructure automation to CI/CD, monitoring, security, and performance optimization.
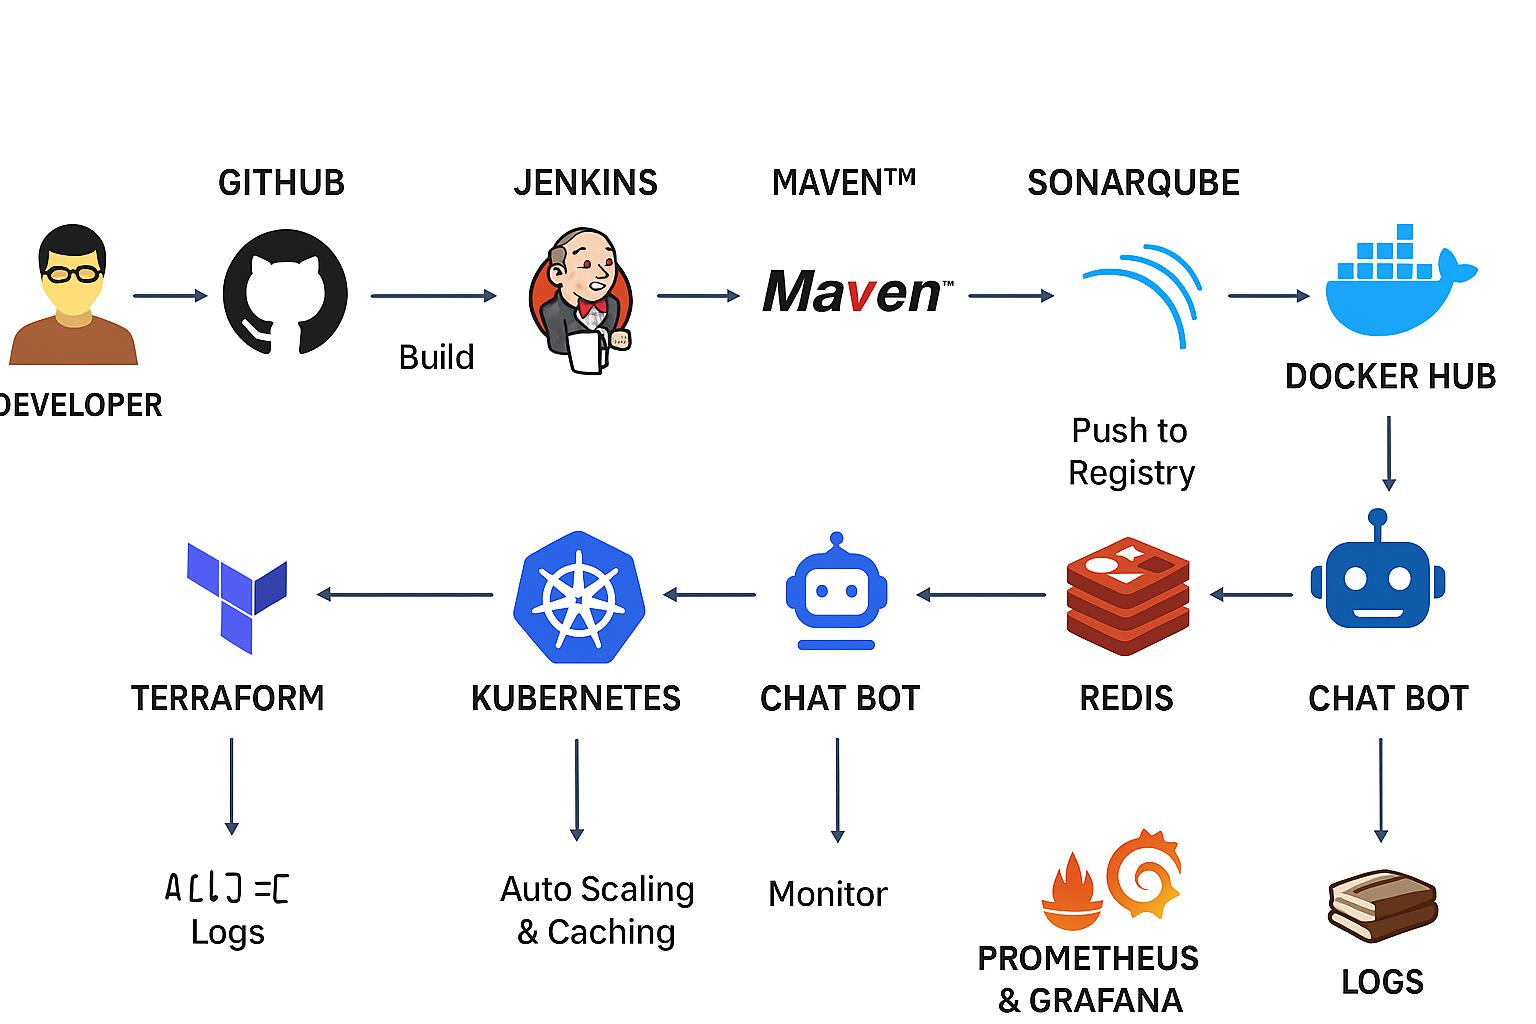
The DevOps Workflow for an AI Chatbot
The project follows a standard, automated CI/CD lifecycle:
A Developer pushes code to a Git Hub repository.
The push triggers a Jenkins pipeline.
Maven builds the application.
SonarQube performs static code analysis for quality and security.
The application is containerized using Docker.
The Docker image is pushed to a Docker Hub registry.
Terraform provisions the necessary cloud Infrastructure.
The container is deployed to a Kubernetes cluster.
The Chatbot application is now live.
Redis is used for caching and to assist with auto-scaling.
Prometheus & Grafana continuously monitor the application’s performance and health.
Logs are aggregated for debugging and analysis.

1. Project Overview
Introduction to the Chatbot Application
A chatbot application is an AI-driven system that interacts with users via text or voice. It can be used for customer support, automation, and information retrieval. The chatbot can be integrated with various platforms like web applications, mobile apps, messaging services (WhatsApp, Telegram), and voice assistants (Alexa, Google Assistant).
├── .github/
│ └── workflows/
│ └── ci-cd.yml
├── app/
│ └── main.py
├── kubernetes/
│ ├── deployment.yaml
│ ├── service.yaml
│ ├── hpa.yaml
│ ├── ingress.yaml
│ └── kustomization.yaml
├── tests/
│ └── test_main.py
├── .gitignore
├── Dockerfile
├── README.md
├── requirements.txt
└── k6/
└── load-test.js
Key Features of the Chatbot
Natural Language Processing (NLP): Uses AI models like OpenAI’s GPT, Google Dialogflow, or Rasa.
Database Integration: Stores chat history, user preferences, and logs.
APIs & Webhooks: Connects with external services for fetching data.
Multi-Platform Support: Deployable on Web, Mobile, Slack, Telegram, WhatsApp, etc.
Automated Responses & Learning: Uses machine learning to improve interactions.
Tech Stack for the Chatbot
Backend: Python (Flask/FastAPI) or Node.js (Express)
Frontend (Optional): Vue.js, React, or Angular
Database: PostgreSQL, MongoDB, or Firebase
NLP & AI: OpenAI API, Rasa, or Google Dialogflow
Deployment: Kubernetes, Docker, AWS/GCP/Azure
Why DevOps for This Project?
Implementing DevOps practices for the chatbot ensures continuous integration, deployment, monitoring, and scaling. Below are the main benefits:
1. Automation of Development & Deployment
CI/CD pipelines automate the build, test, and deployment process, reducing errors and manual intervention.
Example: Every time code is pushed, it triggers a pipeline to deploy updates automatically.
2. Scalability & Reliability
Using Kubernetes & Docker, the chatbot can auto-scale based on traffic.
Load balancing and auto-healing mechanisms ensure uptime.
3. Continuous Monitoring & Logging
Tools like Prometheus, Grafana, and ELK stack provide real-time logs and metrics.
Alerts notify the DevOps team of any issues instantly.
4. Security & Compliance
Automated security scans prevent vulnerabilities before deployment.
Role-Based Access Control (RBAC) ensures only authorized users access production.
5. Cost Optimization
Auto-scaling and on-demand resources prevent unnecessary infrastructure costs.
Example: Basic Chatbot API using Python FastAPI
Here’s a simple FastAPI-based chatbot API that takes user messages and returns responses using OpenAI’s GPT API.
Step 1: Install Dependencies
pip install fastapi uvicorn openaiStep 2: Create main.py for the Chatbot API
import os
import openai
from fastapi import FastAPI

app = FastAPI()

# Configure OpenAI API Key
# Make sure to set this as an environment variable
openai.api_key = os.getenv("OPENAI_API_KEY")

@app.get("/")
def read_root():
    return {"message": "Welcome to Chatbot API"}

@app.post("/chat/")
def chat_with_bot(user_input: str):
    response = openai.ChatCompletion.create(
        model="gpt-3.5-turbo",
        messages=[
            {"role": "user", "content": user_input}
        ]
    )
    bot_response = response["choices"][0]["message"]["content"]
    return {"bot_response": bot_response}
Step 3: Running the API Locally
uvicorn main:app --reloadThe chatbot API now listens for messages and returns AI-generated responses.
How This Chatbot Will Be Streamlined Using DevOps
Containerize the chatbot using Docker.
Deploy it to Kubernetes for auto-scaling.
Integrate CI/CD pipelines for automatic updates.
Use logging & monitoring to track performance.
Ensure security best practices using DevSecOps.
Infrastructure Setup & Automation
Now that we have our chatbot API, we need to set up a DevOps-driven infrastructure that supports scalability, automation, and high availability.
Why Automate Infrastructure?
Faster Deployments: Automating infrastructure avoids manual provisioning delays.
Scalability: Ensures the chatbot runs smoothly under high traffic.
Reliability: Auto-healing ensures the system remains operational.
Security & Consistency: Infrastructure as Code (IaC) ensures the same environment across all deployments.
Infrastructure Components
Docker: For containerizing the chatbot.
Kubernetes (K8s): For orchestration and scaling.
Terraform: For provisioning infrastructure as code.
Secrets Management: Using AWS Secrets Manager or HashiCorp Vault.
Nginx Ingress Controller: For load balancing.
Step 1: Dockerizing the Chatbot API
To ensure portability and consistency, we’ll containerize the chatbot API.
Create a Dockerfile
# Use official Python image
FROM python:3.9

# Set the working directory
WORKDIR /app

# Copy project files
COPY . .

# Install dependencies
RUN pip install --no-cache-dir -r requirements.txt

# Expose the application port
EXPOSE 8000

# Command to run the chatbot API
CMD ["uvicorn", "main:app", "--host", "0.0.0.0", "--port", "8000"]
Build and Run the Docker Container
# Build the Docker image
docker build -t chatbot-api .

# Run the chatbot container
docker run -d -p 8000:8000 --name chatbot chatbot-api
Now, the chatbot runs inside a Docker container.
Step 2: Deploying to Kubernetes
We need a Kubernetes Deployment to scale the chatbot dynamically.
Create deployment.yaml
apiVersion: apps/v1
kind: Deployment
metadata:
  name: chatbot-deployment
spec:
  replicas: 3 # Number of instances
  selector:
    matchLabels:
      app: chatbot
  template:
    metadata:
      labels:
        app: chatbot
    spec:
      containers:
        - name: chatbot
          image: chatbot-api:latest
          ports:
            - containerPort: 8000
Create service.yaml for Load Balancing
apiVersion: v1
kind: Service
metadata:
  name: chatbot-service
spec:
  type: LoadBalancer
  selector:
    app: chatbot
  ports:
    - protocol: TCP
      port: 80
      targetPort: 8000
Deploy to Kubernetes
# Apply Deployment
kubectl apply -f deployment.yaml

# Apply Service
kubectl apply -f service.yaml
Now, the chatbot is running on Kubernetes with load balancing.
Step 3: Automating Infrastructure with Terraform
Instead of manually provisioning cloud resources, we use Terraform.
Create main.tf for AWS Infrastructure
provider "aws" {
  region = "us-east-1"
}

resource "aws_instance" "chatbot_server" {
  ami           = "ami-12345678" # Replace with a valid AMI
  instance_type = "t2.micro"

  tags = {
    Name = "ChatbotServer"
  }
}

resource "aws_s3_bucket" "chatbot_logs" {
  bucket = "chatbot-logs-bucket"
}
Deploy Infrastructure
# Initialize Terraform
terraform init

# Plan and Apply
terraform apply -auto-approve
Now, AWS resources (EC2, S3) are created automatically.
Step 4: Secrets Management
Instead of hardcoding API keys, we store them securely.
Using AWS Secrets Manager
aws secretsmanager create-secret --name chatbot-api-key --secret-string "your-secret-key"Now, secrets are stored securely and can be accessed by the chatbot.
Step 5: Load Balancing with Nginx Ingress
We use Nginx as an Ingress Controller to manage API traffic efficiently.
Create ingress.yaml
apiVersion: networking.k8s.io/v1
kind: Ingress
metadata:
  name: chatbot-ingress
spec:
  rules:
    - host: chatbot.example.com
      http:
        paths:
          - path: /
            pathType: Prefix
            backend:
              service:
                name: chatbot-service
                port:
                  number: 80
Apply Ingress
kubectl apply -f ingress.yamlNow, users can access the chatbot API via a domain name.
Summary of Infrastructure Automation
Docker: Containerized chatbot.
Kubernetes: Auto-scaling & orchestration.
Terraform: Infrastructure as Code (IaC).
Secrets Management: Secured API keys.
Nginx Ingress: Load balancing & traffic management.
CI/CD Pipeline for Automated Updates
Now that we have our infrastructure automated, we need to set up a CI/CD (Continuous Integration & Continuous Deployment) pipeline.
Why CI/CD for the Chatbot?
Faster Deployments: Every code change gets deployed automatically.
Reduced Errors: Automated testing prevents faulty code from being deployed.
Scalability & Reliability: Ensures the chatbot remains updated without downtime.
Security: Prevents unauthorized code changes.
Step 1: Setting Up a GitHub Actions CI/CD Pipeline
We will use GitHub Actions to automate:
Building the chatbot API.
Running tests.
Pushing the image to Docker Hub.
Deploying to Kubernetes.
Create .github/workflows/deploy.yml file
name: Chatbot CI/CD Pipeline

on:
  push:
    branches:
      - main

jobs:
  build:
    runs-on: ubuntu-latest
    steps:
      - name: Checkout Repository
        uses: actions/checkout@v3

      - name: Set up Python
        uses: actions/setup-python@v3
        with:
          python-version: '3.9'

      - name: Install Dependencies
        run: |
          pip install -r requirements.txt

      - name: Run Tests
        run: |
          pytest tests/

  docker-build:
    needs: build
    runs-on: ubuntu-latest
    steps:
      - name: Checkout Repository
        uses: actions/checkout@v3

      - name: Log in to Docker Hub
        run: echo "${{ secrets.DOCKER_PASSWORD }}" | docker login -u "${{ secrets.DOCKER_USERNAME }}" --password-stdin

      - name: Build and Push Docker Image
        run: |
          docker build -t chatbot-api:latest .
          docker tag chatbot-api:latest your-dockerhub-username/chatbot-api:latest
          docker push your-dockerhub-username/chatbot-api:latest

  deploy:
    needs: docker-build
    runs-on: ubuntu-latest
    steps:
      - name: Set up Kubectl
        uses: azure/setup-kubectl@v3
        with:
          version: 'latest'

      - name: Apply Kubernetes Deployment
        run: |
          # Configure kubectl context here
          kubectl apply -f deployment.yaml
          kubectl rollout restart deployment chatbot-deployment
Step 2: Setting Up Kubernetes Rolling Updates
To avoid downtime, we will use Rolling Updates in Kubernetes.
Modify deployment.yaml for Rolling Updates
apiVersion: apps/v1
kind: Deployment
metadata:
  name: chatbot-deployment
spec:
  replicas: 3
  strategy:
    type: RollingUpdate
    rollingUpdate:
      maxUnavailable: 1
      maxSurge: 1
  selector:
    matchLabels:
      app: chatbot
  template:
    metadata:
      labels:
        app: chatbot
    spec:
      containers:
        - name: chatbot
          image: your-dockerhub-username/chatbot-api:latest
          ports:
            - containerPort: 8000
Apply the update
kubectl apply -f deployment.yamlNow, new chatbot versions will be deployed without downtime.
Step 3: Rollback in Case of Failure
If a new update breaks the chatbot, we can roll back to a previous working version.
Rollback to Previous Version
kubectl rollout undo deployment chatbot-deploymentStep 4: Slack Notifications for Deployments
To notify the team of deployments, we can send alerts to Slack.
Modify GitHub Actions Workflow (add this step to the deploy job)
- name: Notify Slack
        uses: rtCamp/action-slack-notify@v2
        env:
          SLACK_WEBHOOK: ${{ secrets.SLACK_WEBHOOK }}
          SLACK_MESSAGE: "Chatbot API has been deployed successfully!"
Now, deployment updates are sent to Slack.
Summary of CI/CD Pipeline
GitHub Actions: Automates build & deployment.
Docker & Kubernetes: Ensures seamless updates.
Rolling Updates: No downtime during deployment.
Automatic Rollbacks: Reverts in case of failure.
Slack Notifications: Alerts for deployment status.
Monitoring & Logging
Now that our CI/CD pipeline is set up, we need to monitor the chatbot’s performance and logs.
Why Monitoring & Logging?
Detect Issues Early: Identify failures before users are affected.
Track Performance: Analyze response times, API usage, and errors.
Security & Compliance: Detect unauthorized access or unusual activities.
Debugging & Troubleshooting: Logs help diagnose and fix issues faster.
Step 1: Setting Up Prometheus & Grafana for Monitoring
We use Prometheus for metrics collection and Grafana for visualization.
1. Install Prometheus in Kubernetes
kubectl create namespace monitoring
kubectl apply -f https://raw.githubusercontent.com/prometheus-operator/prometheus-operator/main/bundle.yaml
2. Create a Prometheus ServiceMonitor Configuration
Create a file prometheus.yaml:
apiVersion: monitoring.coreos.com/v1
kind: ServiceMonitor
metadata:
  name: chatbot-monitor
  namespace: monitoring
spec:
  selector:
    matchLabels:
      app: chatbot
  endpoints:
    - port: http
      path: /metrics
      interval: 30s
Apply it:
kubectl apply -f prometheus.yaml
Now, Prometheus collects chatbot performance metrics.
3. Install Grafana for Visualization
# This is a sample deployment, consider using Helm for production
kubectl apply -f https://raw.githubusercontent.com/grafana/helm-charts/main/charts/grafana/templates/deployment.yaml
Access Grafana: kubectl port-forward svc/grafana 3000:3000 -n monitoring
Default login: Username: admin, Password: admin
4. Create a Dashboard for Chatbot Metrics
Go to Grafana -> Data Sources -> Add Prometheus.
Create a dashboard with the query: rate(http_requests_total[1m])
Now, the chatbot request rate is visualized in real-time.
Step 2: Centralized Logging with ELK Stack
For advanced logging, we use the ELK Stack (Elasticsearch, Logstash, Kibana).
(Note: Deploying the ELK stack is complex. Using a managed service or a Helm chart is recommended for production.)
# Example using Elastic Cloud on Kubernetes (ECK) Operator
kubectl apply -f https://download.elastic.co/downloads/eck/1.2.1/all-in-one.yaml

# Deploy Kibana and Elasticsearch instances via custom resources
Access Kibana: kubectl port-forward svc/kibana 5601:5601 -n monitoring
Now, chatbot logs can be viewed in Kibana.
Step 3: Alerting with Prometheus & Slack
If the chatbot goes down or errors increase, we send alerts to Slack.
1. Configure Alert Rules
Create alert-rules.yaml:
groups:
  - name: chatbot-alerts
    rules:
      - alert: HighErrorRate
        expr: rate(http_requests_total{status="500"}[5m]) > 5
        for: 1m
        labels:
          severity: critical
        annotations:
          summary: "Chatbot is experiencing a high error rate"
Apply it: kubectl apply -f alert-rules.yaml
2. Send Alerts to Slack
Create alertmanager.yaml:
apiVersion: v1
kind: ConfigMap
metadata:
  name: alertmanager-config
  namespace: monitoring
data:
  alertmanager.yml: |
    route:
      receiver: "slack-notifications"
    receivers:
      - name: "slack-notifications"
        slack_configs:
          - channel: "#alerts"
            api_url: "https://hooks.slack.com/services/YOUR_SLACK_WEBHOOK"
Apply it: kubectl apply -f alertmanager.yaml
Now, alerts are sent to Slack when errors increase.
Summary of Monitoring & Logging
Prometheus & Grafana: Performance monitoring & visualization.
ELK Stack: Centralized logging.
Slack Alerts: Real-time notifications for failures.
Security & Compliance (DevSecOps for Chatbot)
Now we integrate DevSecOps practices to secure our chatbot.
Step 1: Secure Code & Dependencies
1. Implement Code Scanning (GitHub Actions)
We use GitHub’s CodeQL to detect security vulnerabilities.
Modify .github/workflows/deploy.yml
jobs:
  security-scan:
    runs-on: ubuntu-latest
    steps:
      - name: Checkout Repository
        uses: actions/checkout@v3
      - name: Run CodeQL Analysis
        uses: github/codeql-action/analyze@v2
        with:
          category: "/language:python"
Now, every push is scanned for security vulnerabilities.
2. Scan Dependencies for Vulnerabilities
We use Dependabot to automatically scan and update dependencies.
Enable Dependabot in .github/dependabot.yml
version: 2
updates:
  - package-ecosystem: "pip"
    directory: "/"
    schedule:
      interval: "daily"
Now, dependencies will be auto-updated if security fixes are available.
Step 2: Secure Kubernetes Cluster
1. Restrict Pod Privileges
Modify deployment.yaml to prevent the chatbot from running as root.
spec:
        securityContext:
          runAsUser: 1000
          runAsGroup: 1000
          readOnlyRootFilesystem: true
          allowPrivilegeEscalation: false
        containers:
        # ... rest of container spec
Now, the chatbot runs with limited permissions.
2. Enable Network Policies
To block unauthorized access, we define a Kubernetes Network Policy.
Create network-policy.yaml
apiVersion: networking.k8s.io/v1
kind: NetworkPolicy
metadata:
  name: chatbot-network-policy
spec:
  podSelector:
    matchLabels:
      app: chatbot
  policyTypes:
    - Ingress
  ingress:
    - from:
        - podSelector:
            matchLabels:
              role: frontend
      ports:
        - protocol: TCP
          port: 8000
Now, only pods with the label role: frontend can access the chatbot API.
Step 3: Enable Role-Based Access Control (RBAC)
We define an RBAC role so only specific users can manage the deployment.
Create rbac.yaml
apiVersion: rbac.authorization.k8s.io/v1
kind: Role
metadata:
  name: chatbot-deployer
rules:
  - apiGroups: [""]
    resources: ["pods"]
    verbs: ["get", "list", "watch"]
  - apiGroups: ["apps"]
    resources: ["deployments"]
    verbs: ["get", "update", "patch"]
Now, only authorized users can modify the chatbot.
Step 4: Automated Security Scanning for Containers
We use Trivy to scan Docker images for vulnerabilities.
Modify GitHub Actions Workflow
image-scan:
    runs-on: ubuntu-latest
    steps:
      - name: Run Trivy vulnerability scanner
        uses: aquasecurity/trivy-action@master
        with:
          image-ref: 'your-dockerhub-username/chatbot-api:latest'
          format: 'table'
          exit-code: '1'
          ignore-unfixed: true
          vuln-type: 'os,library'
          severity: 'CRITICAL,HIGH'
Now, any vulnerable image will be flagged before deployment.
Step 5: Set Up Web Application Firewall (WAF)
To protect against DDoS, SQL injections, and XSS attacks, we use Cloudflare WAF.
Enable Cloudflare WAF Rules
Go to Cloudflare Dashboard -> WAF.
Enable “OWASP Core Rule Set”.
Add a custom rule: If Path Contains /api/chat, Block Requests with High Anomaly Score.
Now, the chatbot API is protected against attacks.
Summary of Security & Compliance
Code Scanning: Prevents vulnerabilities in chatbot code.
Kubernetes Security: RBAC, network policies, restricted privileges.
Container Security: Scanning with Trivy before deployment.
WAF Protection: Blocks SQL injections, DDoS, and XSS.
Audit Logs & Alerts: Security incidents are logged & notified.
Scaling & Performance Optimization
Now we need to scale the chatbot efficiently to handle high traffic.
Step 1: Load Balancing with Kubernetes Ingress
We already configured NGINX Ingress, which distributes traffic evenly across chatbot instances.
Step 2: Auto Scaling with Horizontal Pod Autoscaler (HPA)
We configure Kubernetes HPA to scale chatbot pods automatically.
1. Enable Metrics Server
kubectl apply -f https://github.com/kubernetes-sigs/metrics-server/releases/latest/download/components.yaml2. Configure HPA for Chatbot Deployment
Create hpa.yaml:
apiVersion: autoscaling/v2
kind: HorizontalPodAutoscaler
metadata:
  name: chatbot-hpa
spec:
  scaleTargetRef:
    apiVersion: apps/v1
    kind: Deployment
    name: chatbot-deployment
  minReplicas: 2
  maxReplicas: 10
  metrics:
    - type: Resource
      resource:
        name: cpu
        target:
          type: Utilization
          averageUtilization: 70
Apply it: kubectl apply -f hpa.yaml
Now, chatbot pods will scale automatically based on CPU load.
Step 3: Optimize Database Performance
1. Enable Database Connection Pooling
Modify the chatbot’s PostgreSQL connection settings in config.py:
DATABASE_CONFIG = {
    "minsize": 5, # Minimum connections
    "maxsize": 50, # Maximum connections
}
2. Use Redis for Caching
To reduce database queries, we use Redis caching.
Install Redis in Kubernetes (using Helm is recommended)
helm repo add bitnami https://charts.bitnami.com/bitnami
helm install redis bitnami/redis
Modify Chatbot Code to Use Redis
import redis

cache = redis.Redis(host="redis-master", port=6379, db=0)

def get_response(user_input):
    cached_response = cache.get(user_input)
    if cached_response:
        return cached_response.decode("utf-8")

    response = generate_response(user_input) # Your function to call the AI model
    cache.set(user_input, response, ex=3600) # Cache for 1 hour
    return response
Now, chatbot responses are cached, reducing database load.
Step 4: Enable CDN for Faster API Responses
To reduce latency, we use Cloudflare CDN to cache API responses.
Enable Cloudflare Caching Rules
Go to Cloudflare Dashboard -> Caching.
Add a rule for /api/chat with Cache Level: Cache Everything and Edge TTL: 1 hour.
Now, repeated queries are served instantly from the cache.
Step 5: Performance Testing with K6
We test the chatbot’s scalability using K6.
1. Install K6
# macOS
brew install k6
# Windows
choco install k6
2. Create a Load Testing Script
Create load-test.js:
import http from 'k6/http';
import { sleep, check } from 'k6';

export let options = {
  stages: [
    { duration: '30s', target: 50 }, // Ramp-up to 50 users
    { duration: '1m', target: 100 }, // Peak load
    { duration: '30s', target: 0 },   // Ramp-down
  ],
};

export default function () {
  let res = http.get('http://chatbot.example.com/api/chat?message=hello');
  check(res, {
    'status was 200': (r) => r.status === 200,
    'response time < 500ms': (r) => r.timings.duration < 500,
  });
  sleep(1);
}
3. Run Load Test
k6 run load-test.jsNow, chatbot scalability is tested under simulated high traffic.
Summary of Scaling & Performance Optimization
Load Balancing: Kubernetes Ingress distributes traffic.
Auto Scaling: HPA automatically scales pods based on demand.
Database Optimization: Connection pooling & Redis caching reduce load.
CDN Caching: Cloudflare speeds up API responses.
Performance Testing: K6 validates scalability.
Automated Rollbacks & Disaster Recovery
To prevent data loss and downtime, we implement recovery strategies.
Version Control & Rollback Mechanisms: Git and Kubernetes rollbacks (as shown in the CI/CD section) allow for quick recovery from faulty deployments.
Automated Backups: Use tools like Velero for Kubernetes or automated database snapshots to back up data to cloud storage.
Failover Mechanisms: Implement multi-region or multi-AZ (Availability Zone) deployment strategies for high availability.
Performance Testing: K6 load tests help ensure reliability under high traffic.
Conclusion & Key Takeaways
By implementing DevOps automation, the chatbot now receives automated updates, enhanced security, and scalable performance, ensuring a robust and efficient AI-driven solution.
Key Achievements
CI/CD Automation: Ensured seamless updates with GitHub Actions and Kubernetes.
Infrastructure as Code (IaC): Used Terraform for consistent deployment.
Monitoring & Logging: Integrated Prometheus, Grafana, and ELK for real-time insights.
Security & Compliance: Implemented DevSecOps practices to protect services.
Auto Scaling & Performance: Used Kubernetes HPA, Redis, and Cloudflare for efficiency.
Load Testing & Disaster Recovery: Ensured stability with K6 and backup strategies.
Final Thoughts
Through this end-to-end DevOps automation, we have built a chatbot system that is:
Highly Available: Scales dynamically with user demand.
Fully Automated: Requires minimal manual intervention.
Secure & Compliant: Protected against vulnerabilities.
Performance-Optimized: Faster response times with caching and CDN.
Easy to Monitor & Debug: Comprehensive logging enables quick issue resolution.
This project demonstrates the power of DevOps in creating an efficient, reliable, and future-proof AI chatbot. The same principles can be applied to any AI-driven or cloud-native application.
For more information about Job Notifications, Open-source Projects, DevOps and Cloud project, please stay tuned TechCareerHubs official website.
GitHub Repo: https://github.com/Consultantsrihari/End-to-End-DevOps-Automation-AI-Chatbot.git