A Complete Guide to CI/CD with Jenkins, GitHub, and AWS
In today’s fast-paced software development world, manual deployments are slow, error-prone, and a bottleneck to innovation. The solution? A robust CI/CD (Continuous Integration/Continuous Deployment) pipeline.
This guide will take you from zero to hero, showing you how to build a complete, automated CI/CD pipeline from scratch. When you’re done, you’ll be able to push a code change to GitHub and watch it automatically get tested, built, and deployed to a live server on AWS. No manual steps, just pure automation.
What You Will Learn & Build:
Continuous Integration (CI): Automatically run unit tests on every code change.
Continuous Deployment (CD): Automatically deploy your application if the tests pass.
Infrastructure Setup: Configure servers and networking on AWS EC2.
Pipeline as Code: Define your entire automation workflow in a Jenkinsfile.
Containerization: Package your application into a portable Docker container.
Our Technology Stack
Version Control: GitHub
CI/CD Server: Jenkins
Application: A simple Node.js (Express.js) app
Containerization: Docker
Cloud Provider: Amazon Web Services (AWS) EC2
The Architecture:
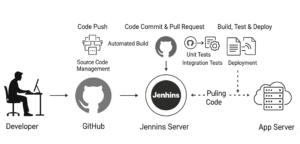
Phase 1: Setting the Stage: AWS Infrastructure
First, we need to create our cloud infrastructure. We’ll set up two servers (EC2 instances): one to run Jenkins and another to host our application.
Prerequisites
An AWS Account (Free Tier eligible).
A GitHub Account.
Git installed on your local machine.
Step 1: Create an EC2 Key Pair
This key is your password to access the servers. Keep it secure!
In the AWS Console, navigate to EC2 -> Key Pairs.
Click Create key pair.
Name it cicd-key, select .pem format, and click Create.
Your browser will download cicd-key.pem. Move it to a secure folder (like ~/.ssh/) on your computer.
Set strict permissions for the key file. This is required for SSH.
chmod 400 /path/to/your/cicd-key.pem
Step 2: Create Security Groups (Firewalls)
Security Groups act as virtual firewalls for our instances.
Navigate to EC2 -> Security Groups.
Create the Jenkins Security Group (jenkins-sg):
Name: jenkins-sg
Description: Firewall for Jenkins Server
Inbound Rules:
SSH (Port 22) from My IP (This ensures only you can access the server’s command line).
Custom TCP (Port 8080) from Anywhere (This allows you to access the Jenkins web UI).
Create the Application Security Group (app-sg):
Name: app-sg
Description: Firewall for Application Server
Inbound Rules:
SSH (Port 22) from jenkins-sg. This is the critical security step. It allows only our Jenkins server to connect and deploy. For the source, select the jenkins-sg group you just created.
Custom TCP (Port 3000) from Anywhere (This allows users to access our Node.js application).
Step 3: Launch EC2 Instances
Now, let’s launch our two servers.
Navigate to EC2 -> Instances -> Launch instances.
Launch the Jenkins Server:
Name: Jenkins-Server
AMI: Amazon Linux 2 (Free tier eligible).
Instance Type: t2.micro (Free tier eligible).
Key pair: Select the cicd-key you created.
Network settings: In “Firewall (security groups)”, choose “Select existing security group” and select jenkins-sg.
Click Launch instance.
Launch the Application Server:
Repeat the process with these settings:
Name: App-Server
AMI: Amazon Linux 2
Instance Type: t2.micro
Key pair: cicd-key
Network settings: Select app-sg.
Click Launch instance.
Phase 2: Building Our Application
With our infrastructure ready, let’s create the simple Node.js application we’ll be deploying.
Step 1: Create the Project Locally
On your computer, create a folder named cicd-node-app and create the following files inside.
Complete project link: https://github.com/Consultantsrihari/Production-Grade-CICD-Pipeline.git
app.js – The core application logic.
const express = require('express');
const app = express();
const port = 3000;

app.get('/', (req, res) => {
  // We will change this text to test our pipeline later!
  res.send('Hello World! This is the initial version.');
});

// We export the app to make it available for our unit tests
module.exports = app.listen(port, () => {
  console.log(`App listening at http://localhost:${port}`);
});
package.json – Defines project dependencies and scripts.
{
  "name": "cicd-node-app",
  "version": "1.0.0",
  "description": "A sample app for our CI/CD project.",
  "main": "app.js",
  "scripts": {
    "start": "node app.js",
    "test": "mocha"
  },
  "dependencies": {
    "express": "^4.17.1"
  },
  "devDependencies": {
    "mocha": "^9.1.3",
    "supertest": "^6.1.6"
  }
}
test/test.js – A simple unit test to validate our app. (Create a test folder first)
const request = require('supertest');
const server = require('../app'); // reference to your app.js file
const expect = require('chai').expect;

describe('GET /', () => {
  it('responds with Hello World', (done) => {
    request(server)
      .get('/')
      .end((err, res) => {
        // We use chai's expect to check the response body
        expect(res.text).to.contain('Hello World');
        done();
      });
  });

  after((done) => {
    server.close(done);
  });
});
Dockerfile – The blueprint for creating our application container.
# Use an official Node.js runtime as a parent image
FROM node:14-alpine

# Set the working directory in the container
WORKDIR /usr/src/app

# Copy package.json and package-lock.json (if available)
COPY package*.json ./

# Install application dependencies
RUN npm install

# Bundle app source
COPY . .

# Your app binds to port 3000, so expose it
EXPOSE 3000

# Define the command to run your app
CMD [ "npm", "start" ]

Step 2: Push to GitHub
Create a new public repository on GitHub (e.g., cicd-pipeline-project).
Initialize Git in your local project folder and push your code.
git init
git add .
git commit -m "Initial project setup"
git branch -M main
git remote add origin https://github.com/<YOUR_USERNAME>/<YOUR_REPO_NAME>.git
git push -u origin main
Phase 3: The Brains of the Operation: Configuring Jenkins
Now we’ll set up Jenkins, our automation engine.
Step 1: Install Jenkins, Git, and Docker
Connect to your Jenkins-Server EC2 instance using its Public IP.
ssh -i /path/to/your/cicd-key.pem ec2-user@<JENKINS_EC2_PUBLIC_IP>
ex: ssh -i /d/own projects/cicd-key.pem ubuntu@3.88.106.87
Run the following commands on the server to install everything we need.
# Switch to root user to install software
sudo su

# Update packages and install Java (a Jenkins prerequisite)
yum update -y
yum install -y java-11-amazon-corretto-devel

# Add the Jenkins repo and install Jenkins
wget -O /etc/yum.repos.d/jenkins.repo https://pkg.jenkins.io/redhat-stable/jenkins.repo
rpm --import https://pkg.jenkins.io/redhat-stable/jenkins.io.key
yum install -y jenkins

# Start Jenkins and enable it to start on boot
systemctl start jenkins
systemctl enable jenkins

# Install Git and Docker
yum install -y git
yum install -y docker
systemctl start docker
systemctl enable docker

# Add the 'jenkins' user to the 'docker' group to run docker commands
# This is crucial for building our Docker image inside the pipeline.
usermod -aG docker jenkins

# Restart Jenkins to apply the new permissions
systemctl restart jenkins
Step 2: Initial Jenkins Setup
Open your browser and navigate to http://<JENKINS_EC2_PUBLIC_IP>:8080.
Jenkins needs an initial admin password. Get it from the server:
sudo cat /var/lib/jenkins/secrets/initialAdminPasswordCopy the password into the Jenkins UI, click Continue.
On the next screen, click Install suggested plugins.
Create your admin user and complete the setup. You’re in!
Step 3: Install Required Plugins
Go to Manage Jenkins -> Manage Plugins -> Available tab. Search for and install:
GitHub Integration
SSH Agent (This allows Jenkins to securely SSH into our App Server for deployments).
Phase 4: The Deployment Target: Configuring the App Server
This server is simple. Its only job is to run our Docker container.
Connect to your App-Server EC2 instance.
ssh -i /path/to/your/cicd-key.pem ec2-user@<APP_SERVER_EC2_PUBLIC_IP>Install Docker.
sudo yum update -y
sudo yum install -y docker
sudo systemctl start docker
sudo systemctl enable docker

# Add the ec2-user to the docker group so you can run docker commands without sudo
sudo usermod -aG docker ec2-user
Important: Log out and log back in for the group permissions to take effect.
Phase 5: The Heart of Automation: Creating the Jenkins Pipeline
This is where we define the CI/CD workflow.
Step 1: Set Up Credentials in Jenkins
We need to give Jenkins a secure way to access our App Server. We’ll use an SSH key pair for this.
On the Jenkins Server, generate a new SSH key for the jenkins user.
# Switch to the jenkins user
sudo su -s /bin/bash jenkins

# Generate the key. Press Enter at all prompts (no passphrase).
ssh-keygen -t rsa

# Display the public key. Copy this entire output.
cat ~/.ssh/id_rsa.pub
On the App Server, authorize the key you just created.
Connect to your App-Server.
Open the authorized_keys file: nano ~/.ssh/authorized_keys
Paste the public key you copied from the Jenkins server into this file. Save and exit.
Back on the Jenkins Server, get the private key.
# Still as the jenkins user
cat ~/.ssh/id_rsa
In the Jenkins UI, add this private key as a credential.
Go to Manage Jenkins -> Manage Credentials -> (global) -> Add Credentials.
Kind: SSH Username with private key.
ID: app-server-key (This is a unique ID we will reference in our pipeline).
Description: Private key for App Server deployment.
Username: ec2-user (The user on the App Server).
Private Key: Check Enter directly and paste the private key you copied.
Click Create.
Step 2: Pipeline as Code: The Jenkinsfile
We will define our entire pipeline in a file named Jenkinsfile. This “Pipeline as Code” approach is powerful because it’s version-controlled right alongside your application code.
In your local project folder, create a file named Jenkinsfile (no extension).
Copy the following code into it. Read the comments carefully and replace the placeholder values.
pipeline {
    // Run this pipeline on any available Jenkins agent
    agent any

    // Define environment variables to be used throughout the pipeline
    environment {
        // Replace with your App Server's PRIVATE IP address.
        // Using the private IP is more secure as traffic stays within the AWS network.
        APP_SERVER_IP = "172.31.28.57"
        DOCKER_IMAGE_NAME = "my-node-app"
        // The credential ID we created in the Jenkins UI
        SSH_CREDENTIALS_ID = "app-server-key"
    }

    stages {
        stage('1. Checkout Code') {
            steps {
                echo 'Checking out code from GitHub...'
                // Get the latest code from the 'main' branch
                git branch: 'main', url: 'https://github.com/Consultantsrihari/Production-Grade-CICD-Pipeline.git'
            }
        }

        stage('2. Install & Test') {
            steps {
                echo 'Installing dependencies and running unit tests...'
                // We run our tests inside a temporary Node.js container.
                // This keeps our Jenkins environment clean and ensures a consistent test environment.
                script {
                    docker.image('node:14-alpine').inside {
                        sh 'npm install'
                        sh 'npm test'
                    }
                }
            }
        }

        stage('3. Build Docker Image') {
            steps {
                echo 'Building the Docker image...'
                script {
                    // The 'sh' step allows us to run shell commands
                    sh "docker build -t ${simple node application} ."
                }
            }
        }

        stage('4. Deploy to EC2') {
            steps {
                echo "Deploying to App Server at ${3.88.106.87}..."
                // Use the SSH Agent plugin to securely connect to our App Server
                // The block will have access to the credentials specified by SSH_CREDENTIALS_ID
                sshagent([ec2-ssh-key]) {
                    sh """
                        # The -o StrictHostKeyChecking=no option prevents SSH from asking for interactive confirmation.
                        ssh -o StrictHostKeyChecking=no ec2-user@${3.88.106.87} '
                            # Stop and remove the old container, if it exists.
                            # The '|| true' part ensures the command doesn't fail if the container isn't running.
                            docker stop ${} || true
                            docker rm ${simple node application} || true

                            # Run the new container from the image we just built.
                            # -d runs the container in detached mode (in the background).
                            # -p 3000:3000 maps port 3000 on the host to port 3000 in the container.
                            docker run -d --name ${simple node application} -p 3000:3000 ${simple node application}
                        '
                    """
                }
            }
        }
    }

    // The 'post' block runs after all stages are complete
    post {
        success {
            echo 'Pipeline finished successfully! The new version is live.'
        }
        failure {
            echo 'Pipeline failed. Please check the logs.'
        }
    }
}
Commit and push the Jenkinsfile to your GitHub repository.
git add Jenkinsfile
git commit -m "feat: Add Jenkinsfile for CI/CD automation"
git push origin main
Step 3: Create the Pipeline Job in Jenkins
On the Jenkins dashboard, click New Item.
Enter a name (e.g., My-Node-App-Pipeline), select Pipeline, and click OK.
Scroll down to the Pipeline section.
Definition: Pipeline script from SCM.
SCM: Git.
Repository URL: https://github.com/<YOUR_USERNAME>/<YOUR_REPO_NAME>.git. # ex: https://github.com/Consultantsrihari/Production-Grade-CICD-Pipeline.git
Branch Specifier: */main.
The Script Path should be Jenkinsfile, which is the default.
Click Save.
Phase 6: Connecting the Dots: The GitHub Webhook
The final step is to tell GitHub to automatically notify Jenkins when you push new code. This is the trigger for our entire pipeline.
In your GitHub repository, go to Settings -> Webhooks -> Add webhook.
Payload URL: http://<JENKINS_EC2_PUBLIC_IP>:8080/github-webhook/. # EX https://http://98.81.84.87:8080/github-webhook/.
Crucial: Don’t forget the trailing slash (/) at the end!
Content type: application/json.
Leave the Secret field blank.
Click Add webhook. You should see a green checkmark next to it, indicating that GitHub successfully pinged your Jenkins server.
Phase 7: The Moment of Truth: Testing Your Pipeline!
You’ve built it. Now, let’s see it in action.
Make a small change to your application. Let’s update the welcome message in app.js.
// in app.js
res.send('My CI/CD Pipeline is ALIVE! Version 2.0');
Commit and push the change to your GitHub repository.
git add app.js
git commit -m "chore: Update welcome message to test pipeline"
git push origin main
Watch the Magic Happen:
Go to your Jenkins dashboard. You’ll see your My-Node-App-Pipeline job has started automatically!
Click on the build number and then Console Output to watch a live stream of the pipeline executing each stage. You’ll see it run tests, build the Docker image, and deploy.
Verify the Deployment:
Once the pipeline shows “SUCCESS”, open your web browser and navigate to your application’s URL: http://<APP_SERVER_EC2_PUBLIC_IP>:3000. EX http://http://98.81.84.87:3000
You should see your new message: “My CI/CD Pipeline is ALIVE! Version 2.0”
Congratulations! You have successfully built and executed a complete, end-to-end CI/CD pipeline. You can now make code changes and have them tested and deployed to the world in minutes, all without lifting a finger.
For more information about Job Notifications, Open-source Projects, DevOps and Cloud project, please stay tuned TechCareerHubs official website.