Enterprise-Grade CI/CD Pipeline for Microservices on AWS
Welcome to this Enterprise-Grade CI/CD Pipeline for Microservices on AWS comprehensive guide where we will build a production-ready CI/CD pipeline. We’ll deploy a polyglot microservices application to Amazon EKS (Kubernetes), manage our cloud infrastructure with Terraform, and orchestrate the entire workflow with GitHub Actions.
Project Architecture
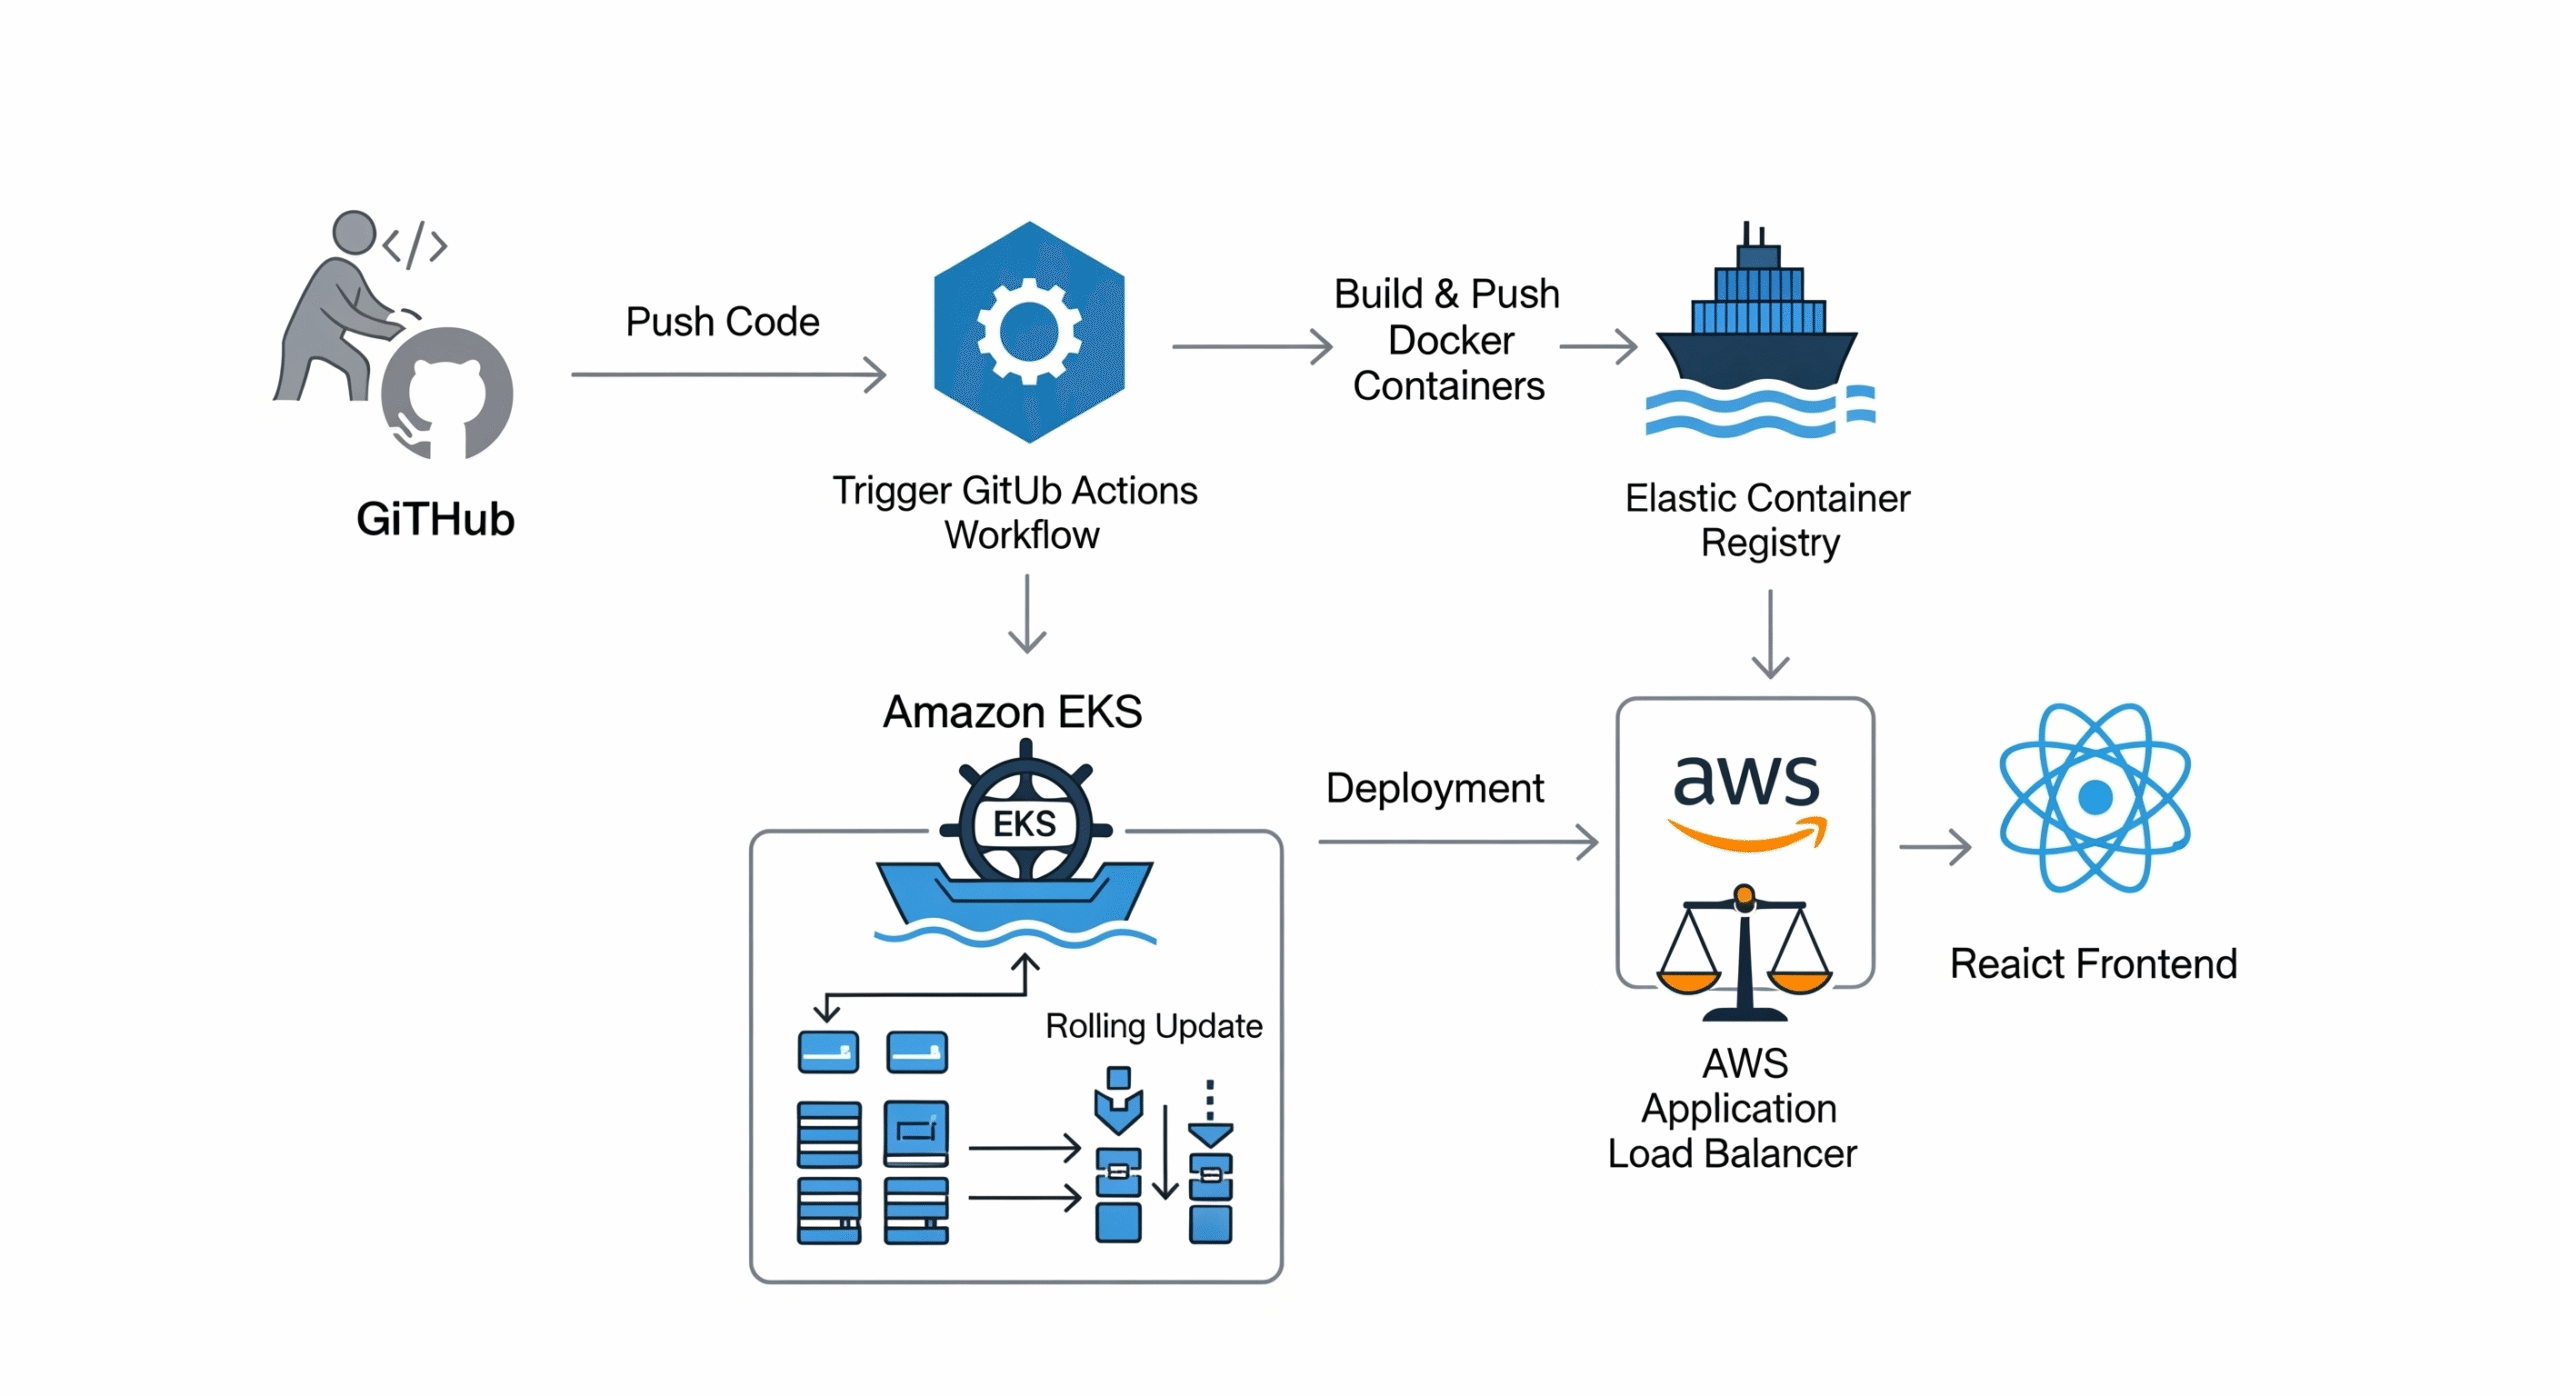
Our final architecture will look like this:
Code: Stored in a GitHub repository (monorepo structure).
Infrastructure as Code (IaC): Terraform will define and create our AWS ECR repositories and two EKS clusters (staging and production).
CI (Continuous Integration): On a pull request, GitHub Actions will lint, test, scan the code with SonarCloud, and build a Docker image for any changed microservice.
CD (Continuous Deployment): On merging to main, GitHub Actions will deploy the new image to the staging cluster, run integration tests, wait for manual approval, and finally promote the release to the production cluster.
https://github.com/Consultantsrihari/microservices-cicd-aws.git
── .github/workflows/ # GitHub Actions CI/CD pipelines
│ ├── ci-pipeline.yml
│ └── cd-pipeline.yml
├── .gitignore
├── go-processor/ # Go microservice code and Dockerfile
├── k8s/ # Kubernetes manifests with Kustomize
│ ├── base/
│ └── overlays/
├── python-backend/ # Python microservice code and Dockerfile
├── react-frontend/ # React microservice code and Dockerfile
├── terraform/ # Terraform code for all AWS infrastructure
└── README.md

Prerequisites
Before you start, ensure you have the following:
An AWS Account: With permissions to create EKS, ECR, VPCs, and IAM roles.
A GitHub Account: And a new, empty repository for this project.
Terraform: Installed on your local machine (~> 1.0).
AWS CLI: Configured with your AWS credentials.
kubectl: The Kubernetes command-line tool.
Docker Desktop: To build and test images.
SonarCloud Account: Sign up with your GitHub account. It’s free for public repositories.
Step 1: Application and Project Setup
We’ll start by creating the sample microservices and initializing our Git repository.
Create the Project Directory and Git Repo:
mkdir microservices-cicd-terraform
cd microservices-cicd-terraform
git init
# Link to your new GitHub repository
git remote add origin https://github.com/YOUR_USERNAME/YOUR_REPO.git
Create the Microservices:
Follow the exact same steps from the previous guide to create the python-backend, react-frontend, and go-processor directories and their corresponding app.py, Dockerfile, etc. This code doesn’t change.Create python-backend/ with app.py, requirements.txt, and Dockerfile.
Create react-frontend/ with npx create-react-app and add its Dockerfile.
Create go-processor/ with main.go and Dockerfile.
Commit the Application Code:
git add .
git commit -m "feat: Initial commit of microservices application"
Step 2: Infrastructure as Code with Terraform
Here, we will define all our AWS resources using Terraform. This makes our infrastructure repeatable, version-controlled, and easy to manage.
Create the Terraform Directory:
mkdir terraform cd terraformproviders.tf: Defines the AWS provider.
# terraform/providers.tf terraform { required_providers { aws = { source = "hashicorp/aws" version = "~> 4.0" } } } provider "aws" { region = var.aws_region }variables.tf: Declares input variables.
# terraform/variables.tf variable "aws_region" { description = "The AWS region to deploy resources in." type = string default = "us-east-1" } variable "project_name" { description = "The name of the project, used for tagging resources." type = string default = "microservices-demo" } variable "microservice_names" { description = "A list of microservice names to create ECR repositories for." type = list(string) default = ["python-backend", "react-frontend", "go-processor"] }main.tf: Defines the EKS clusters and ECR repositories. We use official Terraform modules for VPC and EKS, as this is a best practice that saves hundreds of lines of code and provides a robust, production-ready setup.
# terraform/main.tf # 1. VPC for our Clusters # We create one VPC to house both staging and production clusters in different subnets. module "vpc" { source = "terraform-aws-modules/vpc/aws" version = "3.19.0" name = "${var.project_name}-vpc" cidr = "10.0.0.0/16" azs = ["${var.aws_region}a", "${var.aws_region}b", "${var.aws_region}c"] private_subnets = ["10.0.1.0/24", "10.0.2.0/24", "10.0.3.0/24"] public_subnets = ["10.0.101.0/24", "10.0.102.0/24", "10.0.103.0/24"] enable_nat_gateway = true enable_vpn_gateway = false tags = { Terraform = "true" Environment = "shared" } } # 2. EKS Cluster - Staging module "eks_staging" { source = "terraform-aws-modules/eks/aws" version = "19.5.1" cluster_name = "${var.project_name}-staging-cluster" cluster_version = "1.24" vpc_id = module.vpc.vpc_id subnet_ids = module.vpc.private_subnets eks_managed_node_groups = { staging_nodes = { instance_types = ["t3.medium"] min_size = 1 max_size = 3 desired_size = 2 } } tags = { Environment = "staging" } } # 3. EKS Cluster - Production module "eks_production" { source = "terraform-aws-modules/eks/aws" version = "19.5.1" cluster_name = "${var.project_name}-production-cluster" cluster_version = "1.24" vpc_id = module.vpc.vpc_id subnet_ids = module.vpc.private_subnets # Can be same subnets for simplicity eks_managed_node_groups = { production_nodes = { instance_types = ["t3.medium"] min_size = 2 max_size = 5 desired_size = 3 } } tags = { Environment = "production" } } # 4. ECR Repositories for our Microservices resource "aws_ecr_repository" "microservice_repos" { for_each = toset(var.microservice_names) name = each.key }outputs.tf: Defines what information to display after applying.
# terraform/outputs.tf
output "staging_eks_cluster_name" {
  description = "The name of the staging EKS cluster."
  value       = module.eks_staging.cluster_name
}

output "production_eks_cluster_name" {
  description = "The name of the production EKS cluster."
  value       = module.eks_production.cluster_name
}

output "ecr_repository_urls" {
  description = "The URLs of the created ECR repositories."
  value       = { for repo in aws_ecr_repository.microservice_repos : repo.name => repo.repository_url }
}
Apply the Terraform Configuration:
# Navigate to the terraform directory
cd terraform

# Initialize Terraform (downloads providers and modules)
terraform init

# (Optional) See what Terraform will create
terraform plan

# Apply the changes to create the infrastructure
terraform apply --auto-approve
This will take 15-25 minutes as EKS cluster creation is a lengthy process. When it’s done, take note of the outputs, especially the ECR repository URLs.
Note on State Management: For a real project, you should configure a Terraform S3 Backend to securely store and share the state file among team members.
Step 3: Kubernetes Manifests with Kustomize
This part is identical to the previous guide. We’ll set up our Kubernetes deployment files.
Create the Directory Structure (at the project root):
mkdir -p k8s/base k8s/overlays/staging k8s/overlays/productionAdd k8s/base manifests (python-backend.yaml, react-frontend.yaml, kustomization.yaml). Use a placeholder for the image URI. For example, in python-backend.yaml:
# ...
containers:
- name: python-backend
  image: placeholder/python-backend:latest # This will be replaced by the pipeline
# ...
Add overlay kustomization.yaml files to k8s/overlays/staging and k8s/overlays/production to manage environment-specific configurations.
Step 4: GitHub Configuration (Secrets & Environments)
We need to give GitHub Actions the credentials and configuration it needs to interact with AWS and SonarCloud.
Add Repository Secrets:
In your GitHub repo, go to Settings > Secrets and variables > Actions and add the following:AWS_ACCESS_KEY_ID: Your AWS access key.
AWS_SECRET_ACCESS_KEY: Your AWS secret key.
AWS_REGION: The region you deployed to (e.g., us-east-1).
ECR_REGISTRY: The URL prefix for your ECR repos (e.g., <aws_account_id>.dkr.ecr.us-east-1.amazonaws.com).
SONAR_TOKEN: The token you generated from SonarCloud.
SONAR_HOST_URL: https://sonarcloud.io
Setup GitHub Environments:
Go to Settings > Environments.
Create a production environment.
Add a protection rule for Required reviewers and add yourself. This creates the crucial manual approval gate.
Step 5: The CI/CD Pipeline with GitHub Actions
Now, we define the workflows that automate our entire process. Create the .github/workflows directory at the project root.
CI Pipeline: ci-pipeline.yml (On Pull Request)
This workflow is largely the same. It identifies changed services, runs quality checks, and publishes a container image# .github/workflows/ci-pipeline.yml name: CI Pipeline on: pull_request: branches: [ main ] paths: - 'python-backend/**' - 'react-frontend/**' - 'go-processor/**' jobs: build-and-test: name: Build and Test - ${{ matrix.service }} runs-on: ubuntu-latest strategy: matrix: service: [python-backend, react-frontend, go-processor] steps: - name: Checkout code uses: actions/checkout@v3 with: fetch-depth: 0 # Needed for SonarCloud PR analysis - name: Check for changes in service directory id: changed-files uses: tj-actions/changed-files@v35 with: files: ${{ matrix.service }} # Add placeholder Lint/Test steps here if files changed - name: Run Lint & Tests if: steps.changed-files.outputs.any_changed == 'true' run: echo "Running tests for ${{ matrix.service }}..." # Add real test commands here - name: SonarCloud Scan if: steps.changed-files.outputs.any_changed == 'true' uses: SonarSource/sonarcloud-github-action@master env: GITHUB_TOKEN: ${{ secrets.GITHUB_TOKEN }} SONAR_TOKEN: ${{ secrets.SONAR_TOKEN }} with: projectBaseDir: ${{ matrix.service }} args: > -Dsonar.organization=your-sonarcloud-org -Dsonar.projectKey=your-project-key_${{ matrix.service }} - name: Configure AWS credentials if: steps.changed-files.outputs.any_changed == 'true' uses: aws-actions/configure-aws-credentials@v1 with: aws-access-key-id: ${{ secrets.AWS_ACCESS_KEY_ID }} aws-secret-access-key: ${{ secrets.AWS_SECRET_ACCESS_KEY }} aws-region: ${{ secrets.AWS_REGION }} - name: Login to Amazon ECR if: steps.changed-files.outputs.any_changed == 'true' uses: aws-actions/amazon-ecr-login@v1 - name: Build, tag, and push image to Amazon ECR if: steps.changed-files.outputs.any_changed == 'true' env: ECR_REGISTRY: ${{ secrets.ECR_REGISTRY }} IMAGE_TAG: ${{ github.sha }} run: | docker build -t $ECR_REGISTRY/${{ matrix.service }}:$IMAGE_TAG ./${{ matrix.service }} docker push $ECR_REGISTRY/${{ matrix.service }}:$IMAGE_TAGNote: Replace SonarCloud org/project keys.
CD Pipeline: cd-pipeline.yml (On Merge to main)
This workflow orchestrates the deployment across environments.# .github/workflows/cd-pipeline.yml name: CD Pipeline on: push: branches: [ main ] env: STAGING_CLUSTER_NAME: microservices-demo-staging-cluster # Use name from Terraform PROD_CLUSTER_NAME: microservices-demo-production-cluster # Use name from Terraform jobs: deploy-staging: name: Deploy to Staging runs-on: ubuntu-latest steps: - uses: actions/checkout@v3 - uses: aws-actions/configure-aws-credentials@v1 with: aws-access-key-id: ${{ secrets.AWS_ACCESS_KEY_ID }} aws-secret-access-key: ${{ secrets.AWS_SECRET_ACCESS_KEY }} aws-region: ${{ secrets.AWS_REGION }} - name: Setup Kubeconfig for Staging EKS run: aws eks update-kubeconfig --name $STAGING_CLUSTER_NAME --region ${{ secrets.AWS_REGION }} - name: Setup Kustomize uses: imranismail/setup-kustomize@v1 - name: Update Kubernetes manifests with new image tag run: | cd k8s/overlays/staging kustomize edit set image placeholder/python-backend=${{ secrets.ECR_REGISTRY }}/python-backend:${{ github.sha }} kustomize edit set image placeholder/react-frontend=${{ secrets.ECR_REGISTRY }}/react-frontend:${{ github.sha }} - name: Deploy to Staging EKS run: kustomize build k8s/overlays/staging | kubectl apply -f - integration-tests: name: Run Integration Tests runs-on: ubuntu-latest needs: deploy-staging steps: # Add steps to configure kubectl for staging cluster - name: Run simple health check run: | echo "Running placeholder integration tests..." # A real test would curl endpoints or run a test suite sleep 30 # Give services time to start echo "Tests passed!" approve-and-deploy-production: name: Deploy to Production runs-on: ubuntu-latest needs: integration-tests environment: name: production # This triggers the manual approval gate steps: - uses: actions/checkout@v3 - uses: aws-actions/configure-aws-credentials@v1 with: aws-access-key-id: ${{ secrets.AWS_ACCESS_KEY_ID }} aws-secret-access-key: ${{ secrets.AWS_SECRET_ACCESS_KEY }} aws-region: ${{ secrets.AWS_REGION }} - name: Setup Kubeconfig for Production EKS run: aws eks update-kubeconfig --name $PROD_CLUSTER_NAME --region ${{ secrets.AWS_REGION }} - name: Setup Kustomize uses: imranismail/setup-kustomize@v1 - name: Update Kubernetes manifests with new image tag run: | cd k8s/overlays/production kustomize edit set image placeholder/python-backend=${{ secrets.ECR_REGISTRY }}/python-backend:${{ github.sha }} kustomize edit set image placeholder/react-frontend=${{ secrets.ECR_REGISTRY }}/react-frontend:${{ github.sha }} - name: Deploy to Production EKS run: kustomize build k8s/overlays/production | kubectl apply -f -Key Change: We now explicitly set the cluster names (STAGING_CLUSTER_NAME, PROD_CLUSTER_NAME) which we got from our Terraform setup. Ensure the placeholder placeholder/python-backend matches what you used in your k8s/base manifests.
Step 6: The Full Workflow in Action
Commit Everything:
Commit your Terraform, Kubernetes, and GitHub Actions workflow files to your repository.git add . git commit -m "feat: Add terraform infrastructure and CI/CD pipelines" git push -u origin mainCreate a Pull Request:
Create a new branch: git checkout -b feature/update-frontend-text
Make a small change to the react-frontend code (e.g., in src/App.js).
Commit and push the branch: git add . && git commit -m “feat: Update frontend welcome text” && git push origin feature/update-frontend-text
Open a Pull Request on GitHub.
Watch the CI Pipeline:
The ci-pipeline.yml workflow will trigger.
It will only run the build, test, and scan job for the react-frontend service.
It will build a new Docker image and push it to your ECR repository, tagged with the commit hash.
Merge and Watch the CD Pipeline:
After the PR checks pass, merge it into the main branch.
The cd-pipeline.yml workflow will trigger.
Deploy to Staging: The new image is deployed to the staging EKS cluster.
Integration Tests: The placeholder tests will run against staging.
Manual Approval: The pipeline will PAUSE, waiting for an authorized user to approve the promotion to production.
Deploy to Production: Once you approve it in the GitHub UI, the final job will run and deploy the same image to your production cluster.
Step 7: Cleanup
To avoid ongoing AWS charges, destroy the infrastructure you created.
Navigate to your Terraform directory:
cd terraformRun the destroy command:
terraform destroy --auto-approveThis will delete the EKS clusters, node groups, VPC, and all associated resources. It will not delete the images in your ECR repositories, which you can remove manually via the AWS Console if desired.
Conclusion
Congratulations! You have successfully built a robust, automated, and scalable CI/CD pipeline using industry-standard tools. You’ve learned how to:
Provision Infrastructure as Code with Terraform and reusable modules.
Containerize a polyglot set of microservices with Docker.
Implement CI with linting, testing, and static analysis on every pull request.
Manage Artifacts by pushing versioned container images to ECR.
Implement CD with multi-environment deployments (staging, production), automated testing, and critical manual approval gates.
For more information about Job Notifications, Open-source Projects, DevOps and Cloud project, please stay tuned TechCareerHubs official website.