Scalable Cloud File Storage System with AWS S3
What is the project?
CloudVault is a web application designed to provide users with a secure and intuitive platform to upload, store, manage, and download their digital files. It emulates the core functionalities of popular services like Google Drive or Dropbox but is built entirely on the powerful, scalable, and cost-effective infrastructure of Amazon Web Services (AWS).
What is the use?
The primary use is to offer a personal or small-business-oriented cloud storage solution. Users can free up local device storage, access their files from any web browser, and have peace of mind knowing their data is stored durably and securely in the AWS cloud. It serves as an excellent portfolio project to demonstrate practical skills in full-stack development, cloud architecture, and security best practices.
Project Goal:
To develop a secure, reliable, and user-friendly cloud file storage application that provides robust file management capabilities and ensures user data is isolated and protected.
Key Objectives:
Functionality: Implement core file operations: upload, download, list, preview, and delete.
Security: Ensure that users can only access their own files. All data transfer must be encrypted.
Scalability: Build the system on an architecture that can handle a growing number of users and files without performance degradation.
Usability: Design a clean, intuitive, and responsive user interface that is easy to navigate.
Cost-Effectiveness: Utilize serverless technologies and best practices to minimize operational costs.
Project Architecture
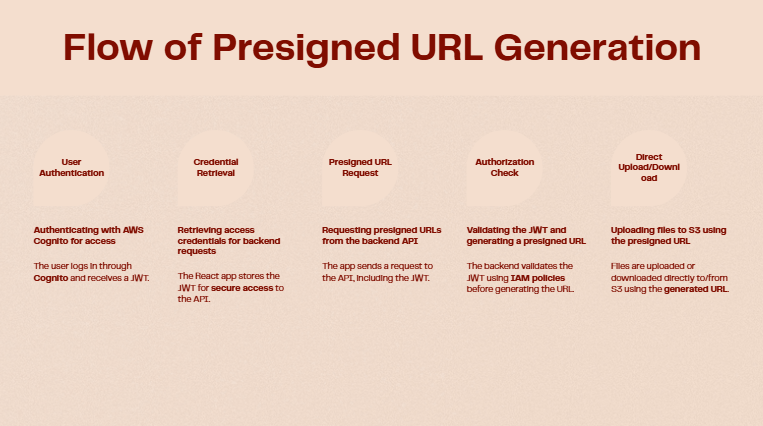
We will employ a Secure Presigned URL Architecture. This is the industry best practice as it prevents the backend server from becoming a bottleneck for file transfers. The user’s browser communicates directly and securely with AWS S3 for uploads and downloads.

Authentication: The user signs into the React app. The app communicates with AWS Cognito to authenticate the user.
Get Credentials: Cognito returns a JSON Web Token (JWT) to the React app, confirming the user’s identity.
Request URL: To upload a file, the React app sends an API request (including the JWT) to our backend, which is hosted on API Gateway and powered by an AWS Lambda function. The request says, “I am User X, and I want to upload document.pdf.”
Authorize & Generate URL: The Lambda function validates the JWT. It then asks IAM for permission and uses the AWS SDK to generate a temporary, secure presigned URL for uploading a specific file (document.pdf) to a specific location in S3 (e.g., private/user-X-id/document.pdf).
Return URL: The API returns this unique presigned URL to the React app.
Direct Upload: The React app uses the presigned URL to upload the file’s data directly to the AWS S3 bucket. The backend server is not involved in this heavy lifting.
Store File: S3 receives the data, validates the signature of the presigned URL, and stores the file. The process is identical for downloads, just with a “get” presigned URL instead of a “put”.
Technology Used:
| Type | Technology | Explanation |
| Frontend | React.js | Enables building a modern, fast, and interactive single-page application (SPA). |
| Backend | Node.js + AWS Lambda | Serverless, scalable, and cost-effective. Only runs when needed. Node.js is fast for I/O. |
| API | Amazon API Gateway | Manages API endpoints, traffic, authorization, and integrates seamlessly with Lambda. |
| Storage | Amazon S3 (Simple Storage Service) | Industry-leading object storage for durability (99.999999999%), scalability, and security. |
| Auth | Amazon Cognito | Fully managed user identity and access control service for sign-up, sign-in, and security. |
| Permissions | AWS IAM (Identity & Access Management) | Provides granular control over who can access which AWS resources. Crucial for security. |
| Hosting | AWS Amplify Hosting | Provides a git-based CI/CD workflow for deploying and hosting the frontend application globally. |
The Complete project GitHub Repo: Scalable-Cloud-File-Storage-System-with-AWS-S3
Phase 1: AWS Infrastructure Setup (The Groundwork)
This phase is done entirely within the AWS Management Console. The goal is to create the foundational cloud resources our application will use.
1. Create S3 Bucket
Action: Go to the AWS S3 console.
Steps:
Click Create bucket.
Bucket name: Enter a globally unique name (e.g., cloudvault-user-files- followed by your initials and date, like cloudvault-user-files-jd-20231027).
AWS Region: Select a region (e.g., us-east-1). Note this region for later.
Under Block Public Access settings for this bucket, ensure all four boxes are checked. This is the secure default.
Click Create bucket.
2. Configure S3 CORS (Cross-Origin Resource Sharing)
Action: Allow your future web app to talk to the S3 bucket.
Steps:
Click on the bucket name you just created.
Go to the Permissions tab.
Scroll down to CORS (Cross-origin resource sharing) and click Edit.
Paste the following JSON. This allows your local development server to make requests.
Generated json
[
    {
        "AllowedHeaders": ["*"],
        "AllowedMethods": ["GET", "PUT", "DELETE"],
        "AllowedOrigins": ["http://localhost:3000"],
        "ExposeHeaders": []
    }
]
Click Save changes. (Note: You will add your production URL here in Phase 5.)
3. Set up Cognito User Pool
Action: Create the service that will manage user accounts (sign-up/sign-in).
Steps:
Go to the AWS Cognito console and click Create user pool.
Step 1: Configure sign-in experience
Under Cognito user pool sign-in options, select Email.
Click Next.
Step 2: Configure security requirements
Leave password policy and MFA as defaults for now. Set MFA to No MFA to keep it simple.
Click Next.
Step 3: Configure sign-up experience
Leave self-service sign-up enabled.
Click Next.
Step 4: Configure message delivery
Choose Send email with Cognito. This is fine for development (it has a daily sending limit).
Click Next.
Step 5: Integrate your app
User pool name: CloudVaultUsers.
Under App client name, enter cloudvault-frontend-client.
IMPORTANT: Uncheck Generate client secret. A public web app cannot securely store a secret.
Click Next.
Step 6: Review and create
Review your settings and click Create user pool.
Record Details: Once created, find and note the User pool ID and the App client ID. You will need these for your frontend and backend.
4. Create IAM Policy & Role for Lambda
Action: Give your backend code permission to interact with S3 on behalf of the logged-in user.
Steps:
Go to the AWS IAM console.
Navigate to Policies on the left menu and click Create policy.
Select the JSON tab and paste the following policy. Replace <your-bucket-name> with your actual S3 bucket name.
Generated json
{
    "Version": "2012-10-17",
    "Statement": [
        {
            "Effect": "Allow",
            "Action": [
                "s3:GetObject",
                "s3:PutObject",
                "s3:DeleteObject"
            ],
            "Resource": "arn:aws:s3:::<your-bucket-name>/private/${cognito-identity.amazonaws.com:sub}/*"
        },
        {
            "Effect": "Allow",
            "Action": "s3:ListBucket",
            "Resource": "arn:aws:s3:::<venkatasrihari-bucket-1992035>",
            "Condition": {
                "StringLike": {
                    "s3:prefix": "private/${cognito-identity.amazonaws.com:sub}/*"
                }
            }
        }
    ]
}
This is the most critical security step. /${cognito-identity.amazonaws.com:sub} is a variable that IAM automatically replaces with the unique ID of the logged-in user. This policy ensures a user can only access files inside their own personal folder within the S3 bucket.
Click Next: Tags, then Next: Review.
Name: CloudVaultLambdaS3AccessPolicy.
Click Create policy.
Now, navigate to Roles on the left menu and click Create role.
Trusted entity type: Select AWS service.
Use case: Select Lambda. Click Next.
Add permissions: Search for and check the CloudVaultLambdaS3AccessPolicy you just created. Also, search for and check the AWS-managed policy named AWSLambdaBasicExecutionRole (this allows writing logs to CloudWatch).
Click Next.
Role name: CloudVaultLambdaExecutionRole.
Click Create role.
Phase 2: Backend Development (API & Logic)
We’ll use the Serverless Framework for this, as it greatly simplifies deploying Lambda and API Gateway.
1. Initialize Serverless Project
# Install Serverless Framework globally
npm install -g serverless

# Create a new project from a template
sls create --template aws-nodejs --path cloudvault-backend
cd cloudvault-backend
npm init -y
npm install aws-sdk
2. Configure serverless.yml
Action: This file is the blueprint for your entire backend. Replace the contents of serverless.yml with this:
service: cloudvault-backend
frameworkVersion: '3'

provider:
  name: aws
  runtime: nodejs18.x
  region: us-east-1 # Change to your region
  # Link the IAM Role created in Phase 1
  iam:
    role: arn:aws:iam::<313406038962>:role/CloudVaultLambdaExecutionRole # ❗️ Replace with your role ARN

functions:
  listFiles:
    handler: handler.listFiles
    events:
      - http:
          path: files
          method: get
          cors: true
          authorizer: # Protect this endpoint
            name: cognitoAuthorizer
            arn: arn:aws:cognito-idp:<us-east-1>:<313406038962>:userpool/<us-east-1_3134AzvJs> # ❗️ Replace with your Cognito ARN

  getUploadUrl:
    handler: handler.getUploadUrl
    events:
      - http:
          path: upload-url
          method: get
          cors: true
          authorizer: # Protect this endpoint
            name: cognitoAuthorizer
            arn: arn:aws:cognito-idp:<us-east-1>:<313406038962>:userpool/<us-east-1_3134AzvJs> # ❗️ Replace with your Cognito ARN


  getDownloadUrl:
    handler: handler.getDownloadUrl
    events:
      - http:
          path: download-url/{key} # Use path parameter
          method: get
          cors: true
          authorizer: # Protect this endpoint
            name: cognitoAuthorizer
            arn: arn:aws:cognito-idp:<us-east-1>:<313406038962>:userpool/<us-east-1_3134AzvJs> # ❗️ Replace with your Cognito ARN


  deleteFile:
    handler: handler.deleteFile
    events:
      - http:
          path: files/{key} # Use path parameter
          method: delete
          cors: true
          authorizer: # Protect this endpoint
            name: cognitoAuthorizer
            arn: arn:aws:cognito-idp:<us-east-1>:<313406038962>:userpool/<us-east-1_3134AzvJs> # ❗️ Replace with your Cognito ARN


# Define the authorizer once
resources:
  Resources:
    cognitoAuthorizer:
      Type: AWS::ApiGateway::Authorizer
      Properties:
        Name: cognito-authorizer
        Type: COGNITO_USER_POOLS
        IdentitySource: method.request.header.Authorization
        RestApiId:
          Ref: ApiGatewayRestApi
        ProviderARNs:
          - arn: arn:aws:cognito-idp:<us-east-1>:<313406038962>:userpool/<us-east-1_3134AzvJs> # ❗️ Replace with your Cognito ARN
❗️ IMPORTANT: Find and replace all placeholders like <Your-AWS-Account-ID>, <Your-Cognito-User-Pool-ID>, etc., with your actual values from Phase 1.
3. Develop Lambda Functions in handler.js
Action: Write the Node.js code that runs when your API is called. Replace the contents of handler.js.
const AWS = require('aws-sdk');
const s3 = new AWS.S3({ signatureVersion: 'v4', region: 'us-east-1' }); // Change to your region
const BUCKET_NAME = 'venkatasrihari-bucket-1992035'; // ❗️ Replace with your bucket name

// Helper to create a standard response
const createResponse = (statusCode, body) => ({
    statusCode,
    headers: {
        'Access-Control-Allow-Origin': '*', // Required for CORS
        'Access-Control-Allow-Credentials': true,
    },
    body: JSON.stringify(body),
});

// Helper to get the user's unique ID
const getUserId = (event) => event.requestContext.authorizer.claims.sub;

module.exports.listFiles = async (event) => {
    try {
        const userId = getUserId(event);
        const params = {
            Bucket: BUCKET_NAME,
            Prefix: `private/${userId}/`,
        };
        const data = await s3.listObjectsV2(params).promise();
        const files = data.Contents.map(file => ({
            key: file.Key.split('/').pop(), // Show only the filename
            lastModified: file.LastModified,
            size: file.Size,
        }));
        return createResponse(200, files);
    } catch (error) {
        return createResponse(500, { error: error.message });
    }
};

module.exports.getUploadUrl = async (event) => {
    try {
        const userId = getUserId(event);
        const { fileName, fileType } = event.queryStringParameters;
        const key = `private/${userId}/${fileName}`;

        const params = {
            Bucket: BUCKET_NAME,
            Key: key,
            Expires: 60, // 1 minute
            ContentType: fileType,
        };
        const uploadUrl = await s3.getSignedUrlPromise('putObject', params);
        return createResponse(200, { uploadUrl });
    } catch (error) {
        return createResponse(500, { error: error.message });
    }
};

module.exports.getDownloadUrl = async (event) => {
    try {
        const userId = getUserId(event);
        const { key } = event.pathParameters;
        const s3Key = `private/${userId}/${key}`;

        const params = {
            Bucket: BUCKET_NAME,
            Key: s3Key,
            Expires: 60,
        };
        const downloadUrl = await s3.getSignedUrlPromise('getObject', params);
        return createResponse(200, { downloadUrl });
    } catch (error) {
        return createResponse(500, { error: error.message });
    }
};


module.exports.deleteFile = async (event) => {
    try {
        const userId = getUserId(event);
        const { key } = event.pathParameters;
        const s3Key = `private/${userId}/${key}`;

        const params = {
            Bucket: BUCKET_NAME,
            Key: s3Key,
        };
        await s3.deleteObject(params).promise();
        return createResponse(200, { message: `File ${key} deleted.` });
    } catch (error) {
        return createResponse(500, { error: error.message });
    }
};
Phase 3: Frontend Development (User Interface)
1. Setup React Project & Install Dependencies
npx create-react-app cloudvault-frontend
cd cloudvault-frontend
npm install aws-amplify @aws-amplify/ui-react axios
2. Configure AWS Amplify
Action: Connect your React app to your AWS backend services (Cognito).
Steps:
Install the Amplify CLI: npm install -g @aws-amplify/cli
Configure the CLI with your AWS account: amplify configure (This will walk you through signing in).
In your project root (cloudvault-frontend), run: amplify init
Accept the defaults, but when asked about authentication, choose “AWS profile” and select the profile you just configured.
Now, import your existing Cognito User Pool: amplify import auth
Select “Cognito User Pool only” and answer the prompts using the User Pool ID from Phase 1.
Amplify will create a file src/aws-exports.js. This file securely configures your frontend.
3. Implement UI & Logic
Action: Write the React code.
In src/index.js: Configure Amplify globally.
import React from 'react';
import ReactDOM from 'react-dom/client';
import App from './App';
import { Amplify } from 'aws-amplify';
import awsExports from './aws-exports';
Amplify.configure(awsExports);

const root = ReactDOM.createRoot(document.getElementById('root'));
root.render(<React.StrictMode><App /></React.StrictMode>);
In src/App.js: Replace the contents with your main application component.
import React from 'react';
import { withAuthenticator } from '@aws-amplify/ui-react';
import '@aws-amplify/ui-react/styles.css';
// Import your file management component
import FileManager from './FileManager';

function App({ signOut, user }) {
  return (
    <div>
      <header style={{ display: 'flex', justifyContent: 'space-between', padding: '1rem', background: '#232f3e', color: 'white' }}>
        <h1>CloudVault</h1>
        <div>
          <span>Hello, {user.attributes.email}</span>
          <button onClick={signOut} style={{ marginLeft: '1rem' }}>Sign Out</button>
        </div>
      </header>
      <main>
        <FileManager />
      </main>
    </div>
  );
}

// withAuthenticator automatically wraps your app in a login/signup flow
export default withAuthenticator(App);
Create src/FileManager.js: This component will handle all file logic.
import React, { useState, useEffect } from 'react';
import { API } from 'aws-amplify';
import axios from 'axios';

const API_NAME = 'ApiGatewayRestApi'; // This is the default name from serverless.yml resources

function FileManager() {
    // ... (The full React component code from the first response goes here)
    // You'll need to adapt the API calls to use the Amplify API library
    // For example:
    // const response = await API.get(API_NAME, '/files', {});
    // const { uploadUrl } = await API.get(API_NAME, '/upload-url', { queryStringParameters: { ... } });
    // await API.del(API_NAME, `/files/${key}`, {});

    // For the upload itself, you still use axios with the presigned URL
    // await axios.put(presignedUrl, file, { headers: { 'Content-Type': file.type } });

    return (
        <div>
            {/* Your UI for uploading and listing files */}
        </div>
    )
}
export default FileManager;
Implementation Note: You would paste the detailed React code from the initial detailed answer into FileManager.js and adapt the axios calls to use Amplify.API as shown in the comments above. This ensures requests are automatically signed with the user’s auth token.
Phase 4: Integration, Testing & Refinement
1. End-to-End Testing Checklist:
Run the backend (sls offline start) and frontend (npm start) locally.
Can a new user register an account?
Can a registered user sign in?
After signing in, does the file list appear empty?
Can the user select and upload a file?
Does the uploaded file appear in the list with correct metadata?
Check the S3 console. Is the file located under private/<user-id>/filename.ext?
Can the user download the file?
Can the user delete the file?
Register a second user. Can they see the first user’s files? (They should not be able to).
Can the second user upload their own file without affecting the first?
2. Error Handling:
Frontend: Wrap API calls in try…catch blocks. Use a state variable like const [error, setError] = useState(null) to display user-friendly error messages in the UI.
Backend: Ensure all Lambda functions have top-level try…catch blocks that return a 500 status code on failure. Use console.error(error) to log detailed errors to CloudWatch.
3. UI/UX Refinement:
Add a loading spinner that appears while the file list is fetching or a file is uploading.
Disable the “Upload” button while an upload is in progress.
Show toast notifications (e.g., using a library like react-toastify) for success (“File uploaded!”) and failure (“Upload failed.”).
Phase 5: Deployment & Go-Live
1. Deploy Backend
Action: Push your serverless API to the AWS cloud.
Command: In your cloudvault-backend directory, run:
sls deployOutput: The Serverless Framework will output the API endpoint URL. Copy this URL.
2. Deploy Frontend
Action: Use AWS Amplify to host your React application.
Steps:
In your cloudvault-frontend directory, run: amplify add hosting
Choose Hosting with Amplify Console (Managed hosting with custom domains, CI/CD).
Choose Continuous deployment (Git-based deployments).
Amplify will open a browser window. Connect to your Git provider (GitHub, etc.) and select your cloudvault-frontend repository and branch.
Amplify will detect it’s a React app and configure the build settings. Click Next, then Save and deploy.
Configure Production Environment Variables:
In the Amplify Console, go to App settings -> Environment variables.
Click Manage variables. Add a new variable:
Variable: REACT_APP_API_URL
Value: Paste the API endpoint URL from your backend deployment.
Your React code must be updated to use this: const API_URL = process.env.REACT_APP_API_URL;
Update the S3 CORS policy (from Phase 1) to include your new Amplify production URL (e.g., https://main.d12345.amplifyapp.com).
Phase 6: Post-Launch, Maintenance & Iteration
Monitoring & Logging:
Action: Regularly check your application’s health.
Where: Go to the AWS CloudWatch console.
What to check:
Log Groups: Look for log groups named after your Lambda functions (e.g., /aws/lambda/cloudvault-backend-dev-listFiles). Here you can see console.log statements and any errors.
Metrics: View metrics for API Gateway (latency, 4XX errors, 5XX errors) and Lambda (invocations, errors, duration). Set up CloudWatch Alarms to notify you via email if the error rate for a Lambda function spikes.
CI/CD (Continuous Integration/Continuous Deployment):
Action: Your deployment is already automated. Now, whenever you git push a change to your main branch, Amplify will automatically rebuild and redeploy the frontend. Whenever you change backend code, you just need to run sls deploy again.
Backup & Recovery:
Action: Protect against accidental data loss.
How: Go to your S3 bucket -> Properties tab -> Bucket Versioning -> Edit -> Enable.
Result: Now, when a user deletes or overwrites a file, S3 keeps the old version. You can recover it if needed.
Feature Iteration (Roadmap):
Folders: Allow users to create, rename, and delete folders within their private space.
Sharing: Implement logic to allow a user to generate a unique, time-limited read-only link to one of their files that they can share with others.
Search: Implement a search bar that filters the file list on the frontend. For a more advanced version, use a Lambda trigger on S3 uploads to index file metadata in a service like Amazon OpenSearch.
Storage Quotas: Track each user’s total storage usage (e.g., in a DynamoDB table) and display it in the UI, eventually enforcing limits.
For more information about Job Notifications, Open-source Projects, DevOps and Cloud project, please stay tuned TechCareerHubs official website.