The Complete DevOps Guide to Git & GitHub: From Basics to Advanced Workflows & AWS Integration
The Complete DevOps Guide to Git & GitHub: Git and GitHub are fundamental pillars of modern software development and DevOps practices. They provide the version control backbone, collaboration platform, and automation triggers necessary for building, testing, and deploying software efficiently and reliably. This guide covers everything a DevOps engineer needs to know, from foundational concepts to advanced techniques and cloud integration with AWS.
Part 1: Basic Git Concepts – A DevOps Engineer’s Strong Foundation
♦ What is Git?
Imagine you’re building a massive skyscraper with a team of architects and engineers. Every small change matters — you can’t afford chaos. Git acts like a time machine and a collaboration manager for your project’s source code (and configuration files, scripts, infrastructure definitions, etc.).
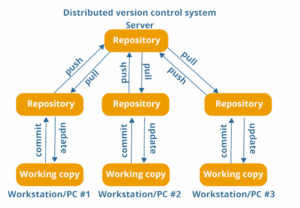
A. Git is a distributed version control system (DVCS).
Version Control: It tracks every change made to files over time, allowing you to recall specific versions later.
Distributed: Every developer has a full copy of the project history on their local machine. This means you can work offline, commit changes locally, and it provides inherent backup.
♦ Why Do We Use It in DevOps?
In DevOps, speed and stability are non-negotiable. Git is essential because it enables:
Parallel Development: Teams can work on different features or fixes simultaneously using branches without interfering with each other.
Traceability: Every change is linked to an author, timestamp, and commit message, providing a clear audit trail. Essential for debugging and compliance.
Experimentation: Developers can create branches to try out new ideas without risking the stability of the main codebase.
Rollback Capability: If a change introduces bugs or issues, Git makes it easy to revert to a previous stable state.
Collaboration: Facilitates merging code from multiple contributors seamlessly.
CI/CD Foundation: Git repositories are the trigger source for most Continuous Integration (CI) and Continuous Deployment (CD) pipelines. Pushing code can automatically kick off builds, tests, and deployments.
Without Git, coordinating software development, infrastructure code, and configurations would feel like juggling with fire — one wrong move, and you risk burning down months of work!
♦ Git vs GitHub: Understanding the Difference
A common confusion for beginners: Git and GitHub are not the same thing.
Git: The tool you install and use locally on your machine. It’s the engine that tracks changes, manages branches, and handles versioning. It operates on your file system in a hidden .git directory.
GitHub (and GitLab, Bitbucket, AWS CodeCommit): A service or platform that hosts your Git repositories online (in the cloud). It provides a central place for collaboration, backup, code reviews, issue tracking, project management, and automation triggers (like webhooks).
Think of Git as your personal diary where you write daily notes about your project’s changes. Think of GitHub as a secure, shared library where you can publish your diary (repository) so others can read it, collaborate, review contributions, or even make copies (forks).
In DevOps, using a remote hosting service like GitHub is crucial because it enables:
Centralized collaboration and code sharing.
Backup of the codebase off your local machine.
Facilitation of Pull Requests and Code Reviews.
Integration point for CI/CD pipelines (e.g., GitHub Actions, AWS CodePipeline).
Access control and permission management.
♦ Install Git and Basic Configuration
Setting up Git is like moving into a new house — a little setup makes everything smoother later.
Install Git:
Windows: Download the installer from git-scm.com and follow the installation wizard.
Mac: Often pre-installed. If not, use Homebrew: brew install git or install Xcode Command Line Tools.
Linux (Debian/Ubuntu): sudo apt update && sudo apt install git
Linux (Fedora/CentOS): sudo dnf install git or sudo yum install git
Basic Configuration (Run once per machine):
git config --global user.name "Your Name"
git config --global user.email "your.email@example.com"
These commands embed your identity into every commit you make. This is vital for tracking who changed what and when.
–global: Applies this configuration to all repositories on your system for the current user. You can omit –global to set config specific to a single repository.
Verify your settings: git config –list
You can also configure other settings like your default text editor (core.editor) or merge tool later.
♦ Git Life Cycle: The Journey of Your Code
Understanding Git’s internal states is key to using it effectively:
Working Directory: This is your project folder containing all the files you are currently working on. Any modifications you make happen here first. Files can be:
Tracked: Files that Git knows about and were in the last snapshot. They can be unmodified, modified, or staged.
Untracked: New files in your working directory that Git hasn’t seen before (not part of the last snapshot and not staged).
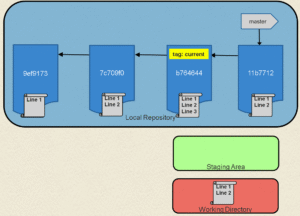
Staging Area (Index): This is an intermediate area where you prepare (or “stage”) the specific changes you want to include in your next commit. It acts like a draft space for your next snapshot. It allows you to selectively commit only parts of the changes you’ve made.
Repository (.git directory): This is where Git permanently stores the history of your project as a series of snapshots (commits). Each commit is a complete snapshot of your project at a point in time, along with metadata (author, date, message, parent commit(s)). This .git folder is hidden within your project directory.
♦ The Typical Workflow:
Modify: Make changes to files in your Working Directory.
Stage: Selectively add the changes you want to save to the Staging Area (git add).
Commit: Record the staged changes as a permanent snapshot in the Repository (git commit).
(Optional but common) Push: Send your committed changes from your local repository to a remote repository (like GitHub) (git push).
This clear separation prevents mistakes — you carefully choose what goes into each commit, avoiding accidentally saving unfinished work or unrelated changes together.
♦ How to Initialize a Git Repository
To start tracking a new or existing project with Git:
Navigate to your project directory in the terminal.
Run:
git init
This command creates the hidden .git sub-directory. From this moment, Git starts watching your project folder.
Check the Status of Files
To see the current state of your working directory and staging area:
git statusThis command tells you:
Which branch you are currently on.
Which files have been modified since the last commit.
Which files are staged (ready to be committed).
Which files are untracked (new files Git doesn’t know about).
Run git status frequently! It’s your dashboard for understanding what Git sees.
Adding Changes to Staging Area
To move changes from the Working Directory to the Staging Area:
# Stage a specific file
git add <filename>

# Stage multiple specific files
git add <file1> <file2>

# Stage all changes (new, modified, deleted) in the current directory and subdirectories
git add .

# Stage all changes across the entire project (from the root)
git add -A
Think of git add as selecting items you want to put into your next “save point” (commit).
Committing Changes with a Message
Once you’ve staged the changes you want to record, create a permanent snapshot (commit):
git commit -m "A meaningful commit message"
-m: Allows you to provide the commit message inline. Without -m, Git will open your configured text editor for you to write a longer message.
Commit Message Best Practices:
Be clear and concise.
Use the imperative mood (e.g., “Fix bug”, “Add feature” not “Fixed bug”, “Added feature”).
Explain what the change does and why it was made, not just how.
Reference issue numbers if applicable (e.g., “Fix login bug related to #123”).
♦ Checking Commit History
To view the history of commits:
# Show full commit history with details (hash, author, date, message)
git log

# Show a condensed, one-line summary of each commit
git log --oneline

# Show history with a visual graph of branches and merges
git log --graph --oneline --all

# Show history for a specific file
git log <filename>

# Show history since a specific date
git log --since="2 weeks ago"
→Viewing Differences Between Versions
Before staging or committing, see exactly what has changed:
# View changes in the Working Directory (not yet staged)
git diff

# View changes that are staged but not yet committed
git diff --staged
# or
git diff --cached

# View changes between two commits
git diff <commit_hash_1> <commit_hash_2>

# View changes introduced by a specific commit
git show <commit_hash>
This helps catch errors or unintended changes before they become part of the history.
♦ Undo Changes (Restore & Reset)
Mistakes happen. Git provides ways to undo changes at different stages:
Discard changes in the Working Directory: Restore a file to how it was in the last commit (or how it is in the staging area if staged).
# Discard changes to a specific file in the working directory
git restore <filename>
Think: “I don’t want these edits at all, revert to the last saved state.”
Unstage a file: Move a file from the Staging Area back to the Working Directory (keeps your modifications, just removes it from being part of the next commit).
# Unstage a specific file
git reset HEAD <filename>
# HEAD refers to the last commit on the current branch

# Unstage all staged files
git reset HEAD
Think: “Oops! I added this file to the ‘commit box’ too early, let me take it out but keep the changes I made.”
Amend the last commit: If you forgot to add a file or made a typo in the last commit message (and haven’t pushed it yet):
# Stage any additional changes (if needed)
git add <forgotten_file>

# Amend the last commit (opens editor to change message, includes newly staged files)
git commit --amend

# Amend the last commit without changing the message
git commit --amend --no-edit
Caution: Avoid amending commits that have already been pushed to a shared remote, as it rewrites history.
Part 2: Intermediate Git Concepts – Taking Control of Collaboration & Code Flow
Cloning a Repository – git clone <repo_url>
When you want to work on an existing project hosted remotely (e.g., on GitHub), you need to create a local copy.
git clone <repository_url>
# Example:
git clone https://github.com/your-org/your-project.git
This command:
Downloads the entire repository history and files into a new directory named after the project.
Automatically sets up a connection named origin pointing back to the original remote URL.
Checks out the default branch (usually main or master) into your working directory.
It’s like photocopying an entire book, including all its past revisions, so you can read and contribute locally.
Remote Repositories – Connecting Local and Cloud
A “remote” is simply a bookmark or alias for the URL of a repository hosted elsewhere.
View existing remotes:
git remote -v(Shows fetch and push URLs for each remote, usually origin).
Add a new remote: If you initialized a project locally (git init) and now want to connect it to a newly created repository on GitHub:
# Add a remote named 'origin' pointing to the GitHub repo URL
git remote add origin https://github.com/your-username/your-new-repo.git
origin is the conventional name for the primary remote repository, but you can name it anything.
Remove a remote:
git remote remove <remote_name>Rename a remote:
git remote rename <old_name> <new_name>
Push, Pull, and Fetch: Talking to Remotes
These commands manage the flow of commits between your local repository and remote repositories.
Push (git push): Send your local commits to the remote.
# Push commits from your local 'main' branch to the 'main' branch on 'origin'
git push origin main

# If your local branch has the same name as the remote branch you want to push to:
git push origin <branch_name>

# Push a new local branch to the remote for the first time and set up tracking
git push -u origin <new_branch_name>
# '-u' sets the upstream link, so future 'git push' and 'git pull' from this branch know where to go.
You’re saying: “Hey origin (e.g., GitHub), take my new commits from my local main branch and add them to your main branch.”
Fetch (git fetch): Download changes from the remote without merging.
# Fetch all changes from the 'origin' remote for all branches
git fetch origin

# Fetch changes only for a specific branch
git fetch origin main
git fetch updates your local “remote-tracking branches” (like origin/main). It doesn’t touch your actual working directory or local branches (main). It’s like downloading new emails without opening them – you can see what’s new (git log origin/main) before deciding to integrate.
Pull (git pull): Fetch changes from the remote AND merge them into your current local branch.
# Fetch changes from the 'origin' remote's 'main' branch and merge them into your currently checked-out local branch
git pull origin main
git pull is essentially a shortcut for git fetch followed by git merge origin/<current_branch_name>. It updates your local code immediately. Use it when you want to sync up with the latest changes from the team and integrate them right away.
git pull vs. git fetch + git merge
git pull: Convenient, one-step sync. Downloads and immediately tries to merge. Can lead to unexpected merge conflicts if you have local changes.
git fetch + git merge: Safer, two-step process. Fetch first downloads changes, allowing you to inspect them (git log main..origin/main) or compare (git diff main origin/main). Then, you explicitly merge (git merge origin/main) when ready. This gives more control and visibility, often preferred in complex workflows.
Branching – Work in Isolation Without Breaking the Main Line
Branches are independent lines of development. Think of them as parallel universes for your code. They allow you to work on new features, bug fixes, or experiments without affecting the main codebase (e.g., main or develop).
List branches:
# List local branches (* indicates current branch)
git branch

# List remote-tracking branches
git branch -r

# List all local and remote branches
git branch -a
Create a new branch:
# Create a new branch named 'feature-xyz' based on your current commit
git branch feature-xyz
This only creates the branch pointer; it doesn’t switch to it
Switch between branches (Checkout):
# Switch to the 'feature-xyz' branch
git checkout feature-xyz

# Switch back to the 'main' branch
git checkout main
This updates your Working Directory to match the state of the checked-out branch.
Create and switch in one command:
# Create a new branch 'feature-abc' and immediately switch to it
git checkout -b feature-abc
This is the most common way to start working on something new.
Merging – Bringing Ideas Back Together
Once work on a branch is complete and tested, you merge its changes back into another branch (e.g., merging feature-abc into develop or main).
Switch to the branch you want to merge into (the target branch):
git checkout mainRun the merge command, specifying the branch to merge from:
# Merge changes from 'feature-xyz' into the current branch ('main')
git merge feature-xyz
Git attempts to automatically combine the changes.
Fast-forward merge: If the target branch (main) hasn’t diverged since the feature branch was created, Git simply moves the main pointer forward to match the feature branch’s latest commit. Clean and simple history.
Three-way merge: If both branches have new commits since they diverged, Git finds a common ancestor commit and creates a new “merge commit” that combines the changes from both branches. This merge commit has two parents.
Visualizing the Branch Graph
To understand how branches have diverged and merged:
git log --oneline --graph --all --decorateThis provides a text-based visual representation of your commit history and branches.
Resolving Merge Conflicts
Conflicts occur when Git cannot automatically merge changes because both branches modified the same lines in the same file, or one branch deleted a file that the other modified. Git will stop the merge and mark the conflicting files.
Identify conflicting files: git status will show “Unmerged paths”.
Open the conflicted file(s): Look for conflict markers:
<<<<<<< HEAD
// Code changes from your current branch (e.g., main)
System.out.println("Hello World");
=======
// Code changes from the branch being merged (e.g., feature-abc)
System.out.println("Hello Universe");
>>>>>>> feature-abc
Edit the file: Manually resolve the conflict. Decide which changes to keep (yours, theirs, or a combination), and remove the conflict markers (<<<<<<<, =======, >>>>>>>).
Stage the resolved file:
git add <resolved_filename>Commit the merge: Once all conflicts are resolved and staged, complete the merge commit:
git commit -m "Merge branch 'feature-abc' into main (resolved conflicts)"
# Git often provides a default merge commit message.
DevOps Context: Merge conflicts are common, especially when multiple teams contribute to shared codebases (like infrastructure code or shared libraries). Communication, clear branching strategies, and frequent integration help minimize them.
Deleting Branches
Once a feature branch has been successfully merged and is no longer needed, clean it up:
Delete a local branch:
# Delete the branch only if it has been fully merged
git branch -d feature-abc

# Force delete the branch, even if unmerged (use with caution!)
git branch -D feature-abc
Delete a remote branch:
# Tell the 'origin' remote to delete the 'feature-abc' branch
git push origin --delete feature-abc
# or the older syntax:
git push origin :feature-abc
Keeping the repository tidy by removing merged branches is good practice, especially for CI/CD systems that might monitor many branches.
Part 3: Important Utility Git Commands for DevOps
These commands provide powerful ways to manage your workflow, history, and working state.
git stash – Temporarily save uncommitted changes.
Syntax: git stash push -m “Optional stash message” (or just git stash)
Purpose: You’re working on feature A, but an urgent production bug needs fixing now. You have uncommitted changes you don’t want to commit yet. git stash saves your modified tracked files and staged changes onto a stack and cleans your working directory (reverts to the HEAD commit).
Example:
# Working on feature A, have changes...
git stash push -m "WIP on feature A"
# Now your working dir is clean. Switch branches, fix the bug, commit, push.
git checkout feature-a-branch
# Ready to resume work on feature A? Apply the stash.
git stash pop – Apply the most recent stash and remove it from the stash list.
Syntax: git stash pop
Purpose: Restores the changes saved by the last git stash command back into your working directory.
Example: (Continuing from above) git stash pop brings back the work-in-progress changes for feature A.
Note: git stash apply applies the stash but keeps it in the stash list. git stash list shows all stashes. git stash drop <stash_id> removes a specific stash.
git rebase – Reapply commits on top of another base tip.
Syntax: git rebase <base_branch> (e.g., git rebase main)
Purpose: Often used to maintain a cleaner, linear project history. When on a feature branch, git rebase main takes your feature branch commits, temporarily removes them, updates your branch with the latest commits from main, and then reapplies your commits one by one on top of the updated main.
Workflow:
git checkout feature-branch
git fetch origin # Get latest remote changes
git rebase origin/main # Rebase your commits onto the latest main
# Resolve any conflicts that arise during reapplication
# Once clean:
git push origin feature-branch --force-with-lease # Force push needed as history was rewritten
Benefit: Avoids “merge bubble” commits, making git log cleaner.
Caution: Never rebase commits that have already been pushed and shared with others, as it rewrites history, causing major problems for collaborators. Use it primarily on your local, unshared branches before merging.
git cherry-pick – Apply a specific commit from another branch.
Syntax: git cherry-pick <commit_hash>
Purpose: You made a critical bug fix commit on a feature branch, but you need only that specific fix in main or release branch now, without merging the entire feature branch.
Example:
git checkout main
git cherry-pick a1b2c3d4 # Hash of the bug fix commit from the feature branch
It duplicates the changes introduced by that commit into a new commit on your current branch.
git tag – Mark specific points in history (e.g., releases).
Syntax:
Lightweight tag: git tag <tag_name> (e.g., git tag v1.0.0) – Just a pointer.
Annotated tag (recommended): git tag -a <tag_name> -m “Tag message” (e.g., git tag -a v1.0.0 -m “Release version 1.0.0”) – Creates a full tag object with metadata (tagger, date, message).
Purpose: Create meaningful names for specific commits, typically used for software releases (v1.0, v2.1-beta). Makes it easy to check out or refer to release versions.
Pushing tags: Tags are not pushed by default.
# Push a specific tag
git push origin v1.0.0
# Push all local tags
git push origin --tags
git clean – Remove untracked files from the working directory.
Syntax:
Dry run (see what would be removed): git clean -n
Remove untracked files: git clean -f
Remove untracked files and directories: git clean -fd
Purpose: Clean up build artifacts, logs, or other generated files that are not part of the repository and clutter your git status.
Caution: This command permanently deletes files. Use the dry run (-n) first! Ensure your .gitignore file is correctly configured to prevent accidental tracking of build outputs.
git revert – Create a new commit that undoes the changes of a previous commit.
Syntax: git revert <commit_hash>
Purpose: Safely undo a problematic commit that has already been pushed to a shared remote. Unlike git reset, revert doesn’t rewrite history. It creates a new commit whose changes are the exact opposite of the specified commit.
Example: Commit a1b2c3d introduced a bug in production.
git checkout main
git pull # Ensure you're up to date
git revert a1b2c3d # Creates a new commit undoing a1b2c3d's changes
git push origin main
This preserves the project history (including the fact that the bad commit existed and was later reverted), which is safer for collaboration.
git reset – Reset current HEAD to a specified state. (Can be dangerous)
Syntax:
git reset –soft <commit_hash>: Moves HEAD pointer, leaves staging area and working directory unchanged. Useful for re-doing commit messages/grouping.
git reset –mixed <commit_hash> (Default): Moves HEAD, resets staging area to match the specified commit, but leaves working directory unchanged. Useful to unstage everything since <commit_hash>. git reset HEAD <file> is a form of this.
git reset –hard <commit_hash>: DANGEROUS. Moves HEAD, resets staging area AND working directory to match the specified commit. Any uncommitted changes (staged or unstaged) are permanently lost.
Purpose: Various ways to undo commits or changes, primarily for local history manipulation before pushing.
Example (–hard): You made several bad commits locally and want to completely discard them and return to the state of commit e4f5g6h.
git reset --hard e4f5g6hCaution: Use –hard with extreme care, especially if you’re unsure. Never use reset (especially –hard) on commits that have been pushed and shared, as it rewrites history. Use git revert for shared history.
Part 4: GitHub Basics – Your Developer Passport to Collaboration
GitHub (and similar platforms like GitLab, Bitbucket, AWS CodeCommit) takes your local Git repository and puts it on a collaborative, web-based platform.
Creating Repositories – Your Project’s Digital Home
A repository (repo) is the fundamental unit on GitHub, containing all your project files, history, and collaboration tools.
Public Repos: Visible to anyone on the internet. Ideal for open-source projects, personal learning projects, or public documentation.
Private Repos: Access is restricted to collaborators you explicitly invite. Used for proprietary code, internal tools, infrastructure configurations, sensitive scripts.
Pushing Code to GitHub – Your Local Code Goes Global
Create a new repository on GitHub (usually without initializing with a README if you have existing local code).
Copy the repository URL (HTTPS or SSH).
In your local terminal, inside your existing Git project:
# Connect your local repo to the remote GitHub repo (only needed once)
git remote add origin <your_github_repo_url>

# Verify the remote connection
git remote -v

# Push your local 'main' branch to the 'origin' remote
# '-u' sets the upstream tracking link for future pushes/pulls
git push -u origin main
Now your code and history are safely stored and shareable on GitHub. Subsequent pushes only require git push origin main (or just git push if upstream is set).
Understanding GitHub UI – Navigate Like a Pro
GitHub’s web interface provides rich tools:
< > Code Tab: Browse files and directories, view READMEs, see latest commit activity. Your project’s main view.
Issues Tab: Track bugs, feature requests, tasks, and discussions. Can be labeled, assigned, and organized into milestones or projects.
Pull requests Tab: Propose, review, discuss, and merge code changes between branches. The heart of collaborative development.
Actions Tab: Define, run, and monitor CI/CD workflows directly from your repository.
Projects Tab: Kanban-style boards or spreadsheets for planning and tracking work (integrates with Issues and PRs).
Wiki Tab: A place for documentation, guides, architecture notes, etc.
Settings Tab: Manage repository settings, collaborators, branches, webhooks, secrets, security features, etc.
Commits (under Code tab): View the detailed commit history.
Branches (under Code tab): View and manage branches.
Forking a Repository – Create Your Copy, Build Your Way
Forking creates a personal copy of someone else’s repository under your GitHub account.
Purpose:
To freely experiment with changes without affecting the original project.
To propose changes back to the original project via a Pull Request (common in open-source).
How: Click the “Fork” button on the original repository’s GitHub page.
Workflow: Fork repo -> Clone your fork locally -> Create a branch -> Make changes -> Push to your fork -> Open a Pull Request from your fork’s branch to the original repository’s branch.
Creating and Reviewing Pull Requests (PRs)
A Pull Request (PR) is a formal request to merge changes from one branch (or fork) into another. It’s the primary mechanism for code review and collaboration on GitHub.
Push your feature branch to the remote repository (git push origin feature-xyz).
Go to the GitHub repository page. GitHub often shows a prompt to create a PR for recently pushed branches. Or, go to the “Pull requests” tab and click “New pull request”.
Select branches: Choose the base branch (where changes should go, e.g., main) and the compare branch (your feature branch, e.g., feature-xyz).
Write a clear title and description: Explain what the PR does and why. Reference any related Issues (Closes #456).
Add reviewers: Request specific teammates to review your code.
Create the PR.
Code Reviews – Quality Gates that Foster Learning
Reviewers examine the PR’s “Files changed” tab:
Review code: Look for bugs, logic errors, style inconsistencies, security issues, performance problems.
Comment inline: Add comments directly on specific lines of code.
Request changes: If significant issues are found.
Approve: If the code looks good and meets requirements.
Discuss: Use the conversation thread for broader feedback.
Code reviews are critical in DevOps for:
Improving Code Quality: Catching issues before they reach production.
Enforcing Standards: Ensuring code consistency and adherence to best practices.
Knowledge Sharing: Spreading understanding of the codebase across the team.
Mentoring: Providing feedback to junior developers.
GitHub Issues – Track Bugs, Features & Everything Between
Issues are more than just bug reports. Use them to track:
Bug reports
Feature requests / Enhancements
Tasks / To-dos
Questions / Discussions
Documentation improvements
Use labels (e.g., bug, feature, priority:high, area:auth), assignees, and milestones to organize and prioritize work effectively. Issues can be linked to PRs.
GitHub Wiki – Your Project’s Built-In Knowledge Base
Each repository can have its own Wiki section for documentation. Ideal for:
Project overview and architecture
Setup and installation guides
API documentation
Team processes and standards (e.g., Git workflow, deployment steps)
FAQs
GitHub Projects – Agile Boards, Right Where the Code Lives
GitHub Projects provide flexible Kanban boards or spreadsheet views to visualize and manage work.
Create columns (e.g., Backlog, To Do, In Progress, In Review, Done).
Add Issues and PRs as cards.
Automate card movement based on Issue/PR status changes.
Track progress towards milestones.
It brings project management closer to the codebase, improving visibility for development teams.
Part 5: GitHub Advanced – Supercharging DevOps with Enterprise-Grade Git Workflows
Branch Protection Rules – Security Checkpoints for Your Codebase
Protect important branches (like main, release/*, production) from unwanted or unreviewed changes. Find this in Settings > Branches. Common rules include:
Require a pull request before merging: Enforces code review.
Require approvals: Specify how many team members must approve a PR.
Dismiss stale pull request approvals when new commits are pushed: Ensures the latest changes are reviewed.
Require review from Code Owners: Automatically request reviews from specific teams/individuals responsible for certain code paths (using a CODEOWNERS file).
Require status checks to pass before merging: Ensures CI builds, tests, linters, or security scans succeed before merging. Crucial for CI/CD integration.
Require conversation resolution before merging: Ensures all review comments are addressed.
Require signed commits: Enforces verification that commits genuinely come from the claimed author (using GPG keys).
Require linear history: Prevents merge commits, enforcing a rebase workflow on the protected branch.
Include administrators: Applies these rules even to repository admins.
Restrict who can push to matching branches: Limit direct pushes (often only allowed for specific automation/release roles).
Allow force pushes: Generally disabled for protected branches to prevent history rewriting.
Example: Protect the main branch to require at least one approval, passing CI checks (e.g., AWS CodeBuild status), and disallow force pushes. This acts as a critical quality and security gate before production deployment.
GitHub Actions – CI/CD Automation Without Leaving GitHub
GitHub Actions allows you to automate workflows directly within your GitHub repository using YAML files stored in the .github/workflows/ directory.
Key Concepts:
Workflow: An automated process defined by a YAML file. Triggered by events.
Event: An activity that triggers a workflow (e.g., push, pull_request, schedule, workflow_dispatch).
Job: A set of steps that execute on the same runner. Jobs run in parallel by default.
Step: An individual task within a job. Can run commands (run:) or use pre-built Actions (uses:).
Action: A reusable unit of code (e.g., actions/checkout@v3, aws-actions/configure-aws-credentials@v1). Found on the GitHub Marketplace or custom-built.
Runner: A server (GitHub-hosted or self-hosted) that executes your jobs.
Basic YAML Structure (.github/workflows/ci.yml):
name: Basic CI Pipeline # Workflow name displayed on GitHub

on: # Events that trigger this workflow
  push: # Trigger on pushes to listed branches
    branches: [ main ]
  pull_request: # Trigger on pull requests targeting listed branches
    branches: [ main ]
  workflow_dispatch: # Allows manual triggering from the Actions tab

jobs: # Container for all jobs in the workflow
  build: # Name of the job (can be anything)
    runs-on: ubuntu-latest # Specify the runner environment

    steps: # Sequence of tasks within the job
      - name: Check out code # Step name (optional but good practice)
        uses: actions/checkout@v3 # Use a pre-built action to get the code

      - name: Set up Node.js # Example: Setting up a tool
        uses: actions/setup-node@v3
        with:
          node-version: '18'

      - name: Install dependencies
        run: npm ci # Execute shell commands

      - name: Run tests
        run: npm test
Real-world DevOps Uses:
Running linters and unit tests on every push/PR.
Building Docker images and pushing them to a container registry (like Amazon ECR).
Deploying applications to AWS services (EC2, ECS, EKS, Lambda, S3).
Provisioning infrastructure using Terraform or AWS CloudFormation.
Sending notifications to Slack or Teams.
Secrets Management – No More Credentials in Plain Sight
Store sensitive information like API keys, passwords, AWS credentials securely in GitHub Secrets (Settings > Secrets and variables > Actions).
Accessing Secrets in Workflows: Use the secrets context.
steps:
  - name: Configure AWS Credentials
    uses: aws-actions/configure-aws-credentials@v1
    with:
      aws-access-key-id: ${{ secrets.AWS_ACCESS_KEY_ID }}
      aws-secret-access-key: ${{ secrets.AWS_SECRET_ACCESS_KEY }}
      aws-region: us-east-1

  - name: Deploy to S3
    run: aws s3 sync ./build s3://${{ secrets.AWS_S3_BUCKET_NAME }}
Secrets are encrypted and only exposed to the specific workflow run. They are never printed in logs (masked as ***).
Never hard-code secrets directly in workflow files!
Triggers – When Do Actions Run?
Control precisely when your workflows execute:
on: push: On pushes to specific branches, tags, or paths.
on:
  push:
    branches:
      - main
      - 'release/**' # Wildcards supported
    paths:
      - 'src/**' # Only run if files in src/ change
      - '.github/workflows/deploy.yml' # Or if the workflow itself changes
on: pull_request: On PRs opened, synchronized, reopened, targeting specific branches.
on:
  pull_request:
    types: [opened, synchronize, reopened] # Default types
    branches: [ main ]
on: schedule: Run at fixed times using CRON syntax.
on:
  schedule:
    # Run every Monday at 06:00 UTC
    - cron: '0 6 * * 1'
on: workflow_dispatch: Allows manual triggering via the GitHub UI (can accept input parameters).
Other triggers: repository_dispatch (external event), workflow_call (reusable workflows), etc.
Webhooks – Talk to the Outside World
Webhooks allow GitHub to send HTTP POST payloads to external services whenever specific events occur in your repository (e.g., push, PR created, issue commented).
Use Cases:
Triggering external CI/CD systems (like Jenkins).
Sending notifications to chat platforms (Slack, Teams).
Updating external dashboards or project management tools.
Integrating with custom automation platforms or serverless functions (like AWS Lambda via API Gateway).
Configure them in Settings > Webhooks. You provide a Payload URL and select the events to trigger on.
GitHub Packages – Private Package Registry, Built In
Host your software packages (Docker images, npm, Maven, NuGet, RubyGems) privately or publicly within GitHub, alongside your source code.
Benefits:
Integrated with GitHub permissions and authentication.
Simplifies dependency management within an organization.
Can be used as a private Docker registry (ghcr.io).
Example (Pushing Docker image in Actions):
jobs:
  build-and-push:
    runs-on: ubuntu-latest
    permissions: # Required permissions to push to GHCR
      contents: read
      packages: write
    steps:
      # ... build steps ...
      - name: Log in to GitHub Container Registry
        uses: docker/login-action@v2
        with:
          registry: ghcr.io
          username: ${{ github.actor }}
          password: ${{ secrets.GITHUB_TOKEN }} # GITHUB_TOKEN is auto-generated

      - name: Build and push Docker image
        uses: docker/build-push-action@v4
        with:
          context: .
          push: true
          tags: ghcr.io/${{ github.repository_owner }}/my-app:${{ github.sha }}
Managing Team Permissions – Collaboration Without Chaos
GitHub provides granular control over who can do what within repositories and organizations.
Repository Roles:
Read: View code, issues, PRs, clone/pull. (Good for QA, stakeholders)
Triage: Manage issues and PRs, no code write access.
Write: Push code to non-protected branches, manage issues/PRs, create branches. (Standard developer access)
Maintain: Manage the repository without full admin rights (e.g., edit repo settings, manage collaborators slightly).
Admin: Full control over the repository, including settings, security, deleting the repo. (For team leads, DevOps)
GitHub Teams: Group organization members into teams (e.g., developers, devops, qa). Assign repository access and permissions to teams instead of individuals for easier management.
Organization Roles: Owner, Member. Owners have full control over the organization.
Best Practice: Implement the principle of least privilege. Grant users and teams only the minimum permissions necessary to perform their jobs. Use Teams for scalable access management. Regularly audit permissions.
Part 6: AWS + GitHub Integration – A DevOps Power Duo for Cloud Deployments
Combining GitHub’s developer-centric workflow and Actions with AWS’s robust cloud services creates powerful, automated CI/CD pipelines.
Connecting AWS Services with GitHub Repositories
There are several ways AWS services can interact with GitHub:
GitHub Actions Deploying to AWS:
Method: Use GitHub Actions workflows (.github/workflows/) to build, test, and deploy directly to AWS services.
Authentication: Typically use aws-actions/configure-aws-credentials action with AWS credentials stored securely in GitHub Secrets (preferably using OIDC for short-lived credentials, avoiding long-lived access keys).
Tools: Use AWS CLI, AWS SDKs, Terraform, CloudFormation, Serverless Framework, or specific AWS deployment actions within the workflow steps.
Pros: Keeps CI/CD logic close to the code, leverages the GitHub ecosystem and Marketplace actions.
Cons: Requires managing credentials/OIDC in GitHub. Might be less integrated with other AWS native tooling compared to CodePipeline.
AWS CodePipeline using GitHub as a Source:
Method: Configure AWS CodePipeline to automatically trigger when changes are pushed to a specific branch in your GitHub repository.
Connection: Set up a connection between AWS and GitHub (using AWS Connector for GitHub or GitHub Apps).
Pipeline Stages: Define stages in CodePipeline for Source (GitHub), Build (AWS CodeBuild), Test (CodeBuild or third-party), and Deploy (AWS CodeDeploy, CloudFormation, ECS, S3, Lambda, etc.).
Pros: Deep integration with AWS services, centralized pipeline orchestration within AWS, leverages IAM roles for permissions.
Cons: CI/CD configuration lives in AWS, potentially separate from the application code repo. Can involve more AWS service configuration.
AWS CodeBuild Triggered by GitHub Webhooks:
Method: Configure a GitHub webhook to trigger an AWS CodeBuild project directly upon events like push or PR creation.
Setup: Create a CodeBuild project configured to use the GitHub repo as source and set the trigger via webhook.
Pros: Simpler than full CodePipeline for build/test-only scenarios.
Cons: Less orchestration capability than CodePipeline for multi-stage deployments.
Continuous Deployment Examples (using GitHub Actions)
Deploying a Static Website to S3 + CloudFront:
name: Deploy Static Site to S3

on:
  push:
    branches: [ main ]

jobs:
  deploy:
    runs-on: ubuntu-latest
    steps:
      - name: Checkout code
        uses: actions/checkout@v3

      - name: Configure AWS Credentials (using OIDC - Recommended)
        uses: aws-actions/configure-aws-credentials@v1-node16 # Example using Node.js 16 based action
        with:
          role-to-assume: arn:aws:iam::ACCOUNT-ID:role/GitHubAction-S3DeployRole # Assumed Role ARN
          aws-region: us-east-1

      # - name: Build React App (if needed)
      #   run: npm ci && npm run build

      - name: Deploy static site to S3 bucket
        run: aws s3 sync ./build s3://${{ secrets.AWS_S3_BUCKET_NAME }} --delete # Sync build dir to S3

      - name: Invalidate CloudFront cache
        run: aws cloudfront create-invalidation --distribution-id ${{ secrets.AWS_CLOUDFRONT_DIST_ID }} --paths "/*"
Requires setting up OIDC trust between GitHub Actions and AWS IAM, and secrets for bucket name/distribution ID.
Building a Docker Image and Pushing to Amazon ECR:
name: Build and Push Docker Image to ECR

on:
  push:
    branches: [ main ]

jobs:
  build-push-ecr:
    runs-on: ubuntu-latest
    permissions: # Required for OIDC
      id-token: write
      contents: read
    steps:
      - name: Checkout code
        uses: actions/checkout@v3

      - name: Configure AWS Credentials
        uses: aws-actions/configure-aws-credentials@v1-node16
        with:
          role-to-assume: arn:aws:iam::ACCOUNT-ID:role/GitHubAction-ECRRole
          aws-region: us-west-2

      - name: Login to Amazon ECR
        id: login-ecr
        uses: aws-actions/amazon-ecr-login@v1

      - name: Build, tag, and push image to Amazon ECR
        env:
          ECR_REGISTRY: ${{ steps.login-ecr.outputs.registry }}
          ECR_REPOSITORY: my-app-repo # Your ECR repo name
          IMAGE_TAG: ${{ github.sha }} # Use commit SHA as tag
        run: |
          docker build -t $ECR_REGISTRY/$ECR_REPOSITORY:$IMAGE_TAG .
          docker push $ECR_REGISTRY/$ECR_REPOSITORY:$IMAGE_TAG
Deploying to Amazon ECS:
After pushing the image to ECR (as above), add steps to:
Download the current ECS task definition.
Update the task definition JSON with the new image tag ($ECR_REGISTRY/$ECR_REPOSITORY:$IMAGE_TAG).
Register the new task definition revision using aws ecs register-task-definition.
Update the ECS service to use the new task definition revision using aws ecs update-service –force-new-deployment.
Alternatively, use actions like aws-actions/amazon-ecs-deploy-task-definition.
Deploying to AWS Lambda:
name: Deploy Python Lambda Function

on:
  push:
    branches: [ main ]
    paths:
      - 'lambda-function/**' # Only trigger if function code changes

jobs:
  deploy-lambda:
    runs-on: ubuntu-latest
    steps:
      - name: Checkout code
        uses: actions/checkout@v3

      - name: Set up Python
        uses: actions/setup-python@v4
        with:
          python-version: '3.10'

      - name: Configure AWS Credentials
        uses: aws-actions/configure-aws-credentials@v1-node16
        with:
          role-to-assume: arn:aws:iam::ACCOUNT-ID:role/GitHubAction-LambdaRole
          aws-region: eu-central-1

      - name: Install dependencies & Package function
        run: |
          cd lambda-function
          pip install -r requirements.txt -t ./package
          cp handler.py ./package/
          cd package
          zip -r ../lambda-package.zip .

      - name: Deploy Lambda function
        run: aws lambda update-function-code --function-name MyLambdaFunction --zip-file fileb://lambda-function/lambda-package.zip
Assumes function code is in lambda-function/ directory.
Deploying Infrastructure as Code (IaC) with GitHub Actions
Automate provisioning and updates to your AWS infrastructure using Terraform or AWS CloudFormation.
Terraform + GitHub Actions:
name: Deploy Terraform Infra to AWS

on:
  push:
    branches: [ main ]
    paths:
      - 'infra/**' # Trigger on changes in infra directory

jobs:
  terraform:
    runs-on: ubuntu-latest
    env: # Set TF backend config if needed
      TF_VAR_aws_region: "us-east-1"
      # For S3 backend:
      # AWS_ACCESS_KEY_ID: ${{ secrets.AWS_ACCESS_KEY_ID }} # Or use OIDC
      # AWS_SECRET_ACCESS_KEY: ${{ secrets.AWS_SECRET_ACCESS_KEY }}
    defaults: # Set working directory for all steps
      run:
        working-directory: ./infra
    steps:
      - name: Checkout code
        uses: actions/checkout@v3

      - name: Setup Terraform
        uses: hashicorp/setup-terraform@v2
        # with:
        #   terraform_version: 1.x.x # Specify version if needed

      - name: Configure AWS Credentials
        uses: aws-actions/configure-aws-credentials@v1-node16
        with:
          role-to-assume: arn:aws:iam::ACCOUNT-ID:role/GitHubAction-TerraformRole
          aws-region: ${{ env.TF_VAR_aws_region }}

      - name: Terraform Init
        run: terraform init # Pass -backend-config if using S3 backend without env vars

      - name: Terraform Validate
        run: terraform validate

      - name: Terraform Plan
        run: terraform plan -input=false -out=tfplan

      # Optional: Add approval step here using GitHub environments

      - name: Terraform Apply
        run: terraform apply -auto-approve tfplan
AWS CloudFormation + GitHub Actions:
name: Deploy CloudFormation Stack

on:
  push:
    branches: [ main ]
    paths:
      - 'cfn-templates/**'

jobs:
  deploy-cfn:
    runs-on: ubuntu-latest
    steps:
      - name: Checkout code
        uses: actions/checkout@v3

      - name: Configure AWS Credentials
        uses: aws-actions/configure-aws-credentials@v1-node16
        with:
          role-to-assume: arn:aws:iam::ACCOUNT-ID:role/GitHubAction-CloudFormationRole
          aws-region: eu-west-1

      - name: Deploy CloudFormation Stack
        uses: aws-actions/aws-cloudformation-github-deploy@v1
        with:
          name: my-cfn-stack
          template: cfn-templates/main.yaml
          # capabilities: CAPABILITY_IAM, CAPABILITY_NAMED_IAM # Add if needed
          # parameter-overrides: "Param1=Value1,Param2=Value2"
Part 7: Real-World Git Workflows & Branching Strategies
Choosing the right branching strategy is crucial for team productivity, code stability, and effective CI/CD.
1. Feature Branch Workflow (GitHub Flow)
Purpose: Simple, fast flow optimized for continuous delivery. main branch is always deployable.
Workflow:
Create a descriptive branch off main (git checkout -b feature/new-login-api).
Commit changes locally to the feature branch.
Push the feature branch to GitHub (git push origin feature/new-login-api).
Open a Pull Request from the feature branch to main.
Discuss, review, and iterate on the PR.
Once approved and CI checks pass, merge the PR into main.
Deploy main immediately (or trigger deployment on merge).
Delete the feature branch locally and remotely.
Best For: Teams practicing continuous deployment, web applications, projects where main must always be stable and ready for release.
2. Gitflow Workflow
Purpose: More structured, suitable for projects with scheduled release cycles, multiple versions in production, or stricter change control.
Main Branches:
master (or main): Represents production-ready code. Only receives merges from release branches and hotfix branches. Tagged for releases (e.g., v1.0, v2.0).
develop: Main integration branch for features. Represents the latest delivered development changes for the next release. Source for feature branches.
Supporting Branches:
feature/*: Branched from develop, merged back into develop. (e.g., feature/user-profile)
release/*: Branched from develop when ready to prepare a new production release. Used for final testing, bug fixing, documentation updates. Merged into master and develop upon release. (e.g., release/v1.1.0)
hotfix/*: Branched from master to fix critical production bugs urgently. Merged back into master and develop to ensure the fix is in future releases too. (e.g., hotfix/login-bug-fix)
Best For: Larger projects, applications with explicit versioning and release cycles (e.g., installed software), teams needing separate development integration and stable production lines. Can be overly complex for simple web apps with continuous deployment.
3. Trunk-Based Development (TBD)
Purpose: Maximize speed and CI/CD flow by having developers commit frequently to a single main branch (trunk, usually main). Minimize the lifetime of branches.
Process:
Developers work directly on main or on very short-lived feature branches (hours or a day at most).
Frequent commits and pushes to main (or merges from short-lived branches).
Heavy reliance on automated testing (CI) on every commit to main to ensure stability.
Feature Flags (Toggles): Used to hide incomplete features in production code, allowing main to be deployed continuously even if features aren’t fully ready for users.
Best For: High-performing DevOps teams, microservices, SaaS applications with robust automated testing and feature flag systems. Requires strong discipline and automation.
4. Managing Dev/QA/Prod Environments Using Git Branching (Environment Branching)
Purpose: Use long-lived branches to represent the state of code deployed to different environments. Promotion involves merging between these branches.
Strategy:
develop: Represents code deployed to the Development environment. Features are merged here first.
qa (or staging, uat): Represents code deployed to the QA/Staging environment. Merged from develop when ready for testing.
main (or master, production): Represents code deployed to Production. Merged from qa after successful testing and approval.
Deployment Flow:
Merge feature branch -> develop (triggers deploy to Dev).
Merge develop -> qa (triggers deploy to QA).
Merge qa -> main (triggers deploy to Production).
Pros: Clear mapping between branches and environments. Simple promotion process (merge).
Cons: Can lead to divergence between environment branches if hotfixes aren’t carefully merged back. Merging large sets of changes between long-lived branches can sometimes be complex. Often works better when combined with Gitflow’s hotfix/release concepts for production stability.
Choosing a Strategy: Consider team size, project complexity, release frequency, testing automation maturity, and deployment strategy (continuous vs. scheduled). The Feature Branch/GitHub Flow is a good default for many modern web projects.
Part 8: Structuring Repositories – Monorepo vs Polyrepo for Microservices
How you organize code for microservices significantly impacts workflows, CI/CD, and team autonomy.
Option 1: Polyrepo (Multiple Repositories)
Structure: Each microservice, library, or distinct component lives in its own dedicated Git repository.
Example: auth-service-repo, payment-service-repo, shared-logging-lib-repo.
Pros:
Clear Ownership: Easy to assign teams ownership of specific repos.
Independent Lifecycles: Each service can be built, tested, and deployed independently.
Smaller Repos: Faster clones, simpler CI builds (focused on one service).
Technology Diversity: Easier to use different languages/frameworks per service.
Cons:
Dependency Management: Managing dependencies between services/libraries across repos can be complex (requires package management, versioning strategies).
Code Sharing: Sharing common code (e.g., utility libraries, data models) requires publishing them as packages, adding overhead.
Cross-Cutting Changes: Making a change that affects multiple services requires coordinating PRs across several repos.
Discoverability: Harder to get a holistic view of the entire system.
Option 2: Monorepo (Single Repository)
Structure: All microservices, libraries, and potentially even frontend apps live within a single Git repository, typically organized into top-level directories.
/monorepo-root
  /services
    /auth-service
    /payment-service
  /libs
    /shared-utils
    /data-models
  /apps
    /web-frontend
Pros:
Simplified Dependency Management: Easier to manage internal dependencies; changes are atomic across components within a single commit/PR.
Easy Code Sharing & Refactoring: Common code is easily imported; refactoring across service boundaries is simpler.
Consistency: Easier to enforce consistent tooling, linting, testing, and build processes across the entire codebase.
Visibility & Collaboration: Developers can easily see and contribute to different parts of the system. Atomic commits for cross-cutting features.
Cons:
Tooling Complexity: Requires specialized tooling (e.g., Nx, Bazel, Lerna, Turborepo) to manage builds, tests, and deployments efficiently (e.g., only build/deploy services that actually changed).
Repository Size: Can become very large, potentially slowing down Git operations and CI checkouts (though Git performance has improved, and tools offer sparse checkouts).
CI/CD Pipeline Complexity: Pipelines need to be intelligent enough to only trigger relevant builds/deploys based on changed paths.
Version Control Noise: History includes changes from all teams/services .
Real-World Decision:
Polyrepo is often simpler to start with, especially for smaller teams or loosely coupled services, and aligns well with team autonomy.
Monorepo is gaining popularity, especially in larger organizations or for systems with tightly coupled services or significant shared code, as the benefits of atomic changes and simplified dependency management often outweigh the tooling investment. The choice depends heavily on team structure, service coupling, and tooling maturity.
Part 9: Mastering Advanced Git & GitHub Features: For DevOps-Driven Engineering
Go beyond the basics to handle complex scenarios, enhance security, and improve developer experience.
1. Git Submodules – “Repo inside a repo”
What: Embeds an external Git repository as a subdirectory within your main repository. The submodule maintains its own separate Git history.
Use Case: Including a shared library, a vendor dependency, or internal tooling maintained in a separate repo without copying the code.
# Add a submodule located at <repo_url> into the path <local_path> git submodule add <repo_url> <local_path> # Example: git submodule add https://github.com/my-org/shared-logging.git libs/logginggit clone –recurse-submodules <main_repo_url>: Clones the main repo and initializes/updates submodules.
git submodule update –init –recursive: Initializes and updates submodules after a normal clone or pull.
git submodule update –remote: Updates submodules to the latest commit on their tracked branch.
Considerations: Can add complexity to the workflow (developers need to remember extra commands). Updates are not automatic on git pull. Useful for specific dependency management scenarios but often replaced by package managers where possible.
2. Git Worktrees – Work on multiple branches simultaneously
What: Allows you to have multiple working trees (directories) linked to the same repository, each checked out to a different branch. Avoids constant stashing/switching.
Use Case: You’re coding a feature on develop, but need to quickly check out main to investigate a production issue without disrupting your develop workspace.
# Currently in 'my-repo' on branch 'develop'
# Create a new worktree in '../my-repo-main' checked out to the 'main' branch
git worktree add ../my-repo-main main

# Now you have:
# ./my-repo       (still on 'develop')
# ../my-repo-main (on 'main')

# To remove the worktree later:
git worktree remove ../my-repo-main
# Also run 'git worktree prune' to clean up administrative files
Benefit: Greatly simplifies working on multiple contexts (e.g., feature dev + hotfix) in parallel without stash juggling or multiple clones.
3. GitHub Enterprise vs Free/Pro/Team GitHub – Scaling Securely
GitHub Free/Pro/Team: Excellent for individuals, open-source, startups, and small-to-medium teams. Offers unlimited public/private repos, core Actions, Packages, Projects, Codespaces (with usage limits/costs). Team adds per-user pricing for enhanced collaboration features and access controls.
GitHub Enterprise (Cloud or Server): Designed for large organizations, regulated industries, and advanced DevOps/security needs.
Key Differentiators:
Advanced Security: GitHub Advanced Security features (Code Scanning, Secret Scanning, Dependency Review) often included or available as add-ons.
Enhanced Identity & Access Management: SAML SSO, SCIM user provisioning, integration with identity providers (Azure AD, Okta).
Compliance & Auditing: Audit logs, IP allow lists, compliance certifications (SOC, ISO, etc.).
Enterprise-level Controls: Fine-grained policies, centralized management, enterprise accounts.
GitHub Connect: Link Enterprise Server (self-hosted) with Enterprise Cloud for hybrid capabilities.
Dedicated Support & SLAs.
Decision: Choose Enterprise when advanced security scanning, stringent compliance, centralized user management (SSO), and robust auditing are required at scale.
4. GitHub Codespaces – Cloud-based development environment
What: Instant cloud development environments accessible via browser or VS Code, configured via code (.devcontainer/devcontainer.json). Runs in a container.
Benefits for DevOps:
Consistency: Ensures all developers (and CI/CD) use the exact same environment, tools, and dependencies.
Fast Onboarding: New team members get a fully configured dev environment in seconds, no local setup required.
Reproducibility: Define the exact OS, tools (Terraform CLI, AWS CLI, Docker, kubectl), extensions, and settings needed for the project.
Resource Flexibility: Access powerful cloud compute resources.
Use Case: Define a devcontainer.json that installs Terraform, AWS CLI, Python, Node.js, and specific VS Code extensions. Any developer opening the repo in Codespaces gets this environment instantly. Great for Infrastructure as Code development or complex microservice setups.
5. GitHub Advanced Security (GHAS)
What: A suite of security tools integrated into the GitHub workflow (often requires Enterprise or a separate license).
Features:
Code Scanning: Uses CodeQL (and other engines) to perform static analysis security testing (SAST) on your code, finding vulnerabilities like SQL injection, cross-site scripting (XSS), insecure handling of credentials, etc. Results appear directly in Pull Requests.
Secret Scanning: Automatically detects secrets (API keys, tokens, private keys) accidentally committed to the repository. Can alert developers and administrators, and potentially block pushes containing secrets (Enterprise feature).
Dependency Review: Scans dependencies declared in manifests (e.g., package.json, requirements.txt, pom.xml) for known vulnerabilities (CVEs) using the GitHub Advisory Database. Shows alerts on PRs if they introduce vulnerable dependencies.
DevOps Integration: Integrate these scans into GitHub Actions workflows. Fail CI builds if critical vulnerabilities are detected (on: pull_request). Enforce security checks via Branch Protection Rules. Proactively shift security left in the development lifecycle.
Part 10: Useful GIT command you will use frequently.
𝟭.𝗴𝗶𝘁 𝗱𝗶𝗳𝗳: Show file differences not yet staged.
𝟮. 𝗴𝗶𝘁 𝗰𝗼𝗺𝗺𝗶𝘁 -m “commit message”: Commit all tracked changes with a message.
𝟯. 𝗴𝗶𝘁 𝘀𝘁𝗮𝘁𝘂𝘀: Show the state of your working directory.
𝟰. 𝗴𝗶𝘁 𝗮𝗱𝗱 𝗳𝗶𝗹𝗲_𝗽𝗮𝘁𝗵: Add file(s) to the staging area.
𝟱. 𝗴𝗶𝘁 𝗰𝗵𝗲𝗰𝗸𝗼𝘂𝘁 -𝗯 𝗯𝗿𝗮𝗻𝗰𝗵_𝗻𝗮𝗺𝗲: Create and switch to a new branch.
𝟲. 𝗴𝗶𝘁 𝗰𝗵𝗲𝗰𝗸𝗼𝘂𝘁 𝗯𝗿𝗮𝗻𝗰𝗵_𝗻𝗮𝗺𝗲: Switch to an existing branch.
𝟳. 𝗴𝗶𝘁 𝗰𝗼𝗺𝗺𝗶𝘁 –𝗮𝗺𝗲𝗻𝗱: Modify the last commit.
𝟴. 𝗴𝗶𝘁 𝗽𝘂𝘀𝗵 𝗼𝗿𝗶𝗴𝗶𝗻 𝗯𝗿𝗮𝗻𝗰𝗵_𝗻𝗮𝗺𝗲: Push a branch to a remote.
𝟵. 𝗴𝗶𝘁 𝗽𝘂𝗹𝗹: Fetch and merge remote changes.
𝟭𝟬. 𝗴𝗶𝘁 𝗿𝗲𝗯𝗮𝘀𝗲 -𝗶: Rebase interactively, rewrite commit history.
𝟭𝟭. 𝗴𝗶𝘁 𝗰𝗹𝗼𝗻𝗲: Create a local copy of a remote repo.
𝟭𝟮. 𝗴𝗶𝘁 𝗺𝗲𝗿𝗴𝗲: Merge branches together.
𝟭𝟯. 𝗴𝗶𝘁 𝗹𝗼𝗴-𝘀𝘁𝗮𝘁: Show commit logs with stats.
𝟭𝟰. 𝗴𝗶𝘁 𝘀𝘁𝗮𝘀𝗵: Stash changes for later.
𝟭𝟱. 𝗴𝗶𝘁 𝘀𝘁𝗮𝘀𝗵 𝗽𝗼𝗽: Apply and remove stashed changes.
𝟭𝟲. 𝗴𝗶𝘁 𝘀𝗵𝗼𝘄 𝗰𝗼𝗺𝗺𝗶𝘁_𝗶𝗱: Show details about a commit.
𝟭𝟳. 𝗴𝗶𝘁 𝗿𝗲𝘀𝗲𝘁 𝗛𝗘𝗔𝗗~𝟭: Undo the last commit, preserving changes locally.
𝟭𝟴. 𝗴𝗶𝘁 𝗳𝗼𝗿𝗺𝗮𝘁-𝗽𝗮𝘁𝗰𝗵-𝟭 𝗰𝗼𝗺𝗺𝗶𝘁_𝗶𝗱: Create a patch file for a specific commit.
𝟭𝟵. 𝗴𝗶𝘁 𝗮𝗽𝗽𝗹𝘆 𝗽𝗮𝘁𝗰𝗵_𝗳𝗶𝗹𝗲_𝗻𝗮𝗺𝗲: Apply changes from a patch file.
𝟮𝟬. 𝗴𝗶𝘁 𝗯𝗿𝗮𝗻𝗰𝗵 -𝗗 𝗯𝗿𝗮𝗻𝗰𝗵_𝗻𝗮𝗺𝗲: Delete a branch forcefully.
𝟮𝟭. 𝗴𝗶𝘁 𝗿𝗲𝘀𝗲𝘁: Undo commits by moving branch reference.
𝟮𝟮. 𝗴𝗶𝘁 𝗿𝗲𝘃𝗲𝗿𝘁: Undo commits by creating a new commit.
𝟮𝟯. 𝗴𝗶𝘁 𝗰𝗵𝗲𝗿𝗿𝘆-𝗽𝗶𝗰𝗸 𝗰𝗼𝗺𝗺𝗶𝘁_𝗶𝗱: Apply changes from a specific commit.
𝟮𝟰. 𝗴𝗶𝘁 𝗯𝗿𝗮𝗻𝗰𝗵: Lists branches.
𝟮𝟱. 𝗴𝗶𝘁 𝗿𝗲𝘀𝗲𝘁 –𝗵𝗮𝗿𝗱: Resets everything to a previous commit, erasing all uncommitted changes.
Conclusion
Mastering Git and GitHub is non-negotiable for any effective DevOps engineer. Git provides the robust foundation for version control, enabling parallel work, traceability, and stability. GitHub (or similar platforms) builds upon this, offering the collaborative hub, automation engine (Actions), security features, and integration points (like with AWS) essential for modern, high-velocity software delivery and infrastructure management.
By understanding these concepts from basic commands to advanced workflows, branching strategies, security practices, and cloud integrations, you equip yourself with the tools needed to build, manage, and deploy systems efficiently, reliably, and securely. Keep practicing, exploring, and integrating these tools into your daily workflows.
For more information about Job Notifications, Open source Projects, Tech updates and Interview questions, please stay tuned TechCareerHubs official website.