The Ultimate Git & GitHub Master Notes (2025): From Zero to Hero
The Ultimate Git & GitHub Master Notes (2025): Welcome to the definitive guide to mastering Git and GitHub. In today’s world of software development, automation, and DevOps, proficiency in Git is no longer optional—it’s the bedrock of modern collaboration and version control.
This master class is designed for everyone, from absolute beginners to experienced professionals looking to solidify their knowledge. We’ll take you on a journey from “Zero to Hero,” covering every essential command and concept. We believe in learning by doing, so open your terminal and get ready to follow along!
Table of Contents:-
Getting Started: Git Setup & Your First Repository
The Core Workflow: Status, Staging, and Adding Files
Creating History: Committing Your Changes
Time Travel: Viewing Your Commit History
The Undo Button: git reset vs. git revert
Parallel Universes: Branching and Merging
Working Together: Remote Repositories and Collaboration
The Pro Toolkit: Advanced Git Operations
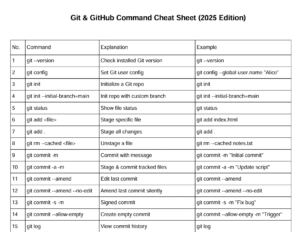
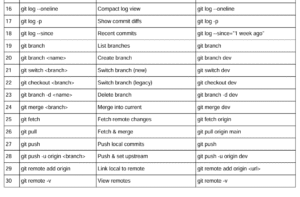
- Git & GitHub Command Cheat Sheet (2025 Edition)
I. Getting Started: Git Setup & Your First Repository
Before you can become a Git master, you need to ensure your workshop is set up correctly.
1. Verifying Your Git Installation
First, let’s see if Git is installed on your system. Open your command-line interface (like Git Bash on Windows, or Terminal on Mac/Linux) and type:
git --versionIf you see a version number (e.g., git version 2.44.0), you’re all set! If not, you’ll need to download and install Git for your operating system. We also highly recommend installing a code editor like VS Code, which has fantastic Git integration.
2. Creating Your First Git Repository with git init
A Git repository (or “repo”) is a container for your project where Git tracks every change. To start tracking a project, you need to initialize a repository.
Purpose: To turn a regular folder into a Git repository.
Command:
# 1. Create a new directory for your project
       mkdir my-first-repo
       cd my-first-repo

# 2. Initialize the Git repository
       git init
This command creates a hidden .git subfolder. This folder is the brain of your repository; it contains all the metadata, object database, and history. You should never manually edit files inside .git.
Best Practice: The main Branch
Historically, the default branch was named master. Modern practice favors main. You can set this as the default during initialization:
git init --initial-branch=mainCrucial Note: A branch is just a pointer to a commit. The main branch doesn’t actually exist until you make your very first commit.
⚠️ Common Pitfall: Where to git init?
Never initialize a Git repository in your Desktop, Documents, or root directory. This will cause Git to try and track thousands of unrelated system files. Always create a dedicated workspace folder for all your projects. Also, avoid nesting Git repos (a repo inside another repo), as it leads to confusing and unpredictable behavior during push and pull operations.
II. The Core Workflow: Status, Staging, and Adding Files
Git thinks about your files in three main states: the Working Directory (your files), the Staging Area (files you’ve marked for the next commit), and the Repository (your committed history).
1. Checking File Status with git status
This is your most-used command. It tells you the current state of your repository.
Purpose: To see which files are tracked, untracked, modified, or staged.
Command:
git statusInterpreting the Output:
Red / “Untracked files”: Git sees the file, but isn’t tracking it. If you delete it, Git can’t help you recover it.
Green / “Changes to be committed”: The file is in the staging area. Git is aware of its contents and it’s ready for the next commit.
“Nothing to commit, working tree clean”: Everything is saved and in sync. You’re up to date!
Useful Options:
git status -s (short): Gives a compact, one-line status report. ?? means untracked, A means added to staging, M means modified.
git status -v (verbose): Shows the actual content changes of modified files.
Did you know? Git does not track empty folders. A folder must contain at least one file to be included in the repository.
2. Adding Files to the Staging Area with git add
Before you can commit a file, you must add it to the staging area. This is like putting items in a box before you seal it for shipping.
Purpose: To tell Git, “I want to include the current version of this file in my next commit.”
Command Examples:
# Create a new file
 echo "Hello World" > f1.txt

# Add a specific file to the staging area
 git add f1.txt

# Add all new and modified files in the current directory
 git add .
Best Practice: While git add . is convenient, use it with caution. Always run git status first to ensure you aren’t accidentally staging temporary files, logs, or secrets. Only stage files that are complete and tested.
3. Undoing git add
What if you stage a file by mistake? You can easily “unstage” it.
Purpose: To remove a file from the staging area and move it back to the working directory.
Command:
# This moves f1.txt out of the staging area
   git rm --cached f1.txt
This command only affects the staging area; your file and its contents are safe in the working directory. This is a very common interview question!
III. Creating History: Committing Your Changes
A commit is a permanent snapshot of your staged files at a specific point in time. It’s the fundamental building block of your project’s history.
1. The Anatomy of a Commit
When you run git commit, Git creates a commit object containing:
A Unique ID (SHA-1 Hash): A 40-character unique identifier for the commit (e.g., a1b2c3d4…).
Author & Committer Info: Who made the change and when.
The Commit Message: A description of why the change was made.
A Pointer to its Parent: Each commit (except the very first) points back to the commit that came before it, forming a chronological chain.
Commits form a chain, with each new commit referencing its parent.
2. How to Commit
The Standard Way:
# This will open a text editor (like Vim or Nano) for you to write a detailed message
    git commit
The Quick Way:
# Use the -m flag to provide a message directly
   git commit -m "feat: Add initial project file f1.txt"
3. Useful Commit Variations
Stage and Commit Tracked Files (-a):
A shortcut to stage changes to already tracked files and commit them in one step.# Note: This will NOT add new, untracked files. git commit -a -m "refactor: Update logic in existing file"Modify the Last Commit (–amend):
This is an incredibly useful command and a frequent interview question. It lets you add changes to your most recent commit or simply edit its message. It doesn’t create a new commit; it rewrites the last one.# Oops, forgot a file! git add forgotten-file.txt # Now amend the previous commit to include it, without changing the message git commit --amend --no-editSign-Off on a Commit (-s):
Adds a Signed-off-by: line to your commit message, often used in corporate or open-source environments to certify that you have the right to submit the work.git commit -s -m "fix: Resolve user authentication bug"Create an Empty Commit (–allow-empty):
Creates a commit with no file changes. This is primarily used to trigger automated CI/CD pipelines (e.g., Jenkins, GitHub Actions) without needing to make a code change.git commit --allow-empty -m "ci: Trigger deployment pipeline"
IV. Time Travel: Viewing Your Commit History
git log is your window into the past. It allows you to explore the entire history of your project.
1. Basic History
Simply type git log to see a reverse chronological list of all commits. Each entry shows the commit ID, author, date, and message. You’ll also see pointers like HEAD -> main, which indicates that HEAD (your current position) is on the latest commit of the main branch.
2. Powerful git log Options
git log is highly customizable. Here are some of the most useful flags:
Limit Commits: git log -n 3 (Show only the last 3 commits).
See Changes: git log -p (Show the patch/diff for each commit).
One-Line View: git log –oneline (Shows a compact view with just the short commit ID and message).
Filter by Author: git log –author=”Srihari”
Filter by Date: git log –since=”1 week ago” or git log –until=”2024-01-01″
Search Messages: git log –grep=”bug fix” (Find commits with “bug fix” in their message).
Custom Formatting: Create your own perfect log format.
    git log --pretty=format:"%h - %an, %ar : %s"
# Output: a1b2c3d - Jatin, 2 days ago : feat: Add new login feature
V. The Undo Button: git reset vs. git revert
Making mistakes is human. Git provides two powerful tools for undoing changes, but they work very differently. Understanding this difference is critical.
1. git reset: Rewriting History (Use with Caution)
git reset moves the branch pointer back to a previous commit, effectively making it seem like the later commits never happened.
⚠️ Warning: This command rewrites history. It is dangerous to use on branches that have been shared with other collaborators, as it can cause major conflicts. Use it primarily on your own local, un-pushed branches.
The Three Modes:
git reset –soft <commit-id>: Moves the branch pointer. The changes from the “undone” commits are kept and placed in the staging area.
git reset –mixed <commit-id> (Default): Moves the branch pointer. The changes are kept but moved to the working directory (they become unstaged).
git reset –hard <commit-id>: Moves the branch pointer and completely deletes all changes from the undone commits. The changes are gone from staging and your working directory. This is destructive!
2. git revert: The Safe Way to Undo
git revert is the preferred method for undoing changes on a shared branch. It doesn’t rewrite history. Instead, it creates a new commit that does the exact opposite of the commit you want to undo.
Command:
git revert <commit-id-to-undo>Why is it safer?
Because git revert adds to the project history rather than erasing it, it preserves the historical record. Anyone who has already pulled the original commit won’t run into conflicts. It’s a transparent and safe way to correct mistakes in a collaborative environment.
Key Takeaway: Use git revert in collaborative projects. Use git reset for local cleanup before you share your code.
VI. Parallel Universes: Branching and Merging
Branches are the single most important feature for collaborative and organized development. They allow you to work on new features, bug fixes, or experiments in an isolated environment without affecting the stable, main codebase.
1. Understanding Branches
Creating a Branch: git branch <branch-name> (e.g., git branch feature/user-login)
Switching to a Branch:
git checkout <branch-name> (the classic command)
git switch <branch-name> (the modern, preferred command)
Create and Switch in One Step: git switch -c <new-branch-name>
When you create a new branch, it’s simply a new pointer to the same commit you’re currently on. As you make new commits on this branch, the pointer moves forward, while the main branch pointer stays put.
Best Practice: Never work directly on the main branch. It should always represent your stable, deployable code. For any new task, create a feature branch from main.
2. Merging Branches with git merge
Merging is the process of integrating the changes from one branch into another. This is the heart of continuous integration.
The Process:
Switch to the branch you want to merge into (the target branch).
git switch mainRun the merge command with the name of the branch you want to merge from (the source branch).
git merge feature/user-login
Types of Merges:
Fast-Forward Merge: If main has no new commits since you created your feature branch, Git simply moves the main pointer forward to match your feature branch’s latest commit. It’s clean and simple.
Three-Way Merge: If main has changed, Git must create a new “merge commit.” This special commit has two parents—the latest commit from main and the latest from your feature branch—unifying the two separate histories.
3. Resolving Merge Conflicts
A merge conflict happens when you’ve edited the same lines in the same file on both branches. Git doesn’t know which version is correct, so it stops and asks you to resolve it.
How to Resolve a Conflict:
Git will mark the conflicted file with <<<<<<<, =======, and >>>>>>>.
Open the file in your editor. The code between <<<<<<< HEAD and ======= is the version from your current branch (main). The code between ======= and >>>>>>> is from the branch you’re merging (feature/user-login).
Manually edit the file to be exactly how you want it, removing the conflict markers.
Stage the resolved file: git add <conflicted-file-name>.
Commit the merge: git commit -m “fix: Resolve merge conflict”.
VII. Working Together: Remote Repositories and Collaboration
So far, everything has been on your local machine. To collaborate, you need a central, remote repository hosted on a service like GitHub, GitLab, or Bitbucket.
1. Connecting to a Remote
After creating a new repository on GitHub, it will give you a URL. You connect your local repo to this remote with:
# 'origin' is the standard alias for your primary remote repository
   git remote add origin <your-remote-repository-url>

# Verify the connection
   git remote -v
2. Pushing Local Changes to the Remote (git push)
Pushing sends your local, committed changes up to the remote repository for others to see.
# For the very first push of a new branch
   git push -u origin main
The -u flag sets the “upstream” tracking reference, so for all future pushes on this branch, you can simply type:
git push3. Cloning an Existing Repository (git clone)
If you’re joining a project that already exists, you’ll start by cloning it.
git clone <remote-repository-url>This single command does it all: it creates a local copy of the project, initializes a Git repo, downloads the entire history, and automatically sets up the origin remote connection for you.
4. Downloading Remote Changes: git fetch vs. git pull
This is a critical concept for avoiding conflicts.
git fetch: This is the safe option. It downloads all the latest changes from the remote but does not automatically merge them into your local working branch. It updates your remote-tracking branches (like origin/main). This allows you to inspect the incoming changes (git log main..origin/main) before deciding how to integrate them.
git pull: This is a shortcut command that is equivalent to running git fetch followed immediately by git merge. It downloads and attempts to merge the changes in one go.
Pro Tip: For your active feature branches, always use git fetch to review changes before merging. For protected branches like main that you don’t work on directly, git pull is often fine for quickly syncing up.
VIII. The Pro Toolkit: Advanced Git Operations
Once you’ve mastered the basics, these commands will elevate your workflow.
1. git stash: Saving Work-in-Progress
Need to switch branches, but your current work isn’t ready for a commit? git stash is your answer. It takes your uncommitted changes (staged and unstaged), saves them on a temporary “shelf,” and cleans your working directory.
Save changes: git stash or git stash save “WIP: login form”
View stashes: git stash list
Re-apply changes: git stash pop (applies and removes from stash) or git stash apply (applies and keeps in stash).
2. .gitignore: Telling Git What to Ignore
Every project has files that shouldn’t be tracked: build artifacts, log files, secrets, or dependency folders (node_modules). A .gitignore file tells Git to ignore these.
Create a file named .gitignore in your project’s root directory.
Example .gitignore file:
# Ignore dependency directories
    node_modules/
    target/

# Ignore log files
    *.log

# Ignore environment variables
    .env

# Ignore OS-specific files
    .DS_Store
     Thumbs.db
Best Practice: Add auto-generated files and folders to your .gitignore immediately. You can find standard templates for any language at gitignore.io.
3. git cherry-pick: Surgical Precision
What if you need just one specific commit from another branch, but not the entire branch? git cherry-pick lets you select a single commit by its ID and apply it to your current branch.
Use Case: This is perfect for feature-based deployment. Imagine feature-A is complete and tested, but feature-B (on the same branch) is not. You can cherry-pick the commits related to feature-A onto your release branch for deployment, enabling partial and controlled releases.
Command:
# Switch to the branch where you want to apply the commit
    git switch release-v1.2

# Cherry-pick the specific commit from another branch
    git cherry-pick <commit-id-from-feature-branch>
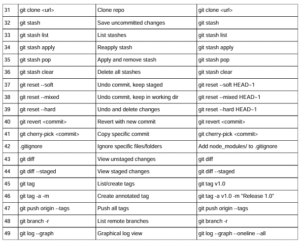
9. Git & GitHub Command Cheat Sheet (2025 Edition)
Conclusion: You Are Now a Git Navigator
Congratulations! You’ve journeyed from the basics of creating a repository to the advanced techniques used by professionals every day. You’ve learned how to track changes, manage history, collaborate with branches, and surgically modify your codebase.
The key to true mastery is practice. Use these commands in your daily work. Create personal projects to experiment without fear. The more you use Git, the more it will become an intuitive and indispensable part of your toolkit.
Bookmark this guide, share it with your team, and keep building amazing things!
For more information about Job Notifications, Open source Projects, Tech updates and Interview questions, please stay tuned TechCareerHubs official website.